Wednesday 30 May 2018

Eric Knowles and Madasahatta

Regular readers of this blog will no doubt remember my mentioning the late Eric Knowles and his famous WW1 Madasahatta campaign. To the uninitiated Madasahatta was an island in the Indian Ocean which boasted both a German and a British Colony, several indigenous tribes of natives and an Arab trading concession. The campaign was designed and organised by Eric and was loosely inspired by the Great War in East Africa. The campaign was fought during the late 1970s and early 1980s by a number of gamers including Bob Cordery, Chris Hardman, Neil Fox and myself in the later stages.

It was enormous fun and all that took part enjoyed the experience.

Luckily for the wargamer of today a lot of written material concerning the campaign survived in the hands of Bob Cordery. Sadly, and to the best of our knowledge no photographs are known to exist of the campaign - bear in mind this was pre-digital cameras and computers -  but one could easily picture the scenes described in the campaign 'newspapers'. To remember Eric and to celebrate his finest wargaming creation Bob has turned the surviving content into the book you see below, supplemented by some anecdotes from those that took part and Bob' own personal tribute as well as some Eric related material.


The front cover....
 
 
….and the back with a list of the chapters contained therein.
 

I will not go into detail about what is in the book - it would spoil the surprise - but suffice it to say there is a veritable smorgasbord of good ideas and inspiration. In fact, The Men Who Would Be Kings are a set of rules that could have been written for Madasahatta!

From a personal perspective this is a superb reminder of a wargames campaign that has given me many years of enjoyment and interests I never thought I would have considered - as well as some lifelong friendships. Bob has done a sterling job with this book (and it is available to purchase) and so hopefully the fun that was Madasahatta can be enjoyed by a new generation of gamers whilst those of us that were there have a wonderful tribute to Eric and the memory of some truly great wargaming times.

Tuesday 29 May 2018

Bank Holiday Lethargy

 
I often wonder if these animals have worked out the meaning of life....


Well that is another Bank holiday chalked off for the year! Actually I should say that is a another Bank holiday where I did not get half the things done I thought I would do but did manage to some things I did not expect to....

I did not get the Denmark Strait action fought. Time ran away from me as we had a number of domestic duties to tackle as well as the usual weekend routine 'stuff'. By the time I was able to get into the man cave with every intention of fighting the battle I was too tired to do anything more meaningful than some gluing. My resolve melted like an ice cream in the May sunshine - it gets very warm in the man cave - as, to be honest, I was feeling pretty lethargic and sloth-like as a result of the busy day we had spent.

I was however, able to glue the Royal Navy Axis and Allies ships on to their bases and the Kriegsmarine ships have all been cleaned up. These will be glued to their bases before the weekend so I can at least get them undercoated. The weather has been hot and sunny with clear blue skies but it has felt really oppressive. This has slowed me down somewhat.

Apart from the naval non-event I have spent some time pondering matters relating to my avowed intention of tackling something for The Men Who Would Be Kings and Congo. There is no hurry with this but I want to get a plan in place sooner rather than later. I know this smacks of 'ticking things off for the sake of it' but I find that it helps me to know what I am going to be doing even if I am not doing yet!

The Colonial 'period' has a lot going for it in terms of variety but true to form I would prefer to tackle something a little less than mainstream. Much as I like them this means no Zulus or the Sudan. I rather fancy the North West Frontier between 1890 and 1920 or the Foreign Legion over the same period.

Being primarily a solo gamer I am quite used to thinking about raising both sides for a game and this would be no exception. I am presented though, with a rather delicious conundrum in that (and I have said this before) these rules would work equally well with 54mm figures. In fact I acquired a whole pile of Armies in Plastic stuff for the Foreign Legion era - partially used in  turn to acquire a vast quantity of Axis and Allies material - but never pushed through with it.

 
Another film from my list of those I have not seen - although I am currently watching it courtesy of iTunes.

It would be easy enough to amass the material required for the adventures of the Legion. For the French I would merely need some artillery (Armies in Plastic produce a rather nice screw gun which would suffice) and a machine gun. It would be nice to have some mounted troops - I have always had a soft spot for French Colonial cavalry - but these would need to be conversions methinks. The Arabs would be straightforward enough as Armies in Plastic produce them although they represent several quite distinct tribal groupings.

Add in some palm trees and perhaps a couple of the Airfix 1/32nd scale desert outposts (actually 'normal' Arab style dwellings would be easy enough even for me to knock up being as they are, essentially boxes of various sizes) and away we go.

I have yet to make a decision as what I am going to do for this period but by virtue of the fact I already have some material to hand for the Legion it would need a compelling argument for me to not to proceed with it - in 54mm or otherwise.


Thursday 24 May 2018

The Denmark Strait, 24th May 1941....Game Number 53, Part 2


Bismarck sorties with some Bf110s providing air cover.


Today marks the anniversary of the of the Battle of the Denmark Strait in 1941, pitting H.M.S. Hood and H.M.S. Prince of Wales against the German Bismarck and Prinz Eugen.

H.M.S. Hood in company with H.M.S. Prince of Wales. Ill-fated ships, H.M.S. Prince of Wales was to be sunk by the Japanese.


The outcome of the battle is of course well known with H.M.S. Hood being sunk with the loss of all but three of her crew.

After a dramatic search and chase of three days the Bismarck was finally sunk by the combined efforts of H.M.S. KGV, H.M.S. Rodney and the cruisers H.M.S. Norfolk and Dorsetshire.

The Royal Navy rescued some 111 survivors, the Germans 5.

As with any wargame refight one should always reflect on the human dimension of what we are undertaking using models in the comfort of our own home.

At times like this I am reminded of a passage in the book The Forgotten Soldier by Guy Sajer. The gist of it is “Too many people learn about war with no inconvenience to themselves. They read about Verdun or Stalingrad without comprehension, sitting in a comfortable armchair, with their feet beside the fire, preparing to go about their business the next day, as usual. One should really read such accounts under compulsion, in discomfort, considering oneself fortunate not to be describing the events in a letter home, writing from a hole in the mud. One should read about war in the worst circumstances, when everything is going badly, remembering that the torments of peace are trivial, and not worth any white hairs. Nothing is really serious in the tranquillity of peace; only an idiot could be really disturbed by a question of salary".

I would suggest rather than "writing from a hole in the mud" one could readily substitute "clinging to some wreckage adrift in the North Atlantic".

Something to think about, and to be thankful that one does not have to endure the same.


Tuesday 22 May 2018

Naval Accessories

During one of my periodic sort outs in the man cave I rediscovered some shell splash markers produced by Litko that I had purchased but had never gotten around to doing anything with. My usual choice of shell hit marker for naval games has tended to be the black and white pegs you get with the game Mastermind - when stood on their 'head' they make perfectly usable hit markers. If you look back through some of my blog posted naval battles you will see them in action.


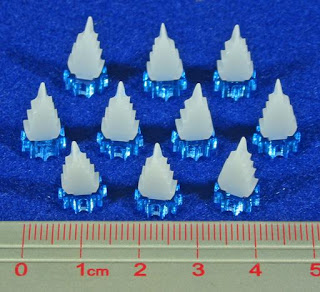
Litko acrylic shell splashes - they are currently $5.99 for 10 but I am sure I paid less for them. Mind you, it was a few years ago!
 
 
These are rather fiddly blighters to put together as the peg at the foot of the white splash is too large for the blue base. This means filing them down individually to fit. It is not difficult but tedious to do - and I have 40 of them. I have completed 20 and intend finishing the rest off over the next day or so. 
 
As I recall they are available in three sizes - those above are the smallest - which would be useful for varying calibre hits if needed. It is not urgent but I may get some explosion or fire type markers from them in due course.
 
I intend using these for my naval games going forward and they will make their debut with the Denmark Strait game I shall be fighting this coming weekend.


Monday 21 May 2018

Changing the Rules of the Game

 
A quite splendid book and one that I need to add to my collection - especially as my copy seems to disappeared into the ether....(along with the Conways titles mentioned previously...)


How many of us, I wonder, have 'tweaked' a set of wargames rules? I am willing to bet that most of have at one time or another and I for one am an inveterate 'tinkerer'. I mentioned briefly in my last post about the ongoing gridded playing area for my forthcoming refight of the Battle of the Denmark Strait. I have the MDF board required and merely need to paint and grid it or I can use the cloth I have and just grid that as a stop gap.

Well, at this stage I am going to do neither.

I shall refight the battle on a normal playing surface - I say normal but perhaps for me that should be abnormal as pretty much all of my games these days are on a grid of some kind - using a scale of 3" to one square. This would give an average WW1 dreadnought a move of 9" whilst the 18" guns of Yamato would reach 27". For the size of models and playing area I am using that would be fine but with a critical advantage over the grid based version.

Manoeuvring. As in being able to - rather being able to more effectively.

At this stage all I would need to do is to change the rules for turning and think about how to tackle submarines and minefields though the latter two are hardly essential at this stage.

The biggest advantage of doing this for the Denmark Strait refight is of course the angle of approach between the two sides at the outset of the action. I can accurately set the forces up at the correct heading far more readily than using a square grid. It also means that considerations concerning firing arcs can be better reflected. I am not saying that I have abandoned the idea of using the square grid for Barry Carter's rules but in the interests of getting the action fought I may well use the non-gridded option.

In respect of the models I am using I shall be basing the remainder of the Royal Navy and Kriegsmarine ships over the next few days and the plan is to have them all painted (there are 52 ships remaining of which 28 are destroyers) ideally by the end of next month.

The range of ships available is limited and the quality variable (as are the scales between types) but for all that they scrub up rather nicely. I am looking forward to adding some missing ships from the Historical Boardgames range to increase the choice available but the big addition will be the Italians in due course. This will consist of ships, aircraft, tanks, artillery and infantry.

The key part of that last sentence is "in due course...."

Of course it is....

Sunday 20 May 2018

Boot Sales, Battleships and a Cruiser

It has been a busy weekend and no mistake. To begin with Holly, my daughter, was back for the weekend from University and my Grandson was with us as well so it was quite a house full. SWMBO and I spent time on Saturday at our local Wickes planning the new bathroom as well as the usual weekly shopping round. then there was the small matter of the Royal wedding and the FA Cup final (a great way for Mr. Conte to sign off if that is what will be happening).

I had hoped to get a sheet of MDF cut but time was against us  - which was just as well as I discovered a 5ft by 3ft in the shed! All it needs is painting and grinding and will then be real to use. In the meantime though I could always grid the cloth I have or could even - and this came to me yesterday afternoon - use Barry Carter's rules without a grid and merely use multiples of 3" for movement and firing. I would need to add in some turning rules but I reckon this has some mileage in it especially as it would serve to open the table up for more manoeuvring.

I was able to finish the four ship models I will be using for the Denmark Strait refight so without further ado here are the stars.


The Mighty 'Ood. The model is 6.5cm long on a 8cm by 2.5cm base.


The ill-starred Prince of Wales. The model is the sole entry from Historical Boardgames from their Global Conflict game. Made from a softer plastic than the Axis and Allies models they still paint up really well.


The Royal Navy steaming hard for the Denmark Strait across a grey towel on the kitchen table....


The German opposition needs no introduction.


There is no doubt about it - the Bismarck was a very striking looking ship


I must admit I am not a great fan of this particular model as the forward superstructure looks way too heavy. She paints up well though and is a mere 5cm long.

Bearing in mind these are first and foremost gaming pieces from a board game and would certainly not win any prizes for detail I think they scrub up rather well and so I am happy in my decision to use these models for my WW2 naval games. If you look closely there are mould lines and 'soft' details but these are minor points when you consider the ranges they will be typically be looked at. They will not be to everybody's taste but I like them and so am happy to use them.

Earlier today SWMBO and I headed out to our usual local boot sale and there I opened my account for the year with the following two books.


£1.50 for the two which for a couple of hardback books is not bad.

The Panzer Army Africa title is a good primer of the army and campaigns fought by the Germans in the desert and includes a useful section on the fighting in Tunisia - which if you recall is where my 'What a Tanker' aspirations are.

The Vikings title is the accompaniment to the BBC series of the same name from a good few tears ago narrated by Magnus Magnusson. I remember watching that and really enjoying it and so I hope it will give me some inspiration - perhaps for Saga or even Lion Rampant.

So all in all it has been a productive and busy weekend and one that I have enjoyed enormously.


Friday 18 May 2018

The Denmark Strait, 24th May 1941....Game Number 53, Part 1


Nothing like some inspiration in readiness for a table top refight!
 
May 24th is of course the anniversary of the catastrophic sinking of H.M.S. Hood by the German Battleship Bismarck in 1941 during the battle of the Denmark Strait. I have a modest selection of ships for both the Royal Navy and the Kriegsmarine being part of my Axis and Allies Boardgame miniatures selection, so I decided to push ahead and paint the main four ships that took part - Hood, Prince of Wales, Bismarck and Prinz Eugen - with a view to refighting the action. I suspect that there have been plenty of refights of this battle over the years so I offer no apologies for tapping into a well-worn seam! 

The battle will be fought using the rules outlined in Barry Carter's book Naval Wargames and the work of extracting the salient points to put together a play sheet is now complete. I shall get the damage cards ready for the four ships - Hood, Prince of Wales, Bismarck and Prinz Eugen - and then there is the small matter of a 3" square gridded playing surface. I have a cloth I could use although it is a little on the dark side. The plan is to get some MDF cut into 2ft squares and painted in a suitable colour with the grid added using a permanent marker. Carter himself used boards of 20" by 25" so using a two foot square board instead would be fine. That is the Bank Holiday job (and visit to Wickes) sorted then!

 
From the Axis and Allies 1941 set - HMS Hood

 
From the Axis and Allies 1942 set - Bismarck and Prinz Eugen

Finally, from the Global Conflict 1936 to 1946 set - A KGV class battleship
 

The models as mentioned are from those available from the Axis and Allies grand strategy wargame. the KGV comes from the Global Conflict game produced by Historical Boardgaming and compatible with the Axis and Allies range. They painted up very easily using my tried and tested black undercoat and drybrushed grey with blocked in decks method (courtesy of Tim Gow). The models are on 2mm MDF bases courtesy of Warbases with added names and ensigns as per my usual method for these things.

At the risk of offending the naval purist I have opted for a uniform early war overall grey finish with the British being in a darker grey than their German counterparts. The models were undercoated in acrylics, the grey was Humbrol enamel (simply because I still have tins and tins of the stuff!) and the decks were Vallejo. The grey was then selectively (and carefully) highlighted in a lighter shade of grey and then topped with white. Being a rather slothful type I did not even bother to wash the models before painting them (actually I forgot to do this) but there were no adverse effects in respect of paint coverage.
 
The models are not bad detail-wise but the upper works on both the Hood and the Prinz Eugen are a little on the 'heavy' side - especially the latter which does a passable impersonation of a modern US Ticonderoga class AEGIS cruiser! Still, let us remember that these are gaming pieces and not scale models after all! I hope to have pictures of the models up over the weekend , once I have finished the bases.

In the meantime I have been revisiting the book you see at the beginning of the post to get me in the 'zone' so to speak.


Thursday 17 May 2018

Somewhere in the Sudan....

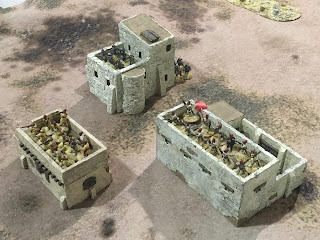
I made my usual flying visit to the club last night, primarily because my old friends Chris Hardman and Neil Fox were putting on a game of The Men Who Would be Kings. Neil was bringing along the British in the shape of the Firkarwi Land Field force under the command of Colonel Buck-Passer Cleverly (aficionados of Madasahatta will no doubt recall them!) whilst Chris was bringing along rather a lot of newly painted Bashi Bazouks and Egyptians. I did not see the game played to its conclusion but have attached a few pictures so you can take a look.

 
The British high command - Note the huge telescope....

 
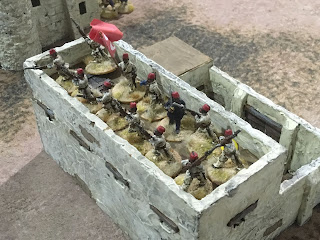
The Egyptians and Bashi Bazouks deployed in the small village - each building was deemed to be able to hold a complete unit of 12 figures

 
Veteran Sudanese in Egyptian service - the best troops Chris fielded

 
The first of the Bashi Bazouks

 
A Gendarme/bodyguard type unit fashioned from Perry Plastic Zouaves

 
The British artillery supporting the advance of the redcoats in the distance


The buildings were a mixture of commercially available and scratch built items from the collection of Chris Hardman who also supplied the table cloth and other pieces of terrain.

Neil supplied the British and a more than passable impersonation of Colour Sergeant Bourne....

Sadly I was only able to stay for a few moves although I should mention that the Egyptians had rather a lot of reinforcement arriving - both horse and foot.

Both Neil and Chris are very good figure painters so seeing them locking horns over the wargames table always means the game will look good. Chris said he kind of got a little addicted to painting Bashi Bazouks and the numbers seemed to go beyond what he originally intended whilst Neil has in mind some additional cavalry for the British.

To finish up with Chris gave me a couple of TMWWBK laminated play sheets whilst Neil kindly gave me a copy of the additional rules he found on the net somewhere.

Many thanks chaps for these and also for the spectacle - sadly my photos have not really done it justice!

Wednesday 16 May 2018

Looking Backwards and Going Forwards


First published in 1975 but available from John Curry as part of his History of Wargaming project


To support the rather mysterious 'mini project' mentioned in my last blog post I have been revisiting an old friend for inspiration. The old friend in question is the book pictured above.

Barry Carter's book is certainly old school and the fact that his rules use a square grid may raise a few eyebrows from die hard naval wargamers but for all that this is a cracking read. I had an ulterior motive when I picked this up to read as I wanted to look closely at his suggestions for rules - and I am very glad I did.

As a rule naval wargamers can be a rather pedantic bunch. I mean no offence when I say this but let's be honest, there is an element of geekiness about being able to quote technical specifications about one's chosen battlefleet - from main gun calibre down to bunker capacity via barbette armour thickness and wardroom cutlery. I have no problem with this and will spend many happy hours looking at technical specifications from Conways or Jane's Fighting Ships - it is all part of the fun really.

I mention the above with my tongue firmly in my cheek but it is true and it does serve to colour how we like to see our ships represented on the tabletop. I believe that Barry Carter would subscribe to this theory as his rules are quite 'intimate' in how they tackle ships. Firing is handled on a '1d6 per barrel' basis and damage is recorded by using hit points that increases as the firing gun calibre gets larger. Ships are given a 'sinking rate' which is not calculated based on any formula I can see - rather it is based on the gamer's own research on how durable a given ship would be. The author says "How the reader arrives at a sinking rate for each ship is a matter of personal preference. I like my battleships to have a rate in the range 700 to 1,200 points." There is small sample of selected ship types with his suggested sinking rates which can serve as a guide for other classes.

Aside from a small mini painting project in support of my next game I have also been stripping the rules out of Barry Carter's book into a convenient playsheet. Actually it is four sides of A4 but is far more convenient to use than thumbing through the book. This is virtually finished as all that remains are the sections on minefields and submarine operations

I shall be using these rules for my next game and the mini project involved pressing ahead with a number of WW2 ships from the Axis and Allies collection I have amassed. the ships are painted and varnished and I only need to tackle the bases and draw up the ship cards and that part is ready. I will also need to get a square gridded playing area sorted out. I have a cloth I can use but it is a little on the dark side however it will suffice in the absence of anything else.

I am rather excited about this and hope to be running the action over the forthcoming bank holiday weekend.

Sunday 13 May 2018

A Diverting Afternoon

No boot sale today - SWMBO and I had a leisurely morning pottering about the house and attending to a few domestic chores. I was however, able to spend some time in the man cave with a paint brush which makes a change. I am not going to go into details about exactly what I was painting- you will see it shortly - but suffice it to say it is relevant to what I am looking at presently.

One of the great things about being the blogoverse is the fact that the efforts of others can help to inspire ones own efforts and this is certainly true for me at the moment. Seeing other people churning out huge numbers of figures, vehicles, ships or whatever certainly helps to keep me on my toes!

In connection with what I am painting at present I have been looking at some old school rules to use with the output and I reckon I have found just the thing. The rules are from the 1970s and whilst I they would not ordinarily be my first port of call after rereading them I think that they have some potential. 

There is a game planned - number 53 - and the preparation for this is already in hand. In fact I have already drafted the first part of the action which will serve to set the scene.

No more details for the moment - I want to maintain the element of surprise!

Friday 11 May 2018

Through the Jungle and Across the Desert


A classic set of rules for adventures within a Colonial setting during the Victorian era - and with some additional possibilities....


You could be forgiven for thinking that despite my insistence that I am now focussed on certain projects my recent blog posts seem to have been somewhat at variance with this noble intention. The opposite is in fact still the case - I am focussed on my project list but it does have rather a lot contained therein! - and so the following post is most certainly within my sphere of activity.

The fact that it is most definitely not something I am looking at present should not detract from the overall scheme of things - it will take its place in the line up at the appropriate time although when that happy state of affairs will come to pass I have no idea....

The Men Who Would Be Kings by Dan Mersey are the Colonial set from his very successful 'Rampant' series of low level skirmish type rules. They, as have the others in the series, proven to be extremely popular for many reasons as, aside from being a great set of rules, they are also relatively easy on the budget. Forces for a typical game can vary from around 40 to 60 plus figures or, to put it another way, a couple of boxes of plastic figures a side.

 
Congo - the rules and the game accessories that come with it.

Congo is a set of rules that work at a lower skirmish level are cover mainly adventures set during the Victorian age in the jungles of Africa although not exclusively so. Again, these are quite budget friendly in terms of the forces one would need to have game being typically around the 30 to 50 figures level.

 
Congo with some of the figure sets available from Wargames Foundry. I saw these at Salute and they look very nice indeed!


So, my point is....

For high drama and excitement there can be little doubt that the Colonial era has this in abundance. For the wargamer it is very well supported with figures, terrain and a wealth of good quality research material. It is a period that I have not played very often but have always enjoyed it when I have done so. However, my plan is to use both the above rule sets for actions set a little later than for when they were intended.

My interest in the so-called 'sideshows' of the Great War - mainly the Arab Revolt (including the Sanussi) and the East African campaign - is well known. I am keen to game either or both of these in due course and I believe that using the above would work well - as indeed possibly for the Afghan campaign at the end of the Great War also.

I have made no decisions yet as to figures or anything similar but can see no reason why using these rules should not work for the kind of game I want to run.

That is pretty much where I am with this particular piece of my project list but it will be something to explore in more detail in due course.

In the meantime though, on with the ships....


Wednesday 9 May 2018

Tanks for the memory....

 
Not to be taken seriously but looks to have a little more depth than Tanks by Gale Force 9 - testing will tell in due course.


Along with rather a lot of other people I was very intrigued by the recent release of What a Tanker! - the latest set of rule from the stable of the Too Fat Lardies. Mindful of my reputation of never indulging on a whim I decided to invest in a set on the grounds that they are WW2 and also that tanks will feature when I get around to the Tunisian campaign in due course.

These rules are not designed as a detailed simulation of WW2 tank combat - rather they are more a Commando comic style of game and so should appeal to most methinks! I know that Dan Mersey of Lion/Dragon Rampant and The Men Who Would be Kings fame is working on something similar with the Plastic Soldier Company which is not really surprising given the amount of tanks kits available from them. I have not read the rules in any great detail but I rather like the idea of improving your crew over time thereby gaining certain advantages.

I could even feel a Wittman bocage-fest or even something from 'Fury' coming on....

I must confess to being a little bit of a tread head and suspect that this is a throwback to my Airfix modelling days. Nowadays of course some lovely models are available on a fast assembly basis and in a bewildering variety of types and scales. My preferred scale would be 20mm and I already have in mind what I want to get. Tunisia features a good selection of tank types from the Tiger 1 downwards so there is a lot of potential. In fact it means I could game the period without worrying about the rest of the kit - infantry and support weapons etc. - if I wanted to. That is certainly something to think about as even I can turn out tanks pretty quickly should the need arise.

As is usual with the Lardies rules there are bits and pieces available to download from their website to help with the game and the rules are also available as a PDF.

This is going to be fun.


Thoughts on Game 52

 
An action from the American Revolution using a scenario and Kriegsspiel components available from Command Post Games


I enjoyed myself enormously with the ACW game in my last post. There are, however, a number of points arising that I want to address going forward. These are mainly around the 'look of the thing' and how the action is reported.

Directional Arrows. I intend producing a number of these in various colours to show things like direction and distance of movement, designating targets for firing or anything else that needs to show what has been with what is now.

Following the pictures gives a good idea of this but you only need a picture to go missing and the whole thing can get a little tricky. As an alternative (or even alongside) I also want to investigate the possibility of adding text etc to the pictures themselves - this will mean experimenting with the 'Markup' feature on my various items of Apple equipment.

Named Commanders and unit designations. To add a little flavour this is an area that needs some further thought and of course has implication for unit identities on the map. At present my blocks are anonymous in that they represent troop types only. Thus far my thinking runs to using coloured spot labels on the blocks with a roster sheet for the designations. I do not want to be too restrictive here - it would defeat the object of using blocks in the first place if I, say, marked a blue unit as the Iron Brigade - it would be that for evermore!

Clarity of purpose. Having a properly scoped scenario with clear victory conditions - the all important before and after the action itself.

Quick Reference Sheets. This is a no brainer really so I will endeavour to make sure I have these available for each game I play, ideally a couple of them.

A lot of the above is 'chrome' to an extent but should help to follow the action and also streamline the whole affair from a playing perspective. I have in my mind's eye how I want to present block games so I merely need to fill in the details.

Dispensing with a grid. Now this is something a little more ambitious. I have been mulling over using the blocks on a normal table top. I have seen a number of games on the net played in this fashion and of course the original Kriegsspiel (not the 'Strict' version) used a map. The advantages of this are many but for now the main point for me is that I will be able to draw custom terrain maps to fight over should I wish. The 'art' side of this should not present too many difficulties especially as I have a budding artist in the family to go to for practical advice.

I would also be able to fight 'normal' games using model terrain - another example of the 3D military map my block games aspire to.

Much to ponder then but for now it is back to painting ships.

Monday 7 May 2018

Rettendon Turnpike, June 1864....Game Number 52

I was very keen to get a game under my belt and so decided that the block armies would once again take to the table top in conjunction with the maps from the Axis and Allies Miniatures game. The ACW has made a welcome reappearance in the man cave and the scenario played was something I conjured up off the top of my head - so any resemblance to anything historical (or should be hysterical?) was purely coincidental but probably intentional....

The Atlanta campaign of 1864, culminating in the siege and fall of the city itself, consisted essentially of outnumbered Confederate forces being continually pushed back from defensive position to defensive position by a series of outflanking manoeuvres undertaken by the numerically superior Union forces. The scenario represented a typical action whereby the outnumbered Confederates were in a strong defensive position but were in danger of being turned and taken in the flank by a more numerous attacker.

To the best of my knowledge there is not a Rettendon Turnpike in Georgia but I will not let such a detail spoil the fun....

The Game Set Up


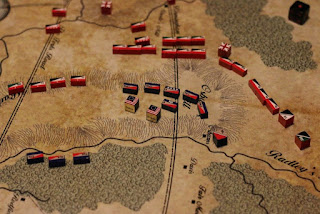
The overall situation at the start of the action - sadly the Confederate reserve of an infantry and a cavalry regiment are not visible as they are deployed to the rear of the town of Rettendon.


The playing area was 15 x 10 hexes and consists of two Axis and Allies Miniatures maps with a few 3D items of terrain added - mainly the Rawlplug fieldworks. The combatant forces were represented by my block armies. The game was very much by way of an experiment in respect of the scenario - for the first time I had consciously devised a plan of action for each side - so I wanted to take my time over the game and record what happened in greater detail than I would usually. The rules I used are Bob Cordery's Portable Wargame 19th Century set.


The Union initial deployment


Union Forces

1 x 2 Commander
6 x 4 Infantry
2 x 3 Cavalry
2 x 3 Artillery

Total Strength Points 38 - Exhaustion Level 14


The Confederates deployed in and around the town of Rettendon - note the fieldworks occupied by artillery and infantry and Beauregard's position in the centre of Rettendon


Confederate Forces

1 x 2 Commander (General Gaylord Beauregard III)
4 x 4 Infantry
1 x 3 Cavalry
2 x 2 Artillery

Total Strength Points 25 - Exhaustion Level 9

All units for both sides are rated as average and the artillery are equipped with smooth bore field weapons.

For identification purposes a unit with a black marker has fired for the turn and a white marker indicates a unit has suffered a hit. Blocks to be removed are stood on their end. If there is no block on its side but a unit has a white marker it means that the unit is opting to fall back rather than taking the loss.

For the most part the units followed the standard 4, 3, 2 approach for infantry, cavalry and artillery. I chose to make the individual Union artillery stronger rather than increasing the number available. It has no effect on their firing but it did mean they would last a little longer.

From the forces above you can see that the Confederates were outnumbered roughly 3:2 but with the advantage of the terrain and of course the fieldworks.

Somewhere, on the road to Atlanta....

"It won't be much longer..." muttered General Gaylord Beauregard III to himself as he surveyed the serried ranks of Yankee soldiery deploying in the distance. He knew it was coming but for all that he was grateful of the weeks grace afforded to him and his small command. The week had been well spent. The men had been able to rest and recover from the almost continuous marching they had been undertaking for what seemed like an age. For sure there work to be done - the fieldworks would not build themselves - but for the most part they were able to rest and recuperate, forage for food (especially important given the abysmal supply situation), make and mend but above all, be away from the shooting.

Beauregard cast his eye over his command for the hundredth time but was certain he had done all that he could with the forces at his disposal. There were lots of youngsters and the veterans were sadly dwindling in number but even so it was a good mix of experience and youthful enthusiasm. The real problem was that there was not enough of them, not enough to halt the blue tide that threatened to wash over them and certainly not enough to turn it back.

There was little pomp and ceremony within his command - for the most part the men had dispensed with that long since - but that did not mean they were undisciplined or in anyway unsoldierly. The men had the measure of their commander and he of them. In truth they were united in facing a common calamity; a calamity that would inevitably overwhelm and consume them all.

There was no unnecessary conversation, just the occasional question and patient answer or an oath muttered from behind a bedraggled beard - each man and boy lost in their own thoughts as they clutched at their weapons, their eyes to the front and the darkening horizon.

The silence was impressive.

Beauregard turned to his ADC, an impossibly young but dashing gentleman from Atlanta itself, eager for glory and whose ornate uniform, polished boots and magnificent black horse were in stark contrast to his own campaign worn attire and tired nag he was having to use, and addressed him directly. "Captain Mayhew if you please". The young officer threw an exaggerated salute to his General. "Captain please extend my compliments to all unit commanders (Beauregard knew that Captain Mathew would not possibly know their names given that he only been with the army for a little over the week they had been in Rettendon) and have them make ready. Our enemy is approaching." With the fire of excitement in his eyes the Captain again threw a salute to the general, jerked his horses bridle away and with a "Hiyah!" galloped away. Beauregard watched him go and then turned his own horse away and slowly walked back to the command post.

It would not be much longer.


Turn 1. After losing the initiative the opening move sees the Union force extending its frontage as to keep the Confederates guessing as to where the main point of attack will be. Note the artillery heading for the hills towards the bottom of the picture and the cavalry heading on a wide flanking move to the North.


Turn 2. The Confederate artillery opens fire at the oncoming bluecoats and inflicts minor casualties.


The Confederate position showing the artillery having fired.


Following the Confederate turn (they won the initiative but opted to stay put, content to await developments) the Union forces press onwards and outwards with the flanking force to the North supported by cavalry. 


Turn 3. The Confederate artillery continues firing and inflicts more casualties on the advancing Yankees (who once again lost the initiative). The Union forces are getting much closer though and their artillery has finally reached the hills where it deployed for action.


Turn 4. Both sides artillery opens fire with the Union infantry again suffering casualties in the centre whilst the Confederate artillery comes under fire from the Yankee guns on the hills. Meanwhile both sides commence rifle fire with the Union coming off worse than their erstwhile opponents - all of whom having the benefit of cover.


Turn 5. The action hots up dramatically as the artillery fore from both sides scores some telling hits - the Confederates against the Union infantry whilst the Union artillery continue to pound the Rebel gun positions. The Union flanking force of infantry and cavalry skirts the wood at the North and is engaged by the sole Confederate mounted unit, desperately trying to keep the Yankee horseman at bay. Meanwhile the Union infantry in the centre is in danger of being overwhelmed as more casualties are suffered resulting in one unit opting to fall back.


Turn 6. Disaster! The Union artillery scores a devastating blow against the Rebel position and destroys both batteries in a storm of fire! (note the double 6 thrown for a hit and the double 1 for effect).


With their artillery destroyed Beauregard commits his infantry reserve to try and stabilise his Northern flank. His cavalry manage to fight their Union counterparts to a standstill but it is too little and too late as inexorably the Yankees turn his flank.


Turn 7. The Northernmost Confederate infantry are caught between Union forces to their front and rear and their only saving grace, albeit temporarily, is that they are in cover. Beauregard surveys his rapidly collapsing position and makes the only decision he can to salvage the situation. He orders the retreat and so those forces that are able to begin to break off the action and head to the Rettendon Turnpike to make their escape.


Turn 8. Endgame. The Southernmost Confederate infantry unit opted to fall back rather than sustain losses while from the North of the position the reserve infantry, although bloodied, was able to fall back on Beauregard's position. the surrounded troops in the woods would have to surrender in due course. the Union had forced the Confederates out of their position but at a cost. However, it was a cost that the Yankees could bear whereas the Confederates could not.


Both sides had reached their exhaustion level but the advantage clearly lay with the Union forces as the Confederates had decided to abandon the position. The Union however, were in no position to organise a pursuit.

Beauregard was exhausted in body and spirit. His men had given their all yet still it was not enough. His small command was now even smaller and and he felt unsure about how long this could continue - the endless marching, digging, fighting and marching again, always away from an enemy that, no matter how times you damaged them, still kept coming. The spectre of ultimate defeat loomed larger but for now he and his men would keep on until defeat consumed them.

Whatever happened to that "impossibly young but dashing gentleman from Atlanta"; so full of life and fire? Beauregard saw the magnificent black horse he owned standing riderless and breathing heavily at the side of the rode and knew the answer.

Overview

It was good to get a game fought at long last and the action went pretty much how I expected it to. If I am honest the Confederates could have made a more effective defence but it is difficult to see what else they could have done to slow the Union forces. Perhaps a mobile defence may have worked better although the Union holding attack proved rather more costly than they had reckoned on.

The rules worked well although I am embarrassed to admit to making a few mistakes with them - nothing major so I will just put it down to being a little out of practice.

I could think of worse ways to spend a bank holiday weekend.


Friday 4 May 2018

Kriegsspiel by every other game....

My recent overdose of models soldiers and all that goes with them - I refer to seeing a portion of Eric's collection in all its glory as well as the battering of the eye candy senses I received at Salute - as well my acquisition of a select number of classic wargames titles has given me much food for thought in a quite unexpected way. I found myself thinking about just how I want to represent armies on the tabletop - do I want to own a collection of thousands of figures with all the associated time, cost, storage and effort to assemble? Is the somewhat sterile approach of using blocks the way forward for me? Is there a workable compromise?

 
A game of Kriegsspiel in progress with no prizes for guessing the battle being refought!


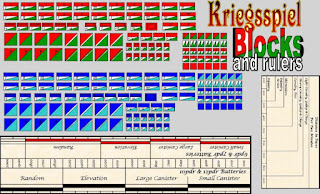
There are few that can argue that Kriegsspiel has had an enormous impact on the wargame as we know it. I was rather intrigued to find out that the very first version of this was in fact grid based and with 3D terrain - the so-called 'Strict Kriegsspiel'. This particular side of the hobby went through several evolutions via the use of maps rather than model terrain before the Little Wars figure based game appeared but certainly still has its devotees, especially since Bill Leeson translated the German text into English back in the early 1980s. Much of Leeson's work is available from Too Fat Lardies and obtaining the blocks for use with the game from such suppliers as Irregular Miniatures or Command Post games is straightforward enough.

 
Unit types and materials needed to play the original Kriegsspiel.
 
 
I have played Kriegsspiel a couple of times in the past and have enjoyed the experience. It does not however, lend itself to solo play very easily which is an important consideration for me. I always liked the nondescriptness of it; the typical 'army red versus army blue' tactical exercise, free of any national bias. Essentially Kriegsspiel does exactly what it says on the tin in that it is a tactical training toolkit. Any wargamer worth his salt could in turn use this to refight a particular action of their choice with little difficulty.


Recent events (and I include attending Salute in this) have given me much pause for thought in terms of how I want to fight my battles and I was properly surprised by this as I thought I had long since settled this argument with myself in favour of small selections of figures supported by the block armies. Seeing some of the model armies on display and in action has served to awaken many old ghosts and so wanting to amass armies of figures is once again testing my resolve.

If I am honest with myself (and that is not something I am usually very good at!) I think I like the idea of owning massed armies rather more than I am able or willing to execute this. This means then should I want to fight large battles I will need to make use of the block collection - which is exactly what it was designed for. Smaller actions could easily make use of figures and models - my Battlegroup plans are a good example of this as is my projected The Men Who Would be Kings/Congo set up.

The humble block - and I mean the military symbol type rather than the Command and Colours variety - has a distinguished place in the world of the military and of the wargame in my opinion and as I have said before - so who am I to ignore this noble tradition?


Thursday 3 May 2018

The Collection of Eric Knowles....Part 3

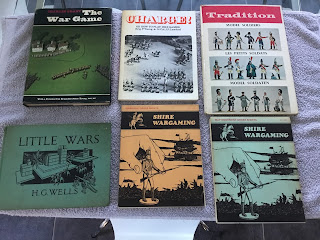
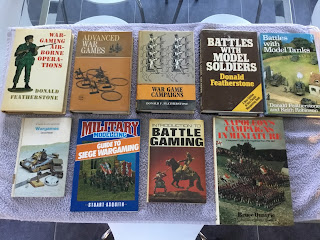
I was able to spend some time yesterday evening cleaning up the books I received from the collection of Eric Knowles, courtesy of his son Bill. They scrubbed up pretty well and considering their age and storage. The ex-library books (all the Featherstone titles, the Terry Wise book and the small Nash title) had the usual stickers and dust jacket sleeve which I was able to remove from all but two of the books. The plastic was pretty grubby and in poor shape so I removed it where I could leaving some surprisingly fresh looking covers. They all had a good dust and wipe with a barely damp cloth and are now 'airing' off in the man cave.

 
I was particularly pleased with the Grant and Wells titles (I already have another paperback version of Charge! and am now on the hunt for the hardback version) with the Tradition catalogue being a wonderful piece of eye candy. Note the two Shire Publications order pads.
 
 
All but the Quarrie and Asquith title are ex-library titles which ordinarily I would not consider (I am a little sniffy about such things, the same applies to book club editions....) but am happy to make an exception in this case!
 
 
I was a little surprised to see the Quarrie title in Eric's collection as I never remember him fighting Napoleonic games although he did take part in the famous 1965 refight of the battle of Waterloo. I would have been very surprised if he used the rules in Quarrie's book and so assume he must have acquired this for reference or inspiration. Having said that I remember selling him my assorted Napoleonic Russians so perhaps there is another surprise waiting to be uncovered from his collection.
 
The Asquith siege title I am not in the least bit surprised Eric owned as he was always quite fond of fortifications and similar. Amongst the terrain pieces that I saw earlier in the week were some fairly extensive 18th century earthworks and stone faced ravelins  - I am no expert on sieges so apologies for any technical inaccuracies - not to mention more pill boxes and gun emplacements, bunkers and block houses than the Atlantic Wall ever had. Funnily enough this is the only book in the collection I have never read nor owned.
 
 
The acquisition of all this lot has had a rather surprising effect in that I now have a full shelf in my bookcase of wargames books. There are a few others that I am keen to get and of course there is John Curry's History of Wargaming project which can serve to fill some gaps. This is not a pressing task and so will only happen on an as and when I see them basis.