Thursday, 31 October 2024

Building a Steam and Sail Warship….Part 3

Whilst part two of this series was a model of brevity the same cannot be said for this, the final part!

As mentioned previously, the main part of the construction process for a steam and sail warship is the masts and so everything else is rather an anticlimax in comparison! The first step of this final stage of the build is of course to undercoat the models prior to painting. I use a brush and Vallejo white for this, mainly because it is easier to get to the underside of the masts - something that might get missed with a spray.


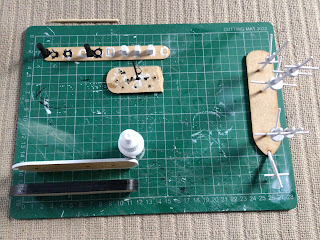
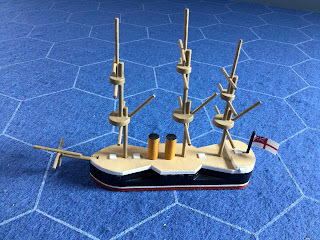
Undercoated. I usually only apply a single coat of white at this stage although anything that will be white at the finish usually gets at least two coats. If you look closely you can see that the top deck section (bottom left) that the edges have been given a second coat as this will the white line of the upper hull - see the finished model to see what I mean (top left).

For the next step I tend to paint the lower hull, the funnels and what will eventually be the gun barrels - these are all painted Vallejo black. The deck features will be painted Vallejo dark sea grey whilst the deck itself will be Vallejo tan earth. As mentioned previously I always complete everything on the deck - including assembly - before the mast and bowsprits are fixed in place. 


The hull and white edge of the top deck have been painted along with the funnels and the cocktail stick that will be used for the gun barrels


The deck features are painted in Vallejo dark sea grey. The hull has a section of the bow painted as this is visible through the bowsprit notch. Once the bowsprit is fixed in place you can not see it anyway but I like to do this in case you can!


The top deck added to the hull. Now you can see the advantage of painting prior to glueing it to the lower hull - the white line is ramrod straight!

The first part of this stage is to paint the hatch covers, gun carriages and the funnel base before adding the deck to the hull and painting it. It is easier holding a four layered hull when painting any detailing!

Once the hull and deck features are dry one can look to paint the deck itself. I would also point out that you can see the advantages of having straight lined features rather than circular. It is easier to paint around a square or rectangle than a circle so the addition of a funnel base is more for convenience than accuracy!


The lower hull painted and ready for the deck features


The first step when making a gun barrel is to file the end into a rounded shape


The filed end is then touched in with black paint


A 10mm length is cut off and is glued in place on the previously fitted gun carriage. I fix this about halfway down the barrel so around 5mm with a 5mm overhang. Note that the two gun carriages clear the mast holes by a couple of mm.


With the gun barrels in place and the funnels fitted the hull is set aside to dry so that painting of the masts can commence.

The subject of masts and rigging is a major study all of its own and would require far more effort than I would want to spend. For the most part I have just ‘winged it’ but the end result looks fine so that will do for me! Painting wise I usually go for Vallejo Iraqi sand for the exposed woodwork of the masts along with black for the spars. Very simple, clean looking and believable - or in other words, ‘purely representational!’


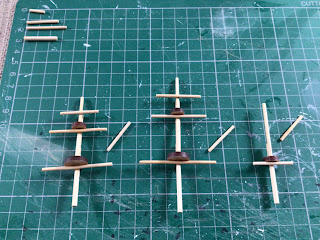
The hull has been varnished and the masts have had the first part painted - the bare wood - and these will be varnished once fixed in place.

Once the masts and bowsprit have been painted the next step is to fix them in place on the hull. This is where the pre-drilled holes come into their own as a drop of super glue on the base of the mast and voila! They are done. Needless to say, care needs to be taken to ensure that they are square in place.

At this point I should have included a picture of the masts fully painted before being fitted to the hull. Sadly I forgot to do this and instead went straight ahead and fixed the masts in place! For the record I tend to fit the bowsprit first followed by the mizzen, the main and the foremast last of all.

Once the glue has hardened off the masts can be varnished, again using my preferred satin varnish. The ensign is added as the final step and is also varnished and hey presto - C.S.S. Florida is ready to sweep the seas of Union shipping!


Viewed from the bow….


….and the aft quarter.


Viewed from the beam. For reference the hexes are four inches between the flat sides

Lessons Learned

Going forwards I shall be painting masts and spars separately and prior to assembly!

Now for the remaining Lake Tanganyika models in advance of industrial quantities of MDF arriving for the ironclads.


Wednesday, 30 October 2024

‘Der Tag’ - WW1 In the North Sea (and the Baltic)

This is not the post you’re looking for”….(borrowed from O.W. Kenobi, kind of…).


The Quintin Barry title found its way into the library some time ago and is a cracking read. The Great War at Sea Jutland title is a fairly recent addition and also includes the Baltic so the Russian Baltic fleet can get an outing. 

I have a long history with gaming the battle of Jutland and indeed, back in 2016 had a madcap plan to refight the battle using 1:2400th scale models. I say madcap as although I completed the capital ships for both sides the prospect of all the lighter ships involved proved to be a step too far for me - I did not have the space and the cost of the models was prohibitive. 

If I am honest I have probably enjoyed Jutland more as a board game - ironic really as the Avalon Hill version is not a board game as such - so the GWAS title above should tick a number of boxes. I like elements of the combat system but in my opinion it needs a little tweaking to suit my needs. Having said that all the game mechanics and ship specs seem sound enough so I do not think it would take much to turn it into a more ‘Wargame-like’ system. Something to play around with for sure - but not yet!

Ironclad Stuff

The masts and bowsprit for the C.S.S. Florida have been painted but do need some touching up prior to assembly and finishing off, so I shall be posting the final part of the series tomorrow all being well.

I have learned what will be a great time saver when the ironclad build commences - and I have been kicking myself for not thinking of it sooner as it is, to be frank, blindingly obvious!

From here on it I plan to paint spars BEFORE fixing them to the masts. The same applies to fighting tops. I shall assemble the masts as usual and will paint them before adding the spars etc. The reason for this it that it will mean that no touching up would be required once fully assembled.

Simple, so simple in fact I still cannot believe I did not think of this sooner!


Friday, 25 October 2024

Building a Steam and Sail Warship….Part 2


Further assembly. Note the card hatch covers, gun carriages and funnel base fashioned from 1mm grey board. On the right you can see the cocktail stick that will become a pair of gun barrels and the two funnels - all jigged up for sealing and painting.

This will be quite a short post as assembly-wise it was a very straightforward part of the process. The hatch covers, gun carriages and the funnel base were all glued to the top deck prior to sealing, undercoating and painting. I also jigged up a cocktail stick for the two gun barrels as well as doing the same for the two funnels. The latter are fashioned from 6mm dowel rod cut into 3/4” lengths. Finally, I sealed the masts and bowsprit.

One thing I have done for the first time with this build is to give the MDF two coats of sealer. I am hoping this will stop the occasional ‘bleed’ through of the MDF into the top coat of paint - especially on light colours.

Next up will be the undercoating and then the painting itself. Before the final assembly - which in this case is fixing the masts and bowsprit - I shall add the funnels and gun barrels as it is easier to do this before the masts are glued into place.

You can probably tell that this will mean that the model will be finished in fairly short order and so Part 3 will be the grand finale!


Thursday, 24 October 2024

Building a Steam and Sail Warship….Part 1


C.S.S. Florida underway. My version will not include sails and at this stage I am uncertain about the slightly angled funnels - but I have a cunning plan about them!

Following on from the previous three posts devoted to building masts I figured it would make sense to describe the rest of the build for this particular model. It is a lot less involved than the masts that I can guarantee!


The picture discovered ‘Journey to the Centre of the Earth style’ between the pages of Paul Silverstone’s book: Warships of the Civil War Navies. 

The model I am working on came about quite by accident in that the above cut out picture was between the pages of a book on American Civil War Warships I acquired on eBay some time ago. It is definitely from a magazine and so after a little internet trawling I decided that building one for my Confederate fleet would be a good idea and so welcome to what will be my ‘purely representational’ version of the C.S.S. Florida

Putting the ‘Representational’ in ‘Purely Representational’

First and foremost I need hardly remind you of my take on the models I build. They are designed to look similar to their historical counterparts but on a very simplified basis. I do not profess to be a good model maker in the accepted sense but I can improvise rather well and so the fruits of this are featured all over the blog and have been for a good while now. When making a model I try to capture the overall look of the subject without being too fussy about fine detail, scale or accuracy. The one thing I do try to do though, is to maintain a sense of the relative sizes between models. The ACW collection is all over the place in this respect, mainly because I did not really think about such niceties when I embarked on the build. The new ironclads will be much better aligned in terms of relative sizes and I will certainly be doing this with the WW1 collection when I get to it.

The model itself

After having built the masts the hull that goes under them is almost an anticlimax in terms of complexity! The hull in this case is made up from four layers of 3mm thick MDF, measuring 5” by 1 1/4”. This size is currently the largest I use and whilst this model is of a sloop for frigates I use five layers. The top layer had holes drilled for the masts and a small notch for the bowsprit. As the top layer will be edged white (common practice for ships of war during the middle years of the 19th century) I usually paint this separately before sticking it to the other layers to ensure a clean finish. The three lower layers can be assembled in readiness to take the top deck once both sections have been painted.


The hull. Built from four layers of 3mm thick MDF and assembled in two stages. The three lower hull pieces are first glued and painted black whilst the top deck layer is edged white before being glued in place to ensure a clean finish. At the bottom of the picture is the hull awaiting sealing, undercoating and then painting.

Hull Shape

The shape I use for my ship hulls (with a couple of exceptions) has all the grace and elegance of a barge! It has a rounded stern and along with the bows are best described as 'bluff'. The sides are also ramrod straight. There was a reason for this. My casemate ironclad building technique requires straight sides and so I kind of stuck with it. From a practical perspective it gives a uniform look to the collection and also makes reordering a lot easier! The main drawback is that shaping the hull into anything requiring slopes etc requires some major work with the Dremel - my model of C.S.S. Manassas was quite a tricky build in this respect despite the apparent simplicity of the actual ship itself. I am not too fussed about it as the end results of straight sided hulls with bluff characteristics fore and aft at least looks like a ship should!

Back to the model

As the model is flush decked and I do not bother with gunwales or similar, the deck fixtures and fittings are positively spartan! In this case they will be limited to a fore and aft hatch cover, a pair of gun carriages and a base for the two funnels. For each of these I use 1mm thick greyboard which is cut to size by Warbases. I use 5mm squares, 5mm by 10mm rectangles for the gun carriages and 10mm square to pop the funnel on. I also have two sizes of 3mm thick lifeboats which have yet to be painted and added to the collection but will get around to doing so - they will help to add to the deck ‘clutter’.


A better view of the deck features on the previously completed model, sparse though they are!

The gun barrels are fashioned from 10mm lengths of cocktail stick with one end filed into a rounded shape. I usually paint up a cocktail stick black and cut these off as needed - they are also fixed in place when the main deck and other features have been painted - as it avoids having too many small pieces lying around.

As this stage of the process is closely linked to the actual painting I will go into more detail in the next post. In the meantime though, the hull and all the masts have been sealed prior to undercoating and the cocktail stick from the gun barrels will be fashioned, along with the two funnels, are also being prepared.

More to follow....


Wednesday, 23 October 2024

Few Tears Before the Mast...Part 3


HMS Superb - the largest model I have built thus far and with the largest set of masts and spars. For this model the spars were fashioned from 2mm dowel rod rather than cocktail sticks and yes, I need to get some more of this!

Now that all of the pieces are in place we can look to the final stage of the assembly - the glueing.

If the second part of the construction needed a tidy approach then the final stage needs something else - patience! This is where a good quality adhesive is essential - my preferred choice is super glue - and the aforementioned patience.

This stage is actually pretty straightforward but you cannot rush it - I learned this the hard way - and I always make sure that I have one of my 'top deck' hull templates to hand to use as a jig whilst the glue is hardening off.

The first step is to, well, step the masts and for this you need to mark off what will be the overlaps.


The starting point - the overlaps (marked in pencil below) are 1/2”


Initial assembly. The fore and main mast are in three steps consisting of two lengths of bamboo skewer and one of cocktail stick whilst the mizzen has only two - one of each type, skewer and cocktail stick.


Adding the top step. You can see where the fighting tops will be placed on the fore and main mast whilst the mizzen already has it in place

It is a good idea to lightly sand the surfaces that will be glued for two reasons. Firstly, it provides a flat surface for the glue to adhere to for a stronger join and secondly, it helps to keep the mast steps aligned.


The addition of the fighting tops to both the fore and the main mast.

Care should be taken at this stage to ensure that not only are the masts aligned but that the fighting tops are square with them and that the underside is fully flush. This is important for when the spars are added.


The underside of the fighting tops - note that they are more or less in line and are flush. A good tip is to lightly sand the underside to ensure that it is square and that the mast is not set too low and is poking out!

You can be fairly generous with the glue here as it will help to seal any gaps as well as providing a stronger join.


The spars are, for the most part, glued directly to the underside of the fighting top and are hard against the mast. This provides a really strong join as plenty of the spar is in contact with some adhesive!

When fixing spars that are not glued to a fighting top I use a rat tailed file to file a curved ‘dip’ in the mast so that the round cocktail stick will ‘sit’ in it. If you look at the foremast above, just above where the number 9 is, you can see the filed recess. Not only does it help the spar to sit nicely it also provides a better surface for glue. 

It is also a good idea to mark the centre point of a spar with a pencil to help line it up when fixing into place.


A view from the underside so you can see that everything is more or less lined up as it should be.


All three masts completed with the exception of the gaff spars.

The small sized fighting tops are only able to take one thickness of mast in the slot so any mast above it is glued directly to the ‘stump’ of the mast and directly on the top of the fighting top.


Looking at the mizzenmast from above showing how the top mast is fixed directly to the top of the fighting top.


Gaff spars ready to be fixed in place. All that needs to be done to these is that one end should be filed to roughly forty five degrees

The gaff spars are fixed against the mast in the slot provided in the fighting top. They should be glued in such a way so that the filed surface and either side of it are glued within the fighting top. In effect they are glued from three sides.


Viewed from the underside - you can see how the gaff spar is mounted using three surfaces - the mast and the two inner sides of the fighting top. You get a better idea of this by zooming in on the picture.


The assembled masts placed temporarily in a hull template for the glue to properly harden off


The first part of the bowsprit. Once again I use 1/2” for the overlap and again, a light sanding to square off the surfaces that will be in contact provides a much stronger join


This is what I refer to as the MP40 stage!


The final step


There you have it, a full set of masts for use with, in this case, another Confederate commerce raider. All I need to do now is to finish the rest of the build and get her painted.

I would love to say that this particular build went smoothly but I did experience a few issues - mainly because it has been a while since I last made any masts and I was a little out of practice - although nothing catastrophic! In truth it has been a good workout for my modelling ‘eye’ so to speak. As every ship in the new ironclad build have masts it was as well I ironed out the wrinkles beforehand!

The paint scheme for the masts will follow that of the completed model above and luckily history helps us out here - black for spars and ironwork was common although how extensive and for how long I am not sure about. Anyway, it looks good and the black covers a multitude of excessive glue-induced traumas!

I hope these three posts have been useful - it was not a subject that could be rushed - and once again I would like to thank John Armatys for giving me the nudge to do this!


Tuesday, 22 October 2024

Few Tears Before the Mast….Part 2


Ready for the off. The first thing I start with are the thicker bamboo skewer parts - the lower steps of the masts and the bowsprit. Everything you need for the this phase is in the picture above

Before I start chopping up lengths of bamboo skewers and cocktail sticks it is worth pointing out, again, the design philosophy behind the models. I cannot emphasise enough the fact these are not built in any scientific way whatsoever - they are built to what I think they should look like or the oft-repeated ‘purely representational’ or ‘Hollywood-esque’ standard. 

Right then, having got that out of the way its on with the show….

The first thing to do is to mark out the lengths you need for each step of each mast. I usually cut the pieces off as I go rather than marking everything up beforehand.


The first part completed. These are the thickest parts of the masts.

The sizes I have used are as follows (from left to right): Bowsprit - 1”, Foremast - 2 x 11/2”, Mainmast - 2 x 1 3/4” and Mizzenmast -  1 1/2”.

I find it useful to lay the parts out as above so you can see where you are at - it helps to visualise the end result. A note of caution though - make sure you keep the right bits with the right bits!

The next step is to cut out the spars from the cocktail sticks. Again, I tend to cut these out as I go rather than marking up a batch and it is also helpful to work through each mast in turn.


The spars duly cut out and arranged as per their final destination

You can see that there are rather more of these than for the skewers. The sizes used are as follows: Bowsprit - 1/2”, 1”, 1 1/4”, Foremast - 3 x 1”, 1 1/2”, 1 3/4”, Mainmast - 1”, 2 x 1 1/4”, 1 1/2”, 2” and Mizzenmast - 2 x 1”, 1 1/2”

The spars angled at roughly forty five degrees are all 1” - these are the gaffs for the nautically inclined!


All the constituent parts laid out in their correct order along with the all-important fighting tops

For the record it actually took me longer to type this blog post than it did to measure and cut out the pieces you see above! You can also appreciate the essential need to make sure that everything is kept in the right place - there are after all 27 pieces to take care of.

In respect of the sizes used I have merely taken what looks about right and just gone with it - remember I am essentially copying another model.


What we are hoping to replicate - at least as far as the masts are concerned!

The final part of this series of posts will be the assembly stage and I hope to write that tomorrow.


Monday, 21 October 2024

Few Tears Before the Mast….Part 1


A Confederate commerce raiding sloop. I have a pair of these but have on the modelling tray a further example to build which will be virtually the same as the above except having two funnels. This will be the C.S.S. Florida. The pictures show the completed masts and spars etc whilst part two of this post will show the actual construction.

A chance comment from the renowned gamer and all round gentleman, John Armatys, whilst I was busy liberating Arnhem at The Other Partizan has been directly responsible for this post! The subject is masts - or rather how I make them for my models. It is hugely relevant at present for me as I shall be undertaking the building of a veritable forest of the things for the ironclads required for the Anglo Turkish War of 1880. Whilst waiting for the industrial quantities of MDF to arrive from Warbases to build the new collection I realised that I still had another ACW sloop to build so I decided that sharing this element of the build would be useful for readers that may want to have a go themselves.

Building a Mast

Using this building technique is pretty straightforward but one does need to be both careful and methodical. The following are some further views of the above model showing the masts and spars to better effect.


The side profile. This shows the ‘stepping’ of the masts and their relative heights. For scale the hull is 5” long


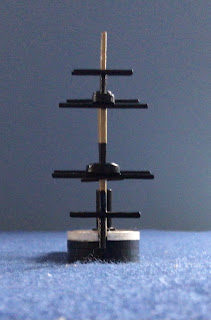
The view looking head on. The spars are quite modest in terms of size but this gives you a good idea of how they should look when finished


The bowsprit.

The first thing I should point out is that during this period the subject of masts and spars could fill several books in their own right! The variety of sailing rigs and what was used and when is a hugely complex subject - certainly well beyond my powers of concentration! As my models are fairly loose in terms of scale and detail I have adopted the simple expedient of using what looks about right and leaving it there. The models are after all, purely representational or ‘Hollywood-esque’.

I am fairly comfortable with the overall look of the masts in my collection and to be honest, if it looks right then it generally is in my opinion - the purist would undoubtedly argue otherwise though!

The Build Itself

One of the most important things you can do when building the masts for a models ship is quite simply to make sure you have sufficient material to do so in the first place! In other words remember the seven ‘Ps’ - Proper Prior Preparation Prevents Piss Poor Performance! 


The tools and materials ready to use

Looking at the picture above you can see what tools I use and the building material itself. Starting from the left we have the old model making standby of super glue. I use this one because although it is not the cheapest it works really well and I have never had any problems with it when building masts. A surgical scalpel or modelling knife - ideally with a new blade - for cutting along with something to file the cut ends with. In this case I use a relatively fine grade Emery board. The pencil and ruler are of course for measuring the sections required.

The masts themselves are fashioned using bamboo barbecue skewers which are usually 3mm thick. Spars and flagstaffs are made from wooden cocktail sticks. In each case (particularly the latter for some reason) ensure that you are using the straightest lengths. It is worth pointing out that keeping any offcuts from the cocktail sticks is a good idea as these are useful for making cannon barrels - I use 10mm and 7mm lengths.

Everything thus far is probably within the modelling supplies of most gamers but there is one other essential ingredient - the fighting tops. The five that you see are of two sizes with the larger being used for the first step of the main and foremast whilst the smaller are for the second. These are 3mm thick MDF and were custom cut from Warbases to a design from me at the start of the ACW project. Again, the purist might take offence at the shape of these - rectangular versions would be easy enough to design and order if required - but it does not matter a jot. They look imposing and provide an extremely important part of the construction process - and this will feature in the second part of this post.


Sunday, 20 October 2024

Beyond Steamer Wars


HMS Fifi (top) and Mimi and Toutou. I have around half a dozen other models to build for this collection, including the Belgians. That will be it then until after the ironclads and DTPIW is finished and then it wil be on with the expanded version of Steamer Wars: Hexed

As written, Steamer Wars was designed for use with gunboats and similar. They work extremely well for this and indeed, there is more than sufficient historical material to play any amount of interesting actions - as evidenced by the supplements that David Manley has published. The system is detailed enough to add that skirmish level feel but still manages to maintain a fast play kind of vibe. In short, they suit me down to the ground - which is probably why I persuaded Mr Manley to let me produce the hexed version! 

My planned WW1 project will be taking the system to the next level in that ships of up to dreadnought size will feature although these will be very much in the minority. The ‘meat and potatoes’ of the project will of course be the cruisers - purpose built and auxiliaries.

I am happy to use my hexed version of Steamer Wars for this but it will need to be expanded to include larger and more varied ships and weapon types, varying degrees of armour protection and generally higher speeds. I have a few ideas about all of these areas and so my thinking is currently moving along these lines.

1. Guns larger than 4”. I will be looking at weapons of up to 12” calibre although for the most part it will be around less than that. I will also need to think about torpedoes although rules for these are covered in River Wars and War on the Great Rivers.

2. Armour - protection in general. Steamer Wars has provision for Light Armour whilst War on the Great Rivers features rules for Very Heavy Armour. I am thinking of adding in Medium and Heavy Armour and changing the original Light Armour classification to Protected. This will give me five relative classes of protection - Protected (used in Steamer Wars), Light, Medium, Heavy and Very Heavy. Protected will represent things like improvised protection or gun shields etc. I shall have a play around with this and see how it can be extended across the range of ships being represented. I am happy to leave the damage etc as is - armour effects can be factored in as required. Following on from The Portable Ironclads Wargame my feeling is to assign a notional armour class to the ship in question depending on their historical specifications. It is an effective system and removes the need for detailed armour location rules etc.

3. Speeds. This is quite straightforward and for me is dictated by my available playing area of 6ft by 4ft. In the hexed version of Steamer Wars a hex equals around 4 knots. This is fine for ships with a top speed of around 16 knots (i.e. 4 hexes) but for the faster warships I will need to use a different nominal scale. My thinking at present is that a hex equals seven or eight knots meaning that a 24 knot cruiser will move 3 hexes. Still very much in the planning stages though.

We are where we are….

The expanded version of Steamer Wars: Hexed will happen but not until DTPIW is finished so will not be until at least the middle of next year. But happen it will, for sure!


Saturday, 19 October 2024

More on the Mediterranean in WW2


The Mediterranean naval library. 

Following on from my previous post and in the interests of completeness I thought it would be useful to show the modest selection of books in my WW2 naval library for the Mediterranean. Aside from a copy of the 1922 to 1946 Conways Fighting Ships I also own the above.

More than enough to be going on with for my needs methinks….

Friday, 18 October 2024

WW2 in the Mediterranean - Afloat!


Oh dear - here we go again…..


The back of the box

In truth I did not see this coming and as an aside I reckon that avoiding eBay would be a good idea - at least for a while anyway!

It is probably not a surprise to learn that I have fought actions in the Mediterranean but not for some time and even then it was using the 1:1800th scale models produced for the Axis and Allies: War at Sea game. The esteemed Mr Fox still has the Italians I believe but my own collection has long since gone. 

Anyways, it is fascinating period to game with plenty of surface stuff to get one’s teeth into along with the ever present aerial threat - certainly the Axis powers made full use of land based air assets to plague the Royal Navy throughout.


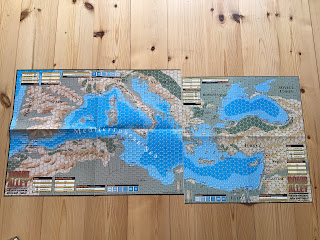
The operational maps - note the use of offset squares. 

I have little enthusiasm for raining model fleets for the period and in truth the same would apply to the Pacific. In the latter case I have the oft-mentioned Flat Top and CV to cover the fighting and indeed, the late S.Craig Taylor Jr, designer of these two games, had planned to use the system for a similar game based on the Mediterranean. I have no idea how far along the design of this he had got and with his passing I suspect that will it see the light of day. I believe that the Flat Top system would work really well for the Mediterranean but we will never know unless someone picks up the idea and develops it.

I have no experience of the Avalanche Press Second World War at Sea system although it uses much in the way of game mechanics as the Great War at Sea. Did I need to acquire this? Well, I have a smattering of titles in the library covering the war at sea in the Mediterranean so it has always been lurking there or thereabouts so I guess the answer is a yes, albeit needing to be fitted into my expanding project list!

The attraction of this system for me is that one has both the strategic and the tactical elements to consider along with a selection of mission types to undertake as well as plentiful scenarios - both historical and ‘what if’.

There is a whole pile of additional material available in respect of supplements etc for the SWWAS system  but to be honest I do not feel the need to avail myself of any of this - the coverage contained within the game is more than sufficient for my needs.

Send no wargamer ever…… ;-)