Friday, 8 March 2013

"Go tell the Fezians"....Game Number 33, Part 2

The battle was fought using Bob Cordery's Memoir of Battle rules for the 19th century on a 13 x 9 hex playing area and using my block armies. The actual order of battle looked like this (the strength points for each unit are in brackets):

Fezia

1 x Commander (2) - Pasha Ali, Good
4 x Infantry (4)
1 x Cavalry (3)
1 x Field Artillery (2)

Total strength points - 23, exhaustion level 15. 

Rusland

1 x Commander (2) - Count Hugo Pullitov, Good
1 x Commander (1), Average
8 x Infantry (4)
2 x Cavalry (3)
2 x Field Artilley (2)

Total strength points - 45, exhaustion level 15

The exhaustion levels reflect the fact that the Rusland force is largely a raiding body whilst that of Fezia simply reflects the dogged nature of the Fezian soldiery when dug in - especially when under the watchful eye of Pasha Ali.

The only special rules I incorporated into Bob's set was that each part of the Rusland force rolled its own command dice and that in the event that both sides reach their exhaustion level in the same game turn then the side that has lost the most units at the end of the turn is deemed to have lost the battle.

Somewhere along the Wooden Doors Road on the way to Firmopoly, 25th May, 1890....


Firmopoly at the start of the action - Pasha Ali is coordinating the defence from the centre of the village.


The Rusland Northern attack gets under way and the leading battalion has already been pushed back with losses from Fezian machine gun fire.


Meanwhile in the South, Pullitov urges his men forwards with the infamous Cossacks in the van.


The Southern units move into position, careful not to spring the trap too early. The unsuspecting Fezians are only concerned with the action in the North.


With a massed cry of 'Hurrah!' the Cossacks and the leading infantry charge into the attack. The Fezian cavalry countercharge and inflict casualties on the Rusland horsemen whilst the infantry fight is poised in the balance.


Meanwhile in the North the main Rusland force struggles to deploy into attack formation under fire from Fezian machine guns, entrenched infantry and artillery. Thus far the Fezians are holding their own and the Ruslanders are unable to make headway or use their superior numbers to any effect.


As fast as the Ruslanders deploy into attack formation so the Fezians shoot them down - casualties are beginning to mount. Can the surprise attack in the South succeed in time?


Then disaster strikes the Fezians! The entrenched infantry, with Ruslanders charging down the hill at them and with their own cavalry being hotly engaged by the Cossacks suffers a collapse in its morale and abandons its position! The Rusland infantry need no urging to rush into the position formally occupied by the Fezian infantry. The gateway to the South of Firmopoly has been opened.


In the North the Rusland infantry attempts to unsuccessfully force the Fezian trenches, aided by their artillery which is now in position. Still the Fezians cling on but casualties are mounting.


Bereft of the protection the trenches offer the retreating Fezian infantry attempt to fall back into Firmopoly but are caught in the open by Rusland rifle and artillery fire and destroyed as a fighting unit. The Cossacks overcome the last of the Fezian cavalry as another Fezian infantry unit moves into position to stem the attack.


Disaster in the North! Perhaps stunned by the rapidly mounting casualties the Commander of the main force fails to order a single unit except for his artillery. The battered infantry in the centre remain halted and stoically await their fate....


....They did not have to wait long and the end was as swift as it was merciless at the hands of the battered, but unbowed Fezian infantry.


In the South of the village a gallant unit of Fezian infantry found itself assailed by artillery, Cossacks and infantry and despite driving off the Rusland infantry with losses, was overwhelmed and destroyed.


In the North the Commander seems to have regained his nerve and two fresh battalions of infantry move up to assault the Fezian position. This time though, not only are the defenders tired and weakened but the attackers are remaining just out of range, in effect pinning the Fezians in their trenches. All the while, the Rusland artillery continues to batter the trench line.


Endgame. In an attempt to stave off defeat Pasha Ali moves a unit of infantry out of the Northern trenches to bolster the defence. It is too late. The second unit of Cossacks breaks into the town and the Rusland artillery engages the Fezian guns on the hill. The last of the Southern Fezian infantry is put to the sword and the Rusland infantry under Pullitov head for the village at top speed.  


With the defences in the South breached and the Northern trenches undermanned and battered by artillery it is only a matter of time before Firmopoly falls. With a heavy heart Pasha Ali offers his sword to Count Pullitov and surrenders. Firmopoly has fallen.

Aftermath

The final score in the final turn was 16 to 15 so the Fezians took the result right to the wire. In fact, it was only the artillery that saved the Ruslanders in the final turn with the casualties that overtook the Fezian score.

The Rusland Northern attack struggled with a succession of poor command rolls and so was quite laboured. As a result many of its units were targets for most of the game and unable to reply to their Fezian tormentors. Once the artillery was in place this helped enormously and so the Fezian infantry in the trenches were gradually being worn down over the course of the attack.

The Rusland Southern attack went off pretty well although also suffered from some poor command rolls. Luckily the artillery was on hand to help out and the morale collapse the Fezian infantry suffered (two flag results - they could ignore the first but had to use the second) was also a significant factor which the Ruslanders exploited gleefully.

In both cases the uncommitted infantry units (four battalions in all) would be able to swiftly move into Firmopoly and ensure that any resistance was overcome.

The Fezians did all that could be expected of them really although a bolder commander may have tried to drive off the Southern attack whilst the Northern assault was stalled - as Pasha Ali later dryly observed, Napoleon may well have thought of such a thing - the strategy of the central position - but he was no Napoleon.

Count Pullitov was decorated for his exploits but passed over for promotion initially due to the number of casualties his force suffered and how close he came to defeat.

Of Firmopoly itself after some routine ransacking and looting (especially by the Cossacks who were extremely keen to get into the town for this very reason - not from any sense of martial necessity!) the Rusland army fell back to the frontier and home. Pasha Ali was paroled and feted as a hero across Fezia for his gallant stand against the might of Rusland. He was recalled by the Sultan, awarded the Order of the Golden Heron, and is now a military adviser.

I am sure we will hear of these worthies again in due course but for now it is enough to know that whenever men speak of war and martial prowess the great battle of Firmopoly is sure to come to mind.


Thursday, 7 March 2013

"Go tell the Fezians"....Game Number 33, Part 1

The Rusland invasion of Fezia in 1900 was in actual fact little more than a large scale raid. No territory was ceded and whilst the damage to the local Fezian economy (wholesale burning of the Pomegranate crop and driving off of much in the way of livestock) was considerable the hardy Fezian peasantry swiftly recovered - aided by various government subsidies and 'considerations' from local businesses - most of whom were of foreign extraction in any event. The matter would have gone largely unnoticed on the global stage as this type  of affair was a routine occurrence along the border but for the heroic Fezian resistance to the invaders at the village of Firmopoly.


The life-blood of Firmopoly - the Pomegranate

The village had been there for centuries and was relatively prosperous in Fezian terms. The reason for its modest wealth was the simple fact that it controlled the famous Wooden Door road; the only route through which the local farmers could safely transport the all important Pomegranate crop to the coast.  The road was named after the two timber doors that controlled both the entrance and the exit to the village via the road. Originally the points of access to the stretch of the road that lay within the village walls were to have been fitted with strong iron gates but sadly the governor had overindulged his rather expansive mistress with the funds for the project and so insufficient remained to complete the works as planned. Instead a pair of rather flimsy and lightweight wooden doors were mounted instead. The locals, with their collective tongues firmly in their cheeks christened the thoroughfare the Wooden Doors road and so the name stuck. Not long afterwards the Governor met with the Sultan's displeasure (rumours abounded of bow strings or the old 'sack thrown in the Bosporus at the dead of night' routine - either way he was never seen again) for his obvious embezzlement of government funds and was hastily removed from office. The wooden doors were never replaced though. With the village seemingly a secure and safe haven for all manner of farming business it was not long before a roaring trade in Hammams, coffee shops, locally produced Firmopoly Fezzes and stabling for sheep, camels, goats and wandering Mullahs grew up, despite the walls of the town being slowly demolished over time as the locals made use of the masonry for houses, animal pens or the occasional stoning. The locals reasoned that as the wooden doors would not stop a strong wind, let alone an attacking army, it made little sense having the walls, so, piece by piece, they were reduced. The infamous doors went as well, rumoured to have been used as firewood by gangs of local brigands.


A typical Fezian gang of Brigands - the infamous Bashi-Bazouks

At the present time the walls have all but vanished and the only stretch that is still visible (and this was only due to the fact that the masonry used along this section was of very poor quality - the money for their construction was beginning to run low at that point) runs parallel to the road itself. For a long period of Firmopoly's history this section of the wall was used for public executions but is no longer used as such as it was deemed unsafe (?) by the Sultan's Health and Safety Officials. Once the walls were closed down enterprising Fezians have taken to giving guided tours of them by camel - complete with sherbet and complementary camel kebab (a local delicacy) - to any passing tourists for the inevitable 'consideration'. The guides take an almost ghoulish delight in describing just whom was executed where along the walls, ending with the tale of Ibrahim the Unlucky - who was executed by impaling for stealing the Imams favourite sheep but then cleared on appeal by his family....


A lithograph of Pasha Ali

At the time of the Rusland invasion a new governor had recently been appointed and had immediately began to bring the place into some kind of order - both from a law and order perspective and, more importantly, a military one. Pasha Ali the Unprincipled was a thoroughly odious individual, much given to gluttony and drunken debauches to the continual horror and righteous indignation of the local clerics. He was a short, rather fat individual with a greasy black beard and a swarthy complexion to match. He was always sweating profusely and so used copious amounts of lemon cologne in order to ensure he was suitably fragrant when  he was, ahem, entertaining guests. Despite having the look of an all in wrestler gone to seed he was no mean commander and although his endless requisitions were the subject of many mutterings in the Hammam, the locals knew that once they had 'broken him in' to the local way of life things would be soon be back to normal. It was always the way when a new man appeared to take charge and was keen to make a name for himself. As the local Fezians would have undoubtedly observed, he merely needed an old head on his young shoulders to be at one with the local way of doing things. The reality was that as long as Ali was given due 'consideration' for his efforts he could be tolerated as merely objectionable rather than downright disgusting.

Aside from taxing everything in sight Ali also organised the defences for his command. Initially this was merely to find work for local ne'er do wells but the reality was he depended on giving out selected defence contracts for the sole purpose of obtaining additional 'considerations' from the local construction industry.

The Rusland inavsion though, was to be Pasha Ali's finest hour - at least he hoped it would as he had made a mint from the locals and had just received news that the Sultan's auditors were en route to check the books so anything positive to report and preferably legal would be most welcome. Ali could only hope that Rusland would come first. He was not to be disappointed.

Due to the rather relaxed border policing of the region it was very common to find people on the wrong side of the border for a variety of reasons; some legitimate, many less so. Theft and sheep rustling was a common, almost everyday way of life on the border and as long as no one side had the better of this rather relaxed arrangement the status quo was happily maintained. This was about to change though when a local Fezian brigand, Mehmet the Outrageous decided that he was going to go into the people rustling trade rather than with sheep. Especially young men, for sale to various harems across the empire. The lot of these captives would probably seem to be a good one given that most harems contained more women than any man could reasonably keep, ahem, entertained; the truth though was very different. They were worked to death and although showered with expensive gifts and clothes were expected to be available at a moments notice to serve and please their feminine masters. They were slaves in all but name.


Mehmet the Outrageous at rest in Cairo

Mehmet the Outrageous used to be one of those slaves but was able to save up sufficient money to be able to buy his freedom - at least that was his story, the truth though, was that the master of the house in question grew tired of his harem continually going on about how good he was and so kicked him out - after a due 'consideration' naturally.

After several successful slave gathering expeditions Mehmet decided to move on and duly did so but the Rusland government angrily demanded that Fezia surrender this rogue into their custody for a fair trial (and inevitable execution of course). Fezia refused point blank stating that as he was technically an outlaw and had yet to be apprehended by them how could they be expected to surrender him? Fezian policing was not of the highest order and so the likelihood of Mehmet ever being found was extremely remote. Mehmet was blissfully unaware of this international furore as he was on a recreational tour of the fleshpots of Cairo at the time. He will appear on the stage of Fezian affairs again; you can be sure of that point.

Feeling slighted by Fezian indifference Rusland resolved that her traditional enemy would be made to pay for her insults. The only problem was that the Czar could really not afford a full scale war. It was decided then, to invade Fezian territory, destroy what property could be reached, ransack a few villages and drive off some flocks and herds. The nearest town in reach was the small village of Firmopoly.

Firmopoly itself sat at the end of valley with hills and pine forests all around. The Wooden Door road skirted the western side of town with the remains of the wall running alongside it and set back from this is the start of the hilly and wooded wilderness. There are a few goat tracks known to the locals but to outsiders the whole region is a dark and forbidding place. Any attack against the village would have to come straight down the main road. Pasha Ali had gotten wind of the Rusland intention to invade from a passing traveller and so had immediately notified the Sultan's advisors. He knew full well that it would be an age before help reached him so resolved to make sure that the place was as secure as possible - not for any great love of the villagers, rather because he still had yet to collect the Pomegranate tax (or rather his 'consideration' due from the same) due in the next few weeks.


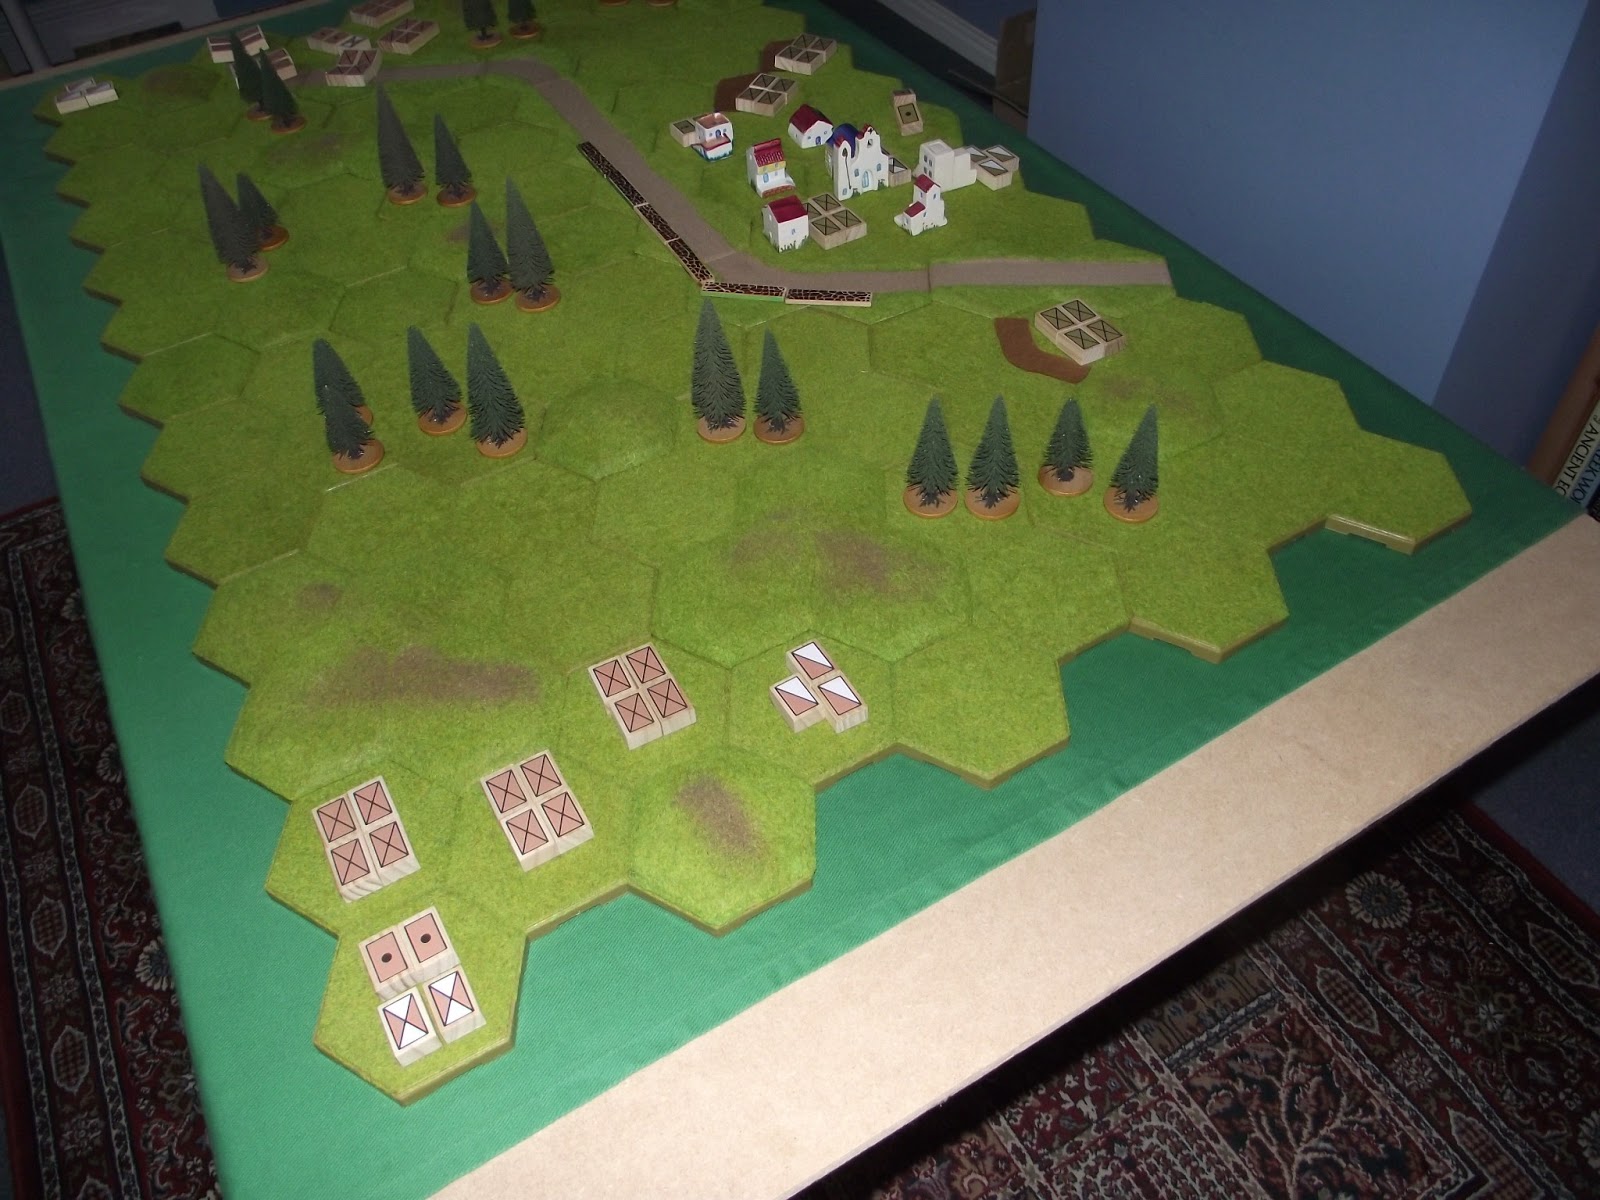
The village of Firmopoly viewed from the south and showing Pasha Ali's initial dispositions. Note the trenches to the north and the remains of the wall alongside the road. The original 'Wooden Doors' were located at either end of the remaining wall. Just out of the picture to the south was the smalle trench containing a single battalion of infantry. The artilley is on the hill and the machine guns are in the northermost building in the centre. Pasha Ali's command post was at the foot of the hill in the village centre.

To defend Firmopoly Ali could call upon four battalions of infantry, a regiment of cavalry, a battery for field artillery and a machine gun company. The village was fairly well protected as parts of the old wall still remained although these were in very poor repair so he set about entrenching where he could - mainly to the north of he village covering the open ground and also to the south. The detachment in the Southern entrenchment was deployed for use as a rearguard in the event of anything untoward happening. It was also Ali's insurance policy as these troops were deemed to be his bodyguard. He deployed his artillery on the small hill in the middle of the village so that it had a good field of fire and the machine guns with an infantry battalion in some of the outer buildings. The cavalry was in reserve and two battalions of infantry were in the Northern trenches; one battalion in the Southern.


Count Hugo Pullitov - from a portrait painted when the General was 76 years of age

The Rusland invasion force under the command of Count Hugo Pullitov consisted of eight battalions of infantry, two regiments of Cossacks and two batteries of artillery. Count Pullitov was the complete opposite to look at compared to Pasha Ali. He was tall and slim and invariably impeccably attired. His men lionised him and thus far his career had been one of continual success. He was confident and determined that this latest mission would follow a similar path. His orders were simple but, as Pullitov was an ambitious man, he wanted to achieve something really worthwhile in order to hasten his promotion and reassignment back to civilisation rather than being stuck on the border. He had managed to capture a disaffected Fezian shepherd who had revealed (for the inevitable, yes, you've guessed it - 'consideration') that a little used pathway led through the hills and woods to the west of the village, more or less to the back door of Firmopoly itself. This was all the encouragement Pullitov needed. If he could capture the village rather than just laying waste to the region then surely his talents would be recognised and a promotion sure to follow? His mind was made up and so he split his force into two parts. His own command would undertake the flanking mission and consisted of three infantry battalions, a regiment of Cossacks and a battery of field guns. The main force attacking down the Wooden Door road comprised five battalions of infantry, a Cossack regiment and a battery of artillery. Their role was to engage the Fezian to the North of the village and hopefully to draw in any reserves. Whilst that was going on he would sneak in via the back way and the village would fall (and with no little irony) like a ripe Pomegranate into his hands.


The flanking force under the direct command of Count Pullitov to the south of the village


The Rusland main body approaching from the North

It was early morning on May 25th, 1890 and Pasha Ali was taking breakfast with an old drinking crony, Count Ivor Abigabelli - the Italian naval attache, notorious rake and bon vivant; when a travel stained and weary Bashi Bazouk strode into the governor's chambers. "They are coming, the Ruslanders are coming!"

Pasha Ali looked up from his plate of Baklava, crumbs clinging to his beard, and reached for his mint tea. The air was pregnant with anticipation. Not a sound was heard, only the laboured wheezing of the Bashi Bazouk and the slup of mint tea. Ali gestured to the duty officer. "Stand the men to and tell them to breakfast well, for tonight we dine in hell! " Abigabelli summoned his personal assistant and dictated a telegram on Ali's behalf (by this time Ali was making sure he breakfasted well and so reached for his second plate of Baklavas). It was difficult to think of the right words so he settled for something suitably heroic and with the sentiment that would echo down through the ages (or at least until the evening papers came out).

"Go tell the Fezians, he who passes by,
Obedient to Pasha Ali, here we lie!"


Wednesday, 6 March 2013

The Telescopic Wargame or Commanding the Level


Guess the level of command being represented - no prizes on offer though!

This post is very much one of a rambling nature for which I apologise in advance but it may serve to strike a chord in certain quarters.

Some time ago somebody posted a simple boardgame on a free wargames rules website as a joke. The game was based on the Battle of Gettysburg and consisted of two counters - one for the Union and one for the Confederates. Essentially each player rolled a d6 and the winner won the battle. As I recall there was no mention of anything in terms of tactics, terrain, commanders or any of those things that wargamers set such great store by. Essentially you a dice and won or lost the battle. I was amused to see this at the time but it did stop to make me think about levels of combat and how we game them.

Our hobby has rules available for everything from single figure skirmishes up to galaxy-spanning wars and pretty much everything in between. I have been thinking about this a lot over recent days as my plans for my Middle Eastern project begin to take shape. To further aid the thought process I have been in regular contact with Bob Cordery and more latterly with Tim Gow over matters Megablitz/Memoir '44/MOMBAT related and the upshot is that I want to be able fight actions where my models are used for higher level formations than they would appear to represent as well as using them for a conventional tactical level game.

Taking Memoir '44 as a very good example the combat units in use can represent anything from a platoon to a battalion or even a brigade. The combat mechanics do not change but because the gamer has almost been pre-conditioned into the appropriate command level by the scenario notes they are quite happy with this apparent inconsistency. Ordinarily though, one would not expect a platoon level game to be fought in the same way as a battalion or even higher level action. Logic dictates that the considerations required by a platoon commander are different to that of a General.

Megablitz by Tin Gow is pitched very firmly at the top end of the scale in terms of what is representing what. It is a system for tackling actions involving divisions and even corps so the lower level tactical detail can be happily ignored - it is simply not relevant to the scale of action being fought.They are a fusion of board and war games methodologies with the added bonus of using models and of being able to make use of a lot of table space when needed!

One of the problems I have had with the Memoir '44 series of games is the fact that whilst it is a good game (and speaking as someone that has pretty much most of what is available for the system - not the carrying bag though....) of war it is not a war game in the sense that most wargamers would understand. Although the higher up the command chain you go, the greater the distance from the purely tactical nature of decision-making; it is safe to say that Memoir '44 does not handle the lower levels particularly well, being too abstract in its approach. I would point out that the various expansions released in the series have attempted to address this (either consciously or coincidentally) with varying degrees of success.

Bob has tinkered endlessly with variations of both the WW2 and ACW/late 19th Century and these have worked uniformly well - if the number of actions I have fought using these is any gauge of success that is!
What Bob has achieved is to turn the system into what is essentially a tactical game, albeit pitched at up to the divisional level.

Now here's the thing. Supposing one wanted to game a WW2 battle at the operational level (using brigades, divisions or even corps) using models and a hexed grid, how would you do it? What would you need to consider in respect of rule mechanics at the command level being gamed?

What indeed.

The first thing that stuck me when I opened my copy of Megablitz a couple of days ago (after, I must confess, they had been sitting in a rules file for, ahem, a number of years....) was the way that strength points are calculated for individual units. Straight away I thought, hang on, don't you ordinarily use strength points for most of the rules you routinely use - MOMBAT and Portable Wargame to name but two sets?

Why not use the Megablitz method for creating actual units to be used within a Memoir '44/MOMBAT setting? This would serve, in one fell swoop, to formalise the units used and so by default define the command level being used. You will end up on a 13 x 9 hexes grid and probably around a dozen or so units give or take. Coincidentally, the Command and Colours system routinely has normal scenarios with a dozen or so units a side - but with the crucial definition of the level of command being gamed usually absent. This is not an oversight; it is a specific function of the game system - the 'blurring' of command level definition. The rules are designed on a 'one size fits all' approach.

My own thoughts on this subject fall into two camps. If I am playing a game at the level that requires tactical thinking then I want a set of rules that address the tactical problems faced on a battle. For me this means I want to be able to make use of cover; I want to deploy machine guns and mortars and I want the tangible differences between, for example, tanks, to be addressed. Similarly, when fighting an Operational level game I want those considerations mentioned in the tactical game to be of much lesser importance as my concern is in the command of a higher level formation. My priorities are different and so the rule set should be as well.

I believe that it is possible to use a hex based system for fighting games at both of these command levels - tactical and operational - and so while the tactical side has been 'nailed' in respect of Bob's MOMBAT series of rules (certainly to my satisfaction for the most part) my thoughts are heading towards the upper echelons of command and this where the concepts behind Megablitz and also Hexblitz (you will need to check out Bob Cordery's blog for this as for some reason I am unable to add any links today!) will come into play.

As for the opening of this post and the 2 counter ACW game - if that is the level of command the designer wanted to address then he has come up with a very slick and fast play mechanism.

Somehow I can't see it catching on though....;-)


Sunday, 3 March 2013

Memoir '44, Megablitz and the 'Bigger Picture'


Memoir '44 - from the stable of Richard Borg and part of the Command and Colours series of games

It occurred to me whilst I was fighting Operation Market Garden (I refuse on principle to abbreviate this to OMG....) that the scale at which I was fighting made a nonsense of thinking about purely tactical considerations. All of the features that are so important at a tactical level - cover, positional awareness, equipment and training (and command of course) etc, are less so when one moves up the command level. Consider the action I just fought as an example. Taking the British Airborne at Arnhem as the benchmark the scenario had 6 units of 4 infantry figures that were accorded 'special forces' status. This meant that they were able to move 2 hexes and battle rather than just the one. They also had the use of a special rule being British and Commonwealth troops that were able to battle back when reduced to a single figure.

In the game itself there was no mention of machine guns, PIATs, supporting mortars or anti tank artillery. All of this is swept up into the 'infantry unit' category employed by the game. That is fair enough and I have no problem given the scale of the action being played. Major terrain features played a part but none of the stone wall, hedge or reverse slope so beloved of hull down tankies or Napoleonic British in Spain. Our considerations are at a much higher level.

So this got me thinking.

If the games that I want to play are pitched at what can only be described as the Operational Level (the movements of brigades and divisions rather than platoons, companies and battalions) why do I need to worry about such things as battalion support machine guns, mortars or anti tank guns?

The simple answer is that I do not. I only need to consider representing infantry, artillery and vehicles of varying types because all the smaller stuff should be absorbed in the greater scheme of things.


Megablitz by Tim Gow - doing exactly what it says on the tin, or rather, cover....;-)

This line of thinking then led me to look at my much thumbed (but sadly never used) copy of Megablitz, by Tim Gow of Megablitz and More fame.

These rules are designed to fight large actions during WW2 and use, as an example, a base of a few infantry figures to represent a battalion. Support weapons feature if they are present in a large enough concentration to be worthy of inclusion - so forget anti tank rifles and such like or section light machine guns! This is heady stuff, at least it is for me.

The rules represent a fusion of traditional wargame and boardgame mechanics so in effect, you have what is essentially a free table board war game. Which is coincidentally the type of game I spent most of last year fighting, albeit on a grid and with wooden blocks. Taken to its logical conclusion both of these systems represent a level of war game that for me has the most appeal - the operational art of war.

I have a feeling that I may have just answered a very long and complex question of what I do and how I do it. I think that Memoir '44 has the operational level of war game pitched at the right sort of level but in a highly abstract and, dare I say, 'gamey' way. I now believe that very few tweaks are needed to make the core rules much more wargames like in their outlook and indeed, the various official additional rules added in the various expansions during the life of the game reflect this.


7th Armoured Division, Megablitz style - from the enormous collection of Tim Gow

The picture above says it all really - this is a complete armoured division in 20mm for use with a set of rules that are designed specifically to present the gamer with the challenges faced at that particular level of command.

That is what I want to do and that is how I am going to tackle the Middle East project from the point of view of the command level to be fought at.

Bring it on I say - or rather, roll on Skirmish for the rest of my 20mm kit!


Saturday, 2 March 2013

Operation Market Garden....Game Number 32, Part 2

The game was fought using primarily Memoir '44 rules but with Bob Cordery's solo adaptation from his Memoir of Modern Battle (MOMBAT) version. I use the oversized scenario map and the playing pieces from the base game and the Mediterranean expansion.

Rather than a turn by turn breakdown of what happened I will instead adopt the essay route - simply because the game did not seem to photograph particularly well - probably due to the use of the 2D map and hordes of rather unpainted plastic. Also, the sartorial elegance of the British could be called into question as in retrospect, using the 8th army to represent 1944 vintage European theatre troops may have been a mistake....;-) Nevertheless, a few selective pictures are included, to highlight some of the more memorable incidents.

The Dutch-Belgian Frontier, September 1944

 The paratroop and glider-borne infantry had landed and so it was the turn of 30 Corps to start the great charge up to Arnhem bridge. Almost immediately, the leading tank units came under fire from the defending Germans although to little effect. The greatest problem the British had at this end of the assault area was that they were very slow to get going - or rather the dice meant that the infantry was in danger of arriving at Arnhem in advance of the tanks. When they did start rolling the British immediately sent two tank units straight down the road, completely ignoring the defending Germans.


30 Corps on the move with the 101st in action against the Germans near their drop zone and in the suburbs of Eindhoven. The 82nd Airborne (top left) are busy sorting themselves out whilst the Germans reinforce Nijmegen.

The 101st Airborne was quickly in action, clearing their drop zones of Germans, thereby securing their position prior to moving off into Eindhoven. the Germans were disorganised and attacked piecemeal and so were easily driven off by the Americans.

The 82nd landed but took some time to form up (lots of 'armour' dice or 'no order' scores rolled) which allowed the Germans to reinforce their positions prior to the battle commencing - it would be a tougher fight than envisaged.

Meanwhile at Arnhem Bridge, the British successfully managed to not only occupy the town but also to send a unit over the bridge so that both ends were secure. The Germans on the drop zone were speedily dealt with; as was most of the infantry that the Germans were able to send against the Red Devils. The armour however, would be a different matter.


The British in Arnhem - note the unit across the river and the two units on the drop zones at the foot of the picture. The German armour is about to roll!

The leading tank units from 30 Corps managed to travel, more or less unopposed up to the great bridge at Eindhoven with their infantry following at best speed, mopping up Germans as they went. the lead unit engaged some Germans actually on the bridge itself and with a truly inspired dice roll destroyed them entirely - the road to Nijmegen was clear. Although the American 101st was hotly engaged with the defending Germans in the central sector it was touch and go. The gallant paratroopers were managing to keep the road open and were holding their own against the German infantry but the again, the armour would be different matter - as the leading British tank unit found out as it was engaged with disastrous effect by a marauding unit of Panzers.


The British tanks make it to the bridge at Eindhoven - blowing the blocking Germans away!


Retribution from the German Armour is swift....

The 30 Corps infantry comes under attack from another unit of German tanks but the Allied breakout is at last beginning to roll en masse.


30 Corps struggle to keep moving in the face of numerous German spoiling attacks - note the attacking tanks  at the top of the picture.

The 82nd have been having a thin time of things and are struggling to get into action against an enemy that is rapidly growing in strength. The British airborne are quite settled in Arnhem and most German infantry attacks have been beaten off although with losses. The German armour though, is beginning to threaten - can the gallant Red Devils hang on?

Across the whole length of the battle area the casualties are mounting for both sides but critically so for the Germans. The Panzers have been sent in in penny packets and the infantry have been thrown in as soon as they have been able to, with little coordination and piecemeal. The Allies have yet to secure the Nijmegen or even the Eindhoven bridges although Arnhem is quite secure for time being.


The 101st fighting hard against Eindhoven with 30 Corps tanks just appearing on the right whilst the 82nd on the left begin to tackle Nijmegen

At last the breakthrough is made as the 101st manage to clear their sector of Germans that are immediately available to attack. Likewise, the 82nd have managed to engage the Germans in Nijmegen and have begun to prevail. At Arnhem though, things are about to get a whole lot trickier as the tanks finally put in an appearance.


As the 82nd drive the Germans from Nijmegen (top right) in a series of fierce and brutal fire fights the SS Panzers attempt to blast their way into Arnhem.

The Panzers attempt to blast their way into Arnhem itself but despite destroying two of the understrength units of British Paratroops can make no further headway. They lack sufficient infantry to make the attack count and even the imminent arrival of a unit of Tiger tanks makes little impression on the gallant Red Devils.


Eindhoven and Nijmegen at the point of being secured - 30 Corps are now able to charge at full speed to Arnhem.

With the fall of Nijmegen the Allies have managed to secure the 13 medals required for victory. The corridor from Belgium to Arnhem is virtually clear so 30 Corps will be able to rush to the aid of the beleaguered Red Berets, thereby securing Montgomery's back door route into Germany.

Perhaps the war would be over by Christmas after all.

Aftermath

I enjoyed this action enormously and would love to tackle this as a pure Memoir '44 game against a live opponent. It was touch and go from the start and it was only the fact that the Germans took such horrendous casualties for little reply that swung it in the Allies favour. 30 Corps and the 82nd Airborne were very unlucky with their activation rolls whilst the British seemed to be unable to make a bad dice roll the entire game. The Germans paid the price for attacking with too little and too often - massing a meaningful strike force may have been a better idea for them but their reaction to having a countryside full of Paratroops this may perhaps have been understandable. The Allies were for the most part concentrated and this is a definite advantage when the shooting starts.


Friday, 1 March 2013

Having the Courage of Somebody Else's Convictions


Rather fetching 1/1200th scale models from the collection of Tim Gow of the WW2 German Battle Cruisers Scharnhorst and Gneisenau in their projected 6 x 15" configuration

It is no secret that for the most part my painting technique when it comes to wargames models is firmly rooted in the 1970s. I still use Humbrol enamels over a white undercoat and to be honest, feel very comfortable doing so.

Which probably explains why it takes me an age to paint anything....;-)

I have made use of acrylics for metals and have been very happy with the results - actually relieved is probably more accurate as varnish does not tend to lift acrylic in the same way as even supposedly dry for three weeks old enamel paint! My only nod to modern techniques has been the occasional use of drybrushing or ink washes. I used both of these techniques when painting up some Battlefleet Gothic space ships many moons ago rather successfully - so much so that the chap at the club who purchased them from me (who is incidentally, a top drawer painter and modeller) merely added a few items of detailing to them and happily used them more or less as I had finished them.

I must own around 300 tins of Humbrol and perhaps a couple of dozen acrylics and so for reasons of economy I plan to continue with my Humbrols - at least until I get a job in any event.

What I am doing though, is planning to radically change my painting technique.

Many gamers I know use a black undercoat on the basis that if the top coat misses a bit then you have an instant shadow effect. I have always been a little wary of this - mainly because my eyesight would struggle with the smaller items of detail against a black backdrop. However, and I have to doff my hat to Tim Gow of 
Megablitz and More for the idea, I am now converted to using such a black undercoat.

It came about quite by chance. I had undercoated the dozen light cruisers I had mentioned previously in white and had painted the areas of wooden decking prior to painting the grey. Some of the detail on the models (especially midship gun mountings of the Magdeburg class) is a little awkward to get at with a brush so I planned to give the areas in question a thin black wash in order to give some shade and depth. I overdid it, massively.

The end result looked like an oil-slopped mess so I was faced with the choice of starting again or trying the technique that Tim uses to such good effect on his ship models (as evidenced in the picture above), namely a black undercoat with a the top colours drybrushed on.

Now I know that Tim uses acrylics and a technique he calls 'wet dry brushing' but I was attempting this with enamels.

(Pauses for a sharp intake of breath and a long roll of drums)

I tried it and it works - beautifully! The class of ships have had their first grey drybrush and all I will do now is to add a fine lighter shade drybrush for the highlights. The areas of wooden decking will probably need to be block painted as they are very small (we are talking about light cruisers after all) although I will try brushing them first.

I hope to have these finished over the next few days - complete with the bases, names and ensigns.

I am really pleased I tried this and the big plus is that painting the ships will now be a much faster process - once they arrive from Stonewall, that is.

Many thanks for the idea Tim, much appreciated and I only wish I had tried it sooner!


Thursday, 28 February 2013

Operation Market Garden....Game Number 32, Part 1


The map for Operation Market Garden

The first game of the new year to be held in the man cave will be based on the Memoir '44, Richard Borg penned large scale scenario depicting Operation Market Garden. The set up will be as per the scenario map but I shall be using Bob Cordery's Memoir of Modern Battle rules with the rather neat solo option of rolling the dice to determine which units you can order.

I am using the playing pieces from Memoir '44 which means the Germans and the Americans will be out of the base set (of which I have two copies) and the British will be, rather uncharacteristically, from the Mediterranean expansion set - so this will mean infantry wearing shorts and Crusader tanks....;-) I chose to do this because it will help the identification process. As far as the number of dice to be rolled in order to determine the units that can be activated is concerned I am using the system suggested by Bob in that units with a good commander roll 6 dice, average is 5 and poor is 4. The units have been subdivided as follows:

  • Each Airborne division has 6 combat dice
  • 30 Corps has 6 command dice
  • German Belgian Border units have 4 combat dice
  • German Eindhoven units have 4 combat dice
  • German Nijmegen  units have 4 combat dice
  • German Arnhem units have 6 combat dice
The low numbers reflect the chaotic condition of the German defenders and for the Airborne units the value of superior training and the element of surprise. Should an Airborne formation lose a complete unit then the number of combat dice drops by one for each unit down to a minimum of 4 dice. The corresponding Germans then add an additional dice, up to a maximum of six.

I have borrowed the victory conditions for the scenario from the scenario itself (13 medals granting victory) and also a couple of the special rules - special forces for the Paratroops, inflatable boats for the 82nd and special road movement rules.

I plan to run this tomorrow (Friday) and of course the after action report will follow on the blog in due course.

"This will be a tale to tell your grandchildren - and mightily bored they'll be....'