
A closer view of the scene at the end of the second turn. The U.S.S. Metacomet (carrying her ensign on her aft gaff spar) is about to be battered by the Confederates from three directions whilst the leading Rebel gunboat - the C.S.S. Gaines - is about to receive a full broadside from the U.S.S. Hartford. Meanwhile the Union monitors are about to further engage the fort.
In the previous post the respective plans of the two fleets were outlined and it is safe to say that the old maxim of ‘no plan survives first contact with the enemy” is about to be ably demonstrated!

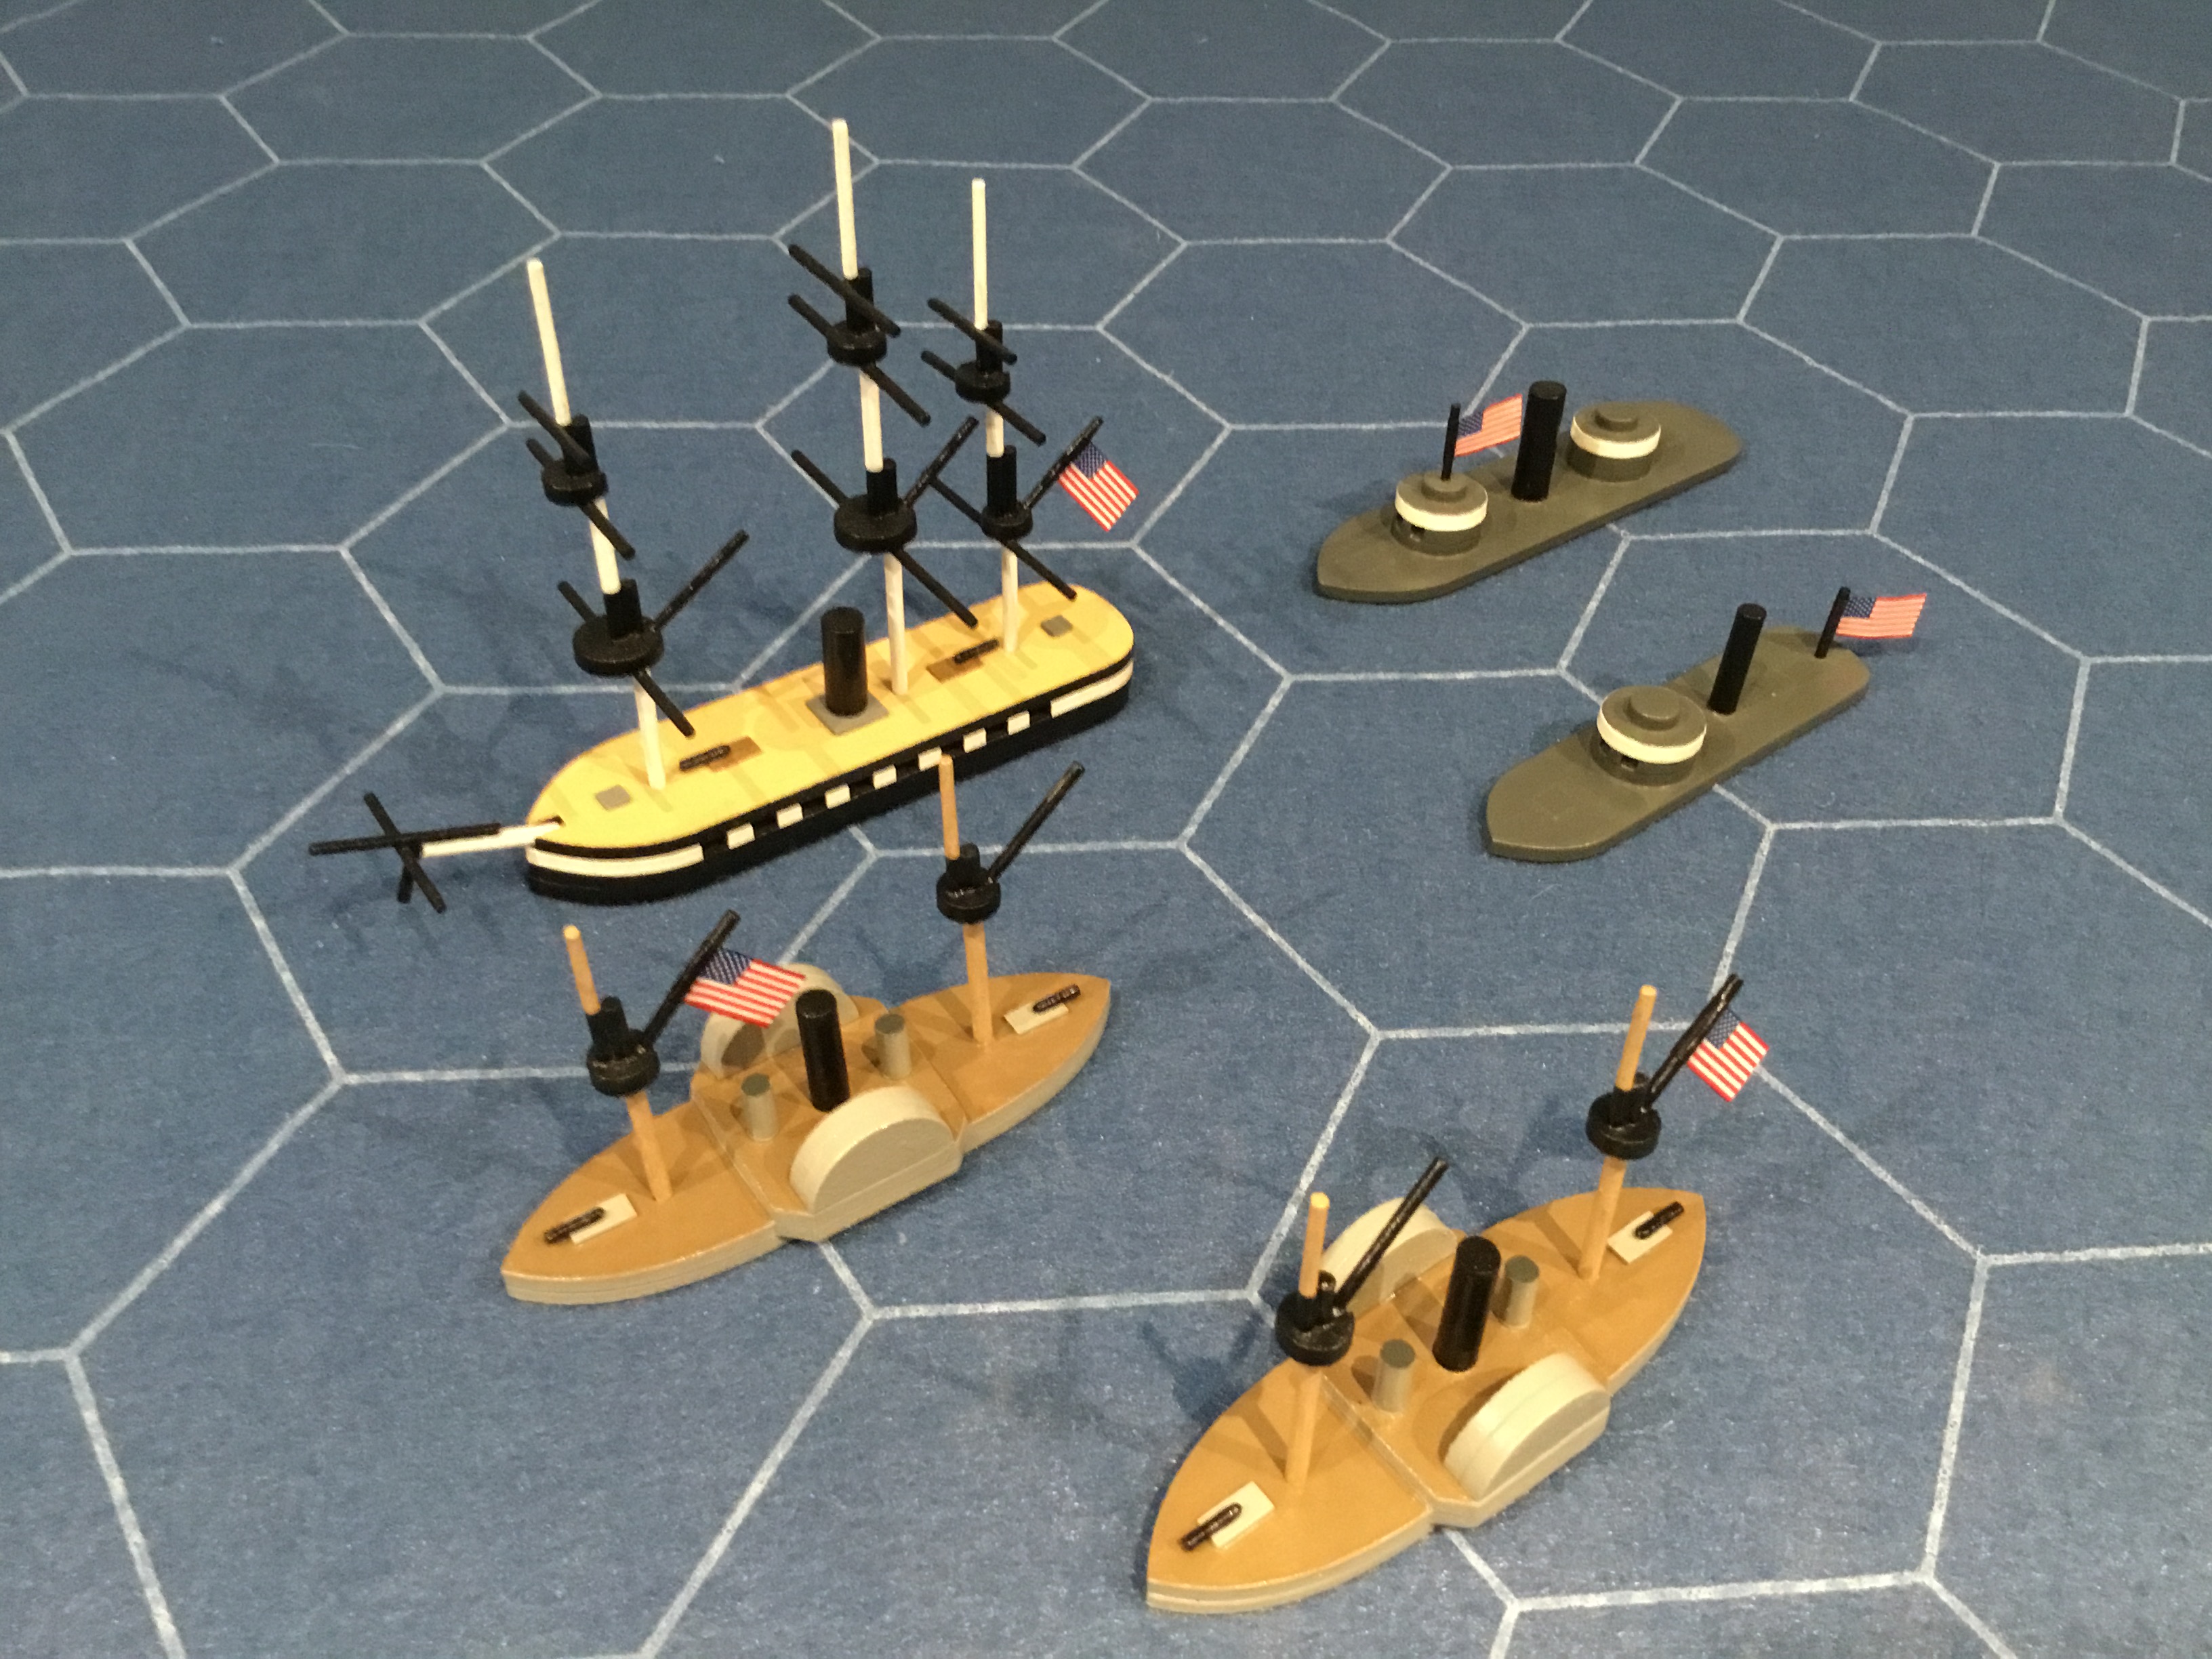
The scene at the start of the action. The Union forces are approaching from the left whilst the Confederates are on the right. Both sides are operating in two divisions.
Turn 1. There was no firing from either side and the Union player was deemed to have the initiative as the attacker and so opted to move first.

The situation at the end of the first turn. The two Union monitors (U.S.S. Tecumseh and U.S.S. Winnebago) are approaching the fort whilst the flagship (U.S.S. Hartford steams directly to the centre of the channel. Her two escorts - the U.S.S. Sassacus (off the bow of the flagship) and the U.S.S. Metacomet (off the starboard bow of the flagship) have raced ahead to secure the centre f the channel. The Confederates are looking to engage the central Union force from what looks like both sides.
Turn 2. Both sides opt fire where they are able. The Confederate C.S.S. Gaines engages the U.S.S. Metacomet at a range of two hexes with her FW 2/3 artillery. She rolls 1D6 to hit with no modifiers. She rolls a 5 meaning a single potential damage point. The Union ship has an armour factor of 0 so the Confederate damage roll will gain a plus 3 for the penetration factor. The roll is a 4 making 7 in total. That is two points of damage and a 1 in 6 chance of a second. The roll of 5 is too high as a 1 was needed. The Union ship fires back from her starboard broadside (rated 2/2) with a single D6 and scores a 4 meaning one potential damage point. Her penetration factor is 2 and the armour factor of the C.S.S. Gaines is 1 so the Union gains a plus 1 to the damage roll. The roll is 3 which with the plus 1 makes 4 in all or a single damage point scored against the Confederate ship.
The C.S.S. Selma opens fire against the U.S.S. Sassacus with her FW 1/2 artillery at a range of 3 with a single D6. The roll of 2 is a miss. The Union ship returns the compliment and scores a 4 meaning a single potential damage roll. The penetration (2) versus armour (1) is a net plus 1 so the subsequent roll of 3 with the positive modifier takes the score to 4 for a single damage point.
Both the Union monitors open fire at the fort. The U.S.S. Tecumseh rolls a D6 and scores a 4 for a potential damage roll. The penetration (4) and armour (3) give a plus one damage modifier overall but as the fort is classed as small there is a minus 1 applied so the damage dice is even. A 5 is rolled meaning the fort takes a single point of damage. The U.S.S. Winnebago opens fire with her forward turret. Her roll of 3 is not enough to register a hit.
The rolls for initiative are as follows: Union 6, Confederate 5. The Union opt to move first.

The situation at the end of he second turn. The Union monitors continue to move into a favourable position to bombard the fort. The twin turreted U.S.S. Winnebago moves around to open the firing arcs of both turrets. Meanwhile the two Union gunboats have reversed course and fallen into a line of battle but the Confederates have manoeuvred in such a way so as to have three ships heading off the Yankee interlopers. Unfortunately in doing so the lead ship - the C.S.S. Gaines - has found herself at point blank range under the port broadside guns of the U.S.S. Hartford. Ominously for the Union, the ship bringing up the rear of the snake-like Confederate line is none other than the ironclad the C.S.S. Tennessee.
Turn 3. All three Confederate gunboats open fire on the U.S.S. Metacomet - in each case using their respective broadside gunnery factors. The Union ship has an armour factor of 0. Starting with the C.S.S. Selma she has a factor of 1/1 so rolls a single D6 with a plus 1 modifier for the range of 1. She rolls a 3 which then goes to 4 so gets a single D6 damage roll at plus 1 for her penetration factor. She rolls a 6! This goes to 7 meaning that she gets an additional 1 in 6 chance for a further damage point. She also gets a single re roll due to the natural 6. This comes up with a 1 so no effect. The roll for passing 6 (remember the total was 7 hence the 1 in 6 chance of further damage) comes up with a miserable 2. Overall then, the U.S.S. Metacomet has suffered 2 points of damage but her ordeal has only just begun.
The C.S.S. Morgan opens fire at point blank range with her broadside of 2/1. Again, each D6 gains plus 1 for the range. The rolls are 3 and 4 which adjust to 4 and 5 or 2 potential damage rolls, each at plus 1. Snake Eyes! A double 1! Doubtless the crew of the Union ship are breathing a huge sigh of relief but they are not of the woods yet as the C.S.S. Gaines also opens fire with a single D6 at range 2. A 1! After a bright start the standard of Confederate gunnery has dropped off alarmingly - perhaps the gun crews were too astounded at the apparently foolhardy nature of the Union attack to aim accurately….
The final Confederate ship to fire was the ironclad C.S.S. Tennessee at the U.S.S. Sassacus at the range of 2 hexes. The guns of the rebel ship are rated at 2/3 so she rolls a single D6 to hit. A glorious 6! The quickly taken natural 6 roll is a 2 so no effect. She has two damage rolls each with plus 3 for penetration - this could get very messy. A 5 and a 4 are rolled, adjusted to 8 and 7. That is 4 points of damage already and a 1 in 6 and a 2 in 6 chances of further damage points. A pair of 4s means nothing extra. However, as the damage scored is one point in excess of the hull factor of the Union ship (which is 3) there is a roll on the critical hit table to be made, which comes up with a 1 meaning either one point off the armour factor or a damage point. As the ship is unarmoured a further damage point is scored making 5 in total.
Both the Union gunboats have taken heavy damage.
The U.S.S. Hartford opens fire with a full point blank broadside at the C.S.S. Gaines. The Union guns are rated as 4/2 and due to the range gain a plus 1 to hit. She rolls a pair of 3s and a pair of 4s which adjust up to a pair of 4s and a pair of 5s so four potential damage rolls are required. The Confederate ship has an armour factor of 1 so overall the U.S.S. Hartford gains plus 1 to each damage dice. She rolls a trio of 5s and a 4! These adjust up to a trio of 6s and a 5 meaning 7 damage points in total! There is also not one but two critical hit rolls to be made as the hull factor of 3 has been covered twice by the damage scored and then a further critical roll for reaching her penultimate damage point (eight points out of nine). The critical rolls are a 1, a 3 and a 5. The 1 is taken as armour damage so the rebel ship no longer has the benefit of any protection. Critical hit 3 is engine/steering and requires an additional D6 roll. The score of 6 means a permanent reduction of speed of 1 or costing 2 movement points to turn a single hexside. The Confederate ship opts to take the steering penalty which is duly noted on her damage chart. It is academic though, as Critical hit 5 is what sends her to the bottom due to a flood as a single damage point is taken immediately. As she only had a single point left for her, the war is over - at least it will be three turns as her sinking roll was a 3.
The U.S.S. Metacomet fires at the C.S.S.Morgan at a range of 1 with her 2/3 FW artillery. Each D6 gains a plus 1 for range. A 2 and a 3 are scored, adjusted to a 3 and a 4 meaning only a single damage roll at an overall plus 2 (her penetration of 3 against the armour of 1). She rolls a 2 which adjusts to 4 meaning a single point of damage is scored against the Confederate ship.
The U.S.S. Sassacus ignores approaching ironclad and instead fires at the C.S.S. Selma at a range of two hexes with her FW 2/3 artillery. She rolls 1D6 to hit scoring 4. Her damage roll is an overall plus 2 and she rolls a 6! This adjusts to 8 meaning a 2 in 6 chance of a further damage point. She rolls a 1! So in addition to the two damage points for the 6 she has an extra point AND a reroll for the natural 6, This is a 2 which adjusts to 4 meaning a fourth point of damage is inflicted on the Confederate ship in addition to which she will require a Critical hit roll (4 points of damage sustained against her hull factor of 3). The roll is a 2 meaning the loss of either a hull factor or a damage point. She opts to take the damage point meaning 5 points in total.
Fort Beauregard, ignoring the looming presence of a pair of Union monitors, opens fire against the passing U.S.S. Sassacus. Her artillery is rated 3/3 meaning she can use 1D6 at range 3 but gains a plus 1 for being a fort firing - being land based makes for a steadier and more accurate gun platform. She rolls a 5 which is adjusted to 6 meaning two potential damage rolls. She rolls a 6 and 4 which are adjusted to a 9 and 7 for her penetration factor of 3 against the 0 of the Union ship. This proved to be fatal. The four points of damage - 2 for each roll having passed 6 - are sufficient to sink the Union gunboat following on from the heavy damage she has suffered from the Confederate ironclad. There was no need to roll for additional damage rolls nor for any Critical hit. Her sinking roll was a 6.
Finally, the two monitors fired at the fort starting with the U.S.S. Tecumseh. Her 4/4 artillery at a range of two means that she rolls 2D6, each at minus 1 as the fort is small. She rolls a 5 and a 1. The 5 adjusts to a 4 meaning a single potential damage roll. She gains a plus 1 for penetration of 4 over the ‘armour’ of 3. She rolls a 5 which goes to 6 meaning 2 points of damage are scored.
The U.S.S. Winnebago opens fire with her forward turret at a range of three hexes meaning that she rolls a single D6, again at a minus 1. She rolls a 5, adjusted to 4 meaning a single potential damage roll. This is a straight D6 roll - 3 penetration against 3 armour - and she rolls a 4 for a single damage point.
The rolls for initiative are as follows: Union 2, Confederate 6. The Confederate opted to allow the Union to move first.

The situation at the end of the third turn. Both Union monitors are now in position to bombard Fort Beauregard although the U.S.S. Winnebago would have preferred to have been slightly further forward - the sinking U.S.S. Sassacus rather spoiled that idea! The U.S.S. Metacomet is frantically holding station whilst what looks like the entire Confederate navy is passing by her as if in review! Meanwhile the U.S.S. Hartford, having settled accounts with the C.S.S.Gaines is about to tackle the C.S.S. Selma although help is on the way in the shape of the C.S.S. Tennessee. Note the sinking markers around the U.S.S. Sassacus and the C.S.S. Gaines.
Turn 4. Sinking markers are removed. Both the C.S.S. Morgan and the C.S.S. Tennessee ope fire against the U.S.S. Metacomet. The C.S.S. Morgan fires at range 1 with 2D6 from her starboard broadside, gaining a plus 1 for the range. She rolls a splendid 6 and a 5, adjusted to 7 and 6. The natural 6 roll is a 3, adjusted to 4 meaning that she has five potential damage rolls and a further 1 in 6 chance for the 7 - this was a 3 so a failure. The five damage rolls are at an overall plus 1 per D6 - penetration is 1 opposed to armour 0. She rolls a pair of 1s which are immediately discounted, a pair of 3s and a 5 meaning there are now a pair of 4s and a 6. This is four points of damage which means two things. She has to roll for a Critical Hit for the damage and a further critical hit as she has reached her critical point. The critical hits are a 5 and 2 but the result is largely academic as the Flood critical hit - the roll of 5 - causes an immediate damage point which is sufficient to caused the gallant gunboat to sink in six turns (she rolled a 6 for her sinking rate).
The U.S.S.Metacomet ‘spitting her last breath at thee’, in this case the C.S.S. Selma. Opens fire at range one with 2D6, each gaining a plus 1 for the range. She rolls a 6 and a 4, adjusted to 7 and 5 with a natural 6 re roll - scoring a 5 which adjusts up to 6. This means five potential damage rolls and a 1 in 6 chance of a further point of damage - which is missed due to a throw of 4. The damage rolls have an overall plus 2 modifier. The dice come up with a pair of 3s, a 4, a 5 and a 6. These are adjusted to a pair of 5s, a 6, a 7 and an 8. That is a truly spectacular eight points of damage - even before after 6 damage rolls (which are a 4 and a 5 and so both failed). The C.S.S. Selma has been sunk and unsurprisingly, given the battering she has just received rolls a 2 for her sinking rate.
Fort Beauregard opens fire against the U.S.S. Winnebago at a range of three hexes so rolls a single D6. The roll of 2 is not enough to score a hit. U.S.S. Tecumseh fires with 2D6, each at a minus 1. Annoyingly she rolls a pair of 4s which are adjusted to 3s. The U.S.S. Winnebago opens fire with both turrets at range three and so rolls 2D6 each at minus 1. She rolls a 6 and 4 meaning 5 and 3 or a single potential damage roll at evens. She rolls a 4 so scores a single point of damage.
The rolls for initiative are as follows: Union 2, Confederate 5. The Confederates opt to allow the Union to move first.


10 comments:
David,
Wow! That was some battle!
This looked like it was the biggest battle that you have fought using these rules … and it seems that they worked as well as one would have hoped.
I love the look of your models; easy to recognise what they are and robust enough for wargaming use.
I assume that if it was part of a campaign, troops would be landed to occupy the fort. That would certainly be the sort of combined operation that often took place during the ACW.
All the best,
Bob
Excellent. And a belated Congrats on publication of the rules! I have a copy gradually making its way to me as I type.
Hello there Bob,
It was a real Pell-mell type of action and the level of chaos felt wholly appropriate for the period! I like the inbuilt frustration of using long range artillery fire - quite often a single D6 - with only a few larger calibre weapons and the vulnerability of wooden ships to such weaponry. It all felt quite believable with the all important period ‘flavour’.
The models are very much fit for purpose and the enjoyment I have gained through building them has been immeasurable!
It certainly gave me a boost and I look forward to completing the remaining models before thinking about the next naval adventure.
All the best and thanks,
DC
Hello there El Grego,
Great to hear from you old chap and a Happy New Year to you! Many thanks indeed - both for the congratulations and for getting a copy - and I hope you enjoy the book. If you have any questions abut any of it drop me a line and I will be delighted to help.
All the best,
DC
A fine looking action, David - and had the right 'look' of the Mobile Bay battle. It might have been fun to see USS Tecumseh 'try' the minefield...
I'm still waiting for my copy of your book to arrive. Looks as though it might be a while. I can probably spend a bit of that time going over my own ACW fleets...
Cheers,
Ion
Hello there Archduke,
Happy new year sir! Many thanks for kind comments - I was tempted to get both the monitors ‘up close and personal’ with the fort but the Union plan (at least that part of it) worked well enough from where they took up station. It could have gotten interesting if the C.S.S. Tennessee had got to the monitors but the mid channel traffic jam put paid to that idea. Confederate ironclads are powerful but usually s-l-o-w…..
If it is any consolation we are still waiting on the hardback versions in the UK! In the meantime you can get the ACW ships out in readiness!
All the best,
DC
An excellent read, bravo!
Hello there Mr Manley,
Thank you kindly old chap! It was more of a ‘technical’ post in that I wanted to go over the ‘mechanics in action’ rather than telling a story. It worked on both levels which was good to see.
It has given me much in the way of food for thought though….
All the best,
DC
Splendid stuff David…
Pell-Mell is definitely a good description of the action.
All the best. Aly
Hello there Aly,
It was chaotic bit the rules stood up well although I am now looking at some optional and advanced rules - just adding a further sprinkling of fairy dust!
It was good fun to fight though for sure!
All the best,
DC
Post a Comment