Saturday 27 June 2020

The Return of an Old Friend


The original version of a truly fantastic boardgame. Avalon Hill took the game to another level in terms of production values.


The ‘new’ version - and what box full of naval and aerial goodness!

Now this is a little on the embarrassing side. Way back in the late 1970s I purchased a copy of the board game Flat Top by S. Craig Taylor Jr and then published by BattleLine. As an aside I purchased my copy from Tradition when they were open in Shepherd’s Market, Mayfair. I was working in Berkeley Square at the time which was just around the corner so many a happy lunch hour was spent browsing in that goldmine of a shop.

The game is based on the carrier battles in the South Pacific during 1942 - not including Midway although the Avalon Hill version includes the ships required to run this - and, at the risk of being repetitive,  it is a truly fantastic experience. S. Craig Taylor Jr was one of my favourite game designers and using the Flat Top system he produced a game called CV published by Yaquinto which covered the Midway campaign.

The reason for the embarrassment is that I sold my original Battleline version many years ago after having played it death. I then repeated the rather hasty disposal after I had acquired a copy of the Avalon Hill version some years later from Mr Fox which was again moved on during one of my periodic reorganisations - primarily as I had not fully appreciated the full potential of the newer version, a story Rather depressingly repeated back in 2012. So that is three copies of the same game that have gone through my collection!

For what I hope will be the final time I have acquired a further copy of the Avalon Hill version and this time I have seriously thought about exactly what I want from the game and how I will be able make use of it. Great thoughts have been thunked for sure!

A number of these ideas I will outline in a further post and they will certainly fit within my avowed intention of having a frugal gaming approach. In the meantime though, take a look at the components.


A 44” by 28” two part mounted map board


Two pads for plotting purposes


Rules and game charts


The 1,300 counters!

Without going into too many details and aside from what the game is designed for I am looking to the Great War and some ‘Hunt the Raider’ style actions. Something that will not require a huge amount of setting up in terms of material.

Something to think about anyways.


Thursday 18 June 2020

Waterloo A La Carte....Game Number 56, Part 3


What a coincidental find! My first visit to a charity shop for nigh on 3 months and on the 18th June I found a copy of the above for £2. 

Waterloo Sunset....

The end of the first phase of the action at game turn 6 was fitting as it enabled me to address a couple of things. To begin with from Game turn 7 the Prussians may arrive and also the French can call upon the Guard. I had also made a mistake with the artillery as it only scores a hit on a unit at a range of 1. At range 2 or 3 it can only cause a disruption result so the ‘destroyed’ French artillery has dramatically reappeared....


French Turn 7 - 7 Action Points. With a renewed sense of urgency the French pressed on. Their Curassiers attempted to charge the Belgian horse but to no effect whilst their infantry resumed their assault on Hougoumont. At last the Scots Greys received a hit whilst moving up the Brussels road came the leading elements of the Guard - in this case the Young Guard.


Allied Turn 7 - 5 Action Points. The Prussians are coming! The first troops of Blucher’s army appear next to Papelotte. The Belgians in Hougoumont are holding their own as are their mounted countrymen. The ridge is holding but will the French be able to prise them off it?


French Turn 8 - 6 Action Points. The attack on Hougoumont eases off whilst the French redeploy for a fresh assault. Not waiting for the outcome the remaining French cavalry is ordered to move around the chateau to attack the ridge from the right flank. Meanwhile the Scots Greys are finally seen off whilst Ney busily rallies the conscripts for a fresh assault on La Haye Sainte.


Allied Turn 8 - 6 Action Points. More Prussians arrive and so to gain some time the Duke some infantry on his left flank to advance from the ridge between La Haye Sainte And Papelotte against the massing French. The Belgian cavalry fall back and the ridge from the chateau to the Brussels road is suddenly covered in squares in readiness for the cavalry assault to come.


French Turn 9 - 7 Action Points. Mindful of the fast approaching Prussians Ney sends some infantry out to engage them on his right flank. Meanwhile the Old Guard has moved up the Brussels road whilst the cavalry masses to the north of Hougoumont. The situation looks serious but are the French in danger of losing faster than the allies can win?


Allied Turn 9 - 6 Action Points. The Prussians continue to emerge from the woods on the French right from Papelotte southwards. The Duke and his infantry are rooted to the ridge awaiting the inevitable cavalry attack but for the moment are content to be spectators. From the great man downwards, all know that they will not waiting for long.


French Turn 10 - 6 Action Points. After some ineffective fire against the chateau all eyes turn to the great mass of French cavalry thundering you the right flank of the ridge. Their impetus was blunted slightly by the ground and the squares of the infantry held firm. The British artillery suffered casualties as they dare not leave their guns.


Allied Turn 10 - 5 Action Points. The gallant Belgians in Hougoumont succeed in driving off their assailants whilst to the north the French light cavalry streams back down from the ridge chased by canister from the British artillery.


French Turn 11 - 6 Action Points. Once again the French cavalry thunder up to the ridge but again to little effect. The Cuirassiers manage to push the Belgian cavalry back which could prove to be costly.


Allied Turn 11 - 7 Action Points.  The final Prussians arrive close to Plancenoit whilst the great cavalry battle continues on the opposite flank. The ridge continues to hold and the Duke now has a large force of infantry deployed from Lay Haye Sainte to Plancenoit so pressure can at last be applied to the flank and rear of the French position.


French Turn 12 - 5 Action Points. Breakthrough! The gallant Chasseurs charge the British artillery once again and succeed in destroying the guns line (these were painted by Ray Rousell hence their panache and flamboyance....)! The allied infantry is now isolated on the ridge - can Ney apply the coup de grace?


Allied Turn 12 - 7 Action Points. The garrison of Hougoumont chases off yet another wave of attackers and in doing so secures the flank for the time being. The infantry of the left, including the newly arrived Prussians, are gradually shaking out into an ordered line with the French in the vicinity of Plancenoit already being engaged. If only the ridge can hold firm - “Give me night, or give me Blucher....”


French Turn 13 - 5 Action Points. The impetus of the French attack was fading rapidly. The cavalry, despite their success against the British artillery were unable to make any further headway against the resolute allied squares. The bulk of their infantry was too far away from their Cavalry to be able to influence the outcome and now that the Prussians were beginning to make their presence felt a successful outcome to the action seemed further away than ever. Was there still time for a final twist in the tale?


Allied Turn 13 - 5 Action Points. The Prussians began to bend the French line back on itself via Plancenoit whilst over on the other flank the gallant Belgians in Hougoumont successfully dispatched the Chasseurs milling around in the British artillery gun line. Their mounted comrades successfully charged the Cuirassiers and finally succeeded in forcing them back. Sensing a decisive moment the Duke stood in his saddle and waved his hat furiously above his head. Everyone, down to the lowliest drummer, knew what he meant.

Marshal Ney, astride his fifth horse of the day, surveyed the field of battle through the smoke and haze of a summer sunset and knew that the day was lost. His cavalry was a spent force and his infantry would be forced to fight just to survive the approaching Prussians. His plan had failed but where was the Emperor? Ney was a fighter and his master provided the brains but on this occasion this was noticeably absent. Wearily he turned his horse around and began the long trek back to the Emperor’s headquarters and then to who knows where. The Napoleon he knew, the master f his destiny, no longer existed.

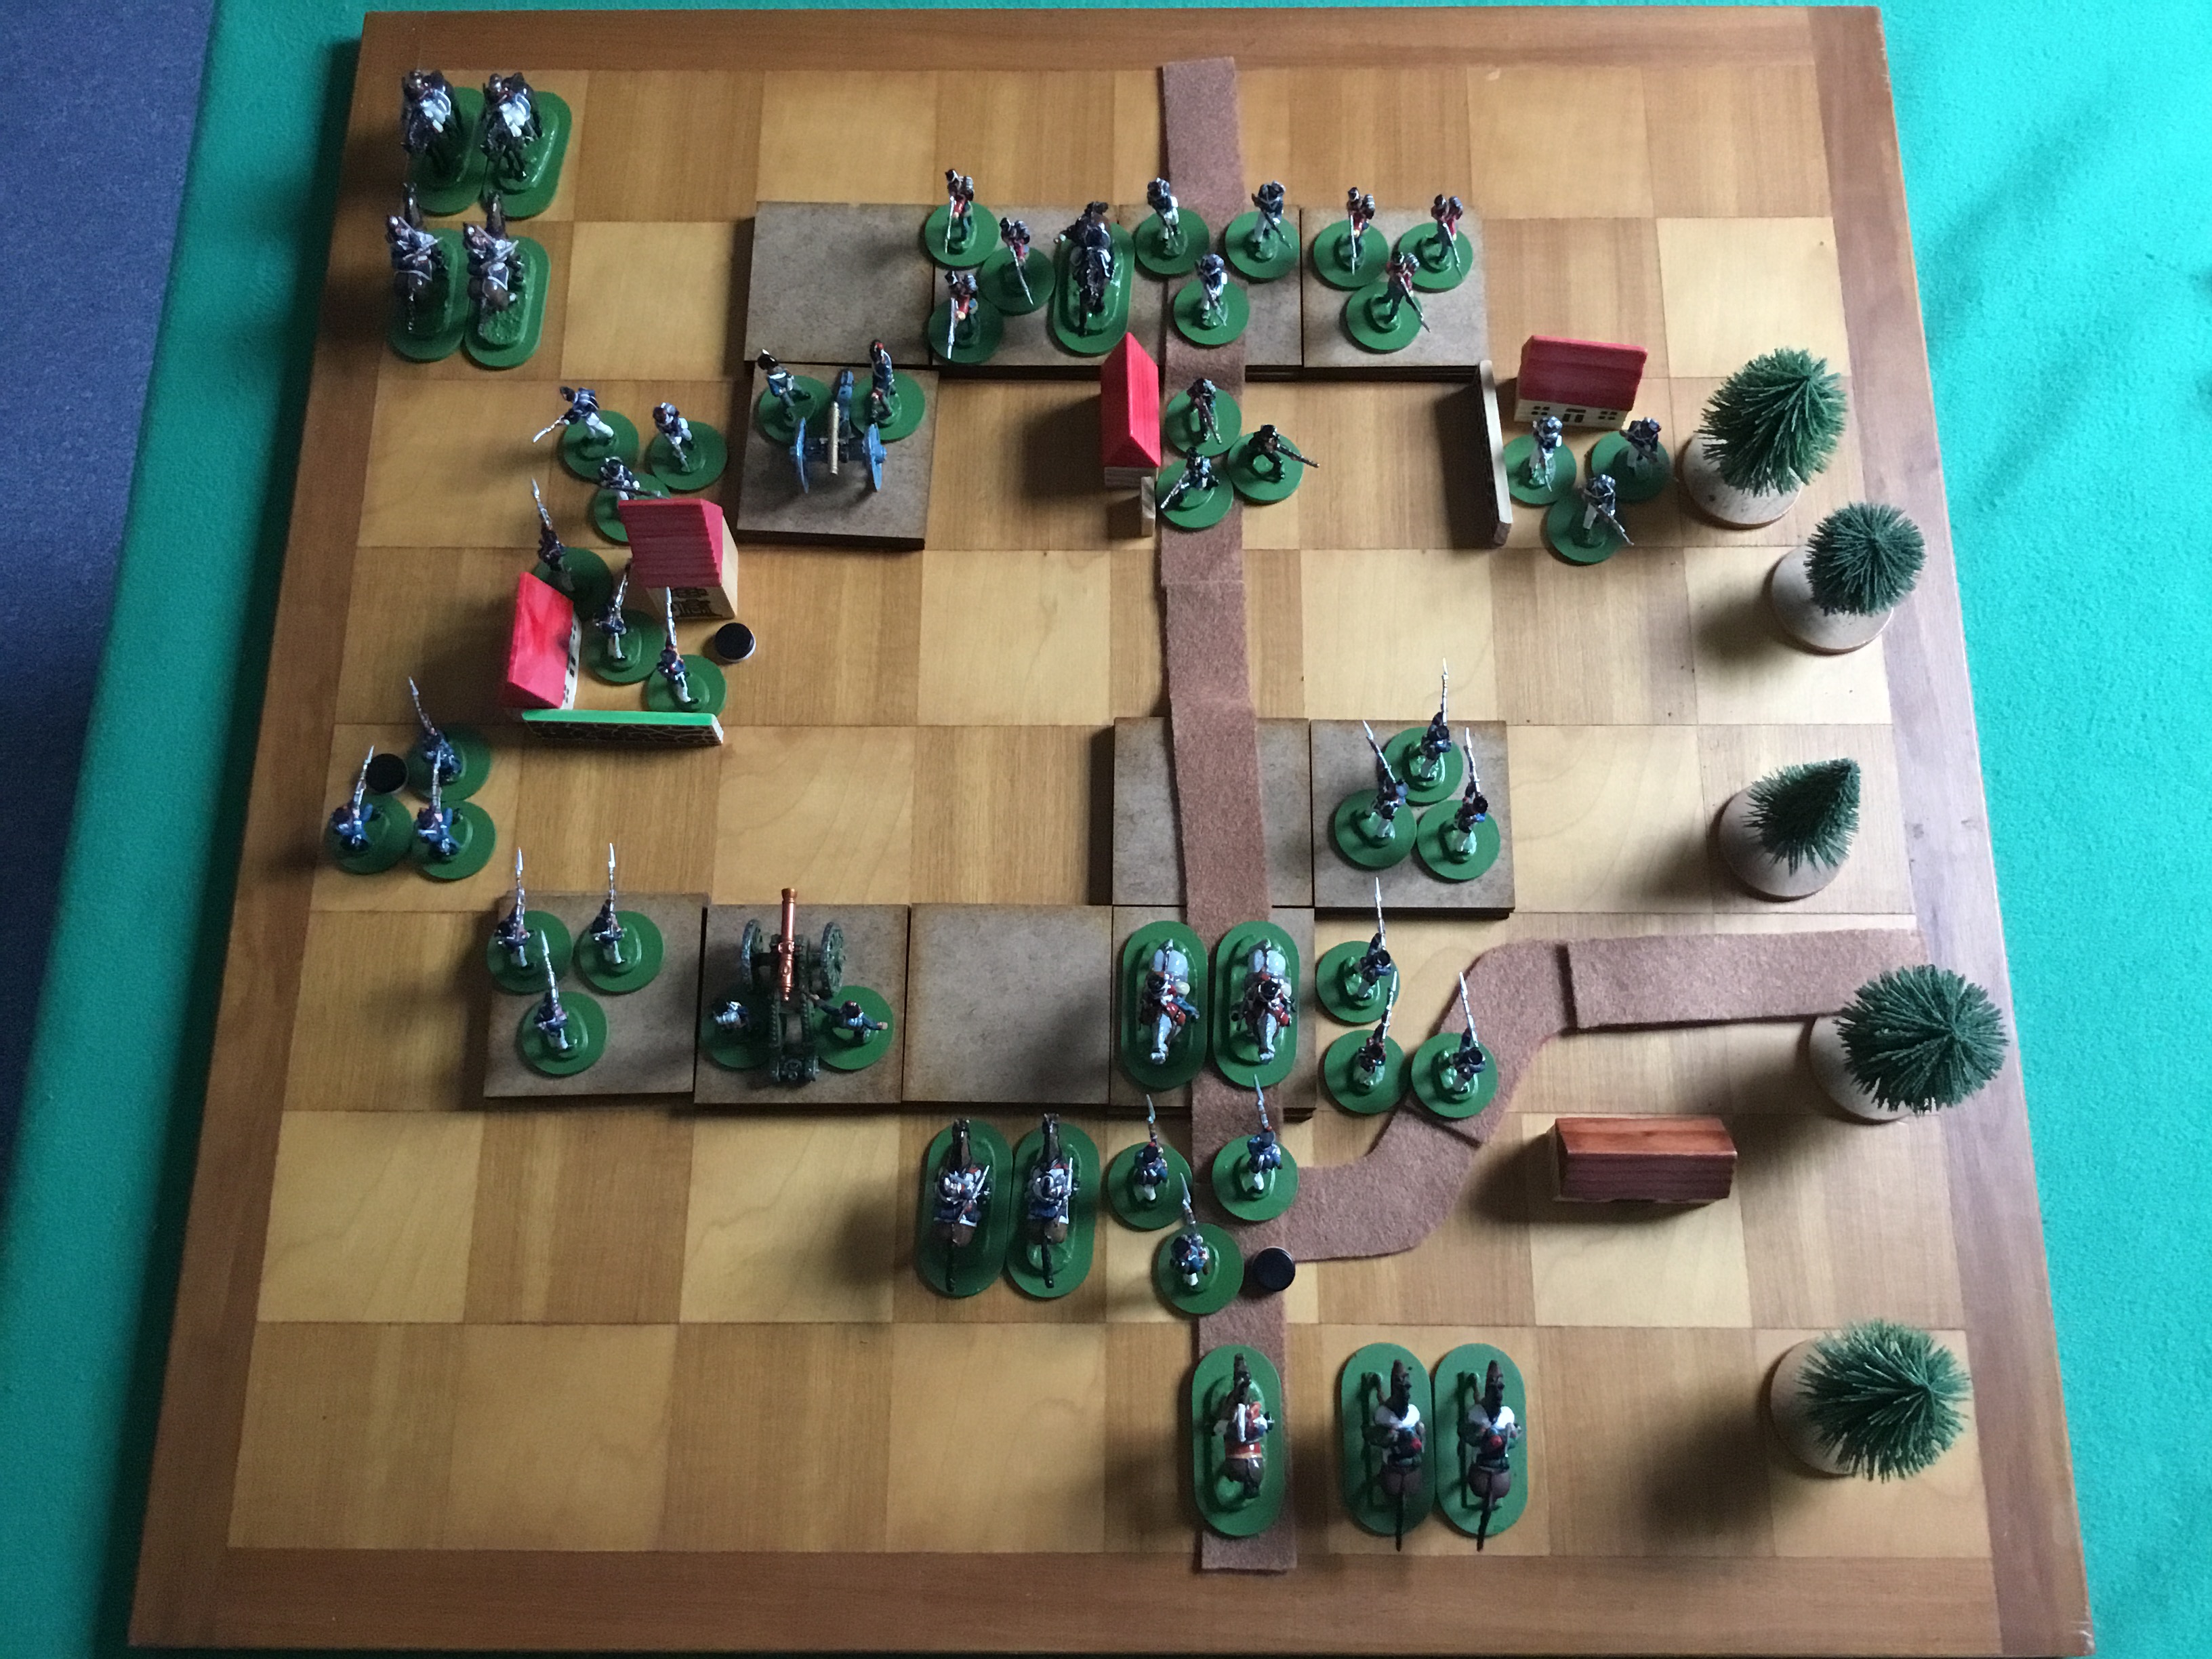
I called a halt at this point as it was impossible for the French to achieve their victory conditions of destroying 7 allied infantry units and exiting three of their own off the allied baseline. The final casualty count looked something like the picture below.


The Allies lost the Scots Greys, the Guards and the artillery whilst the French lost the Chasseurs, a unit of conscripts and a line infantry unit.

The game played rather well (aside from my minor artillery faux pas) and it is certainly one I will revisit - in fact I plan to do so on my hex mat with larger units and possibly a better aligned (and expanded) order of battle. 

The author, Jay Ward, has been in touch with me with some thoughts and ideas which I will experiment with going forward so a big thank you to him for this and also for providing such a great toy to play with!

Monday 15 June 2020

Wofun and Games


A selection from the 28mm Jacobite Rebellion range


The infantry deployed on the base in two ranks (40mm x 30mm)


Another view of the samples - note that lovely Peter Dennis artwork

Nothing on part 2 of the Waterloo game just yet - simply because I have been out and about following the decorating and I also realised what the date is. June 15th - three days until the 18th which is of course the 205th anniversary of the actual battle. I figured it would be appropriate to post this on the anniversary of Waterloo so there you have it.

In the meantime though, a chance exchange of emails with that very nice chap Andy Callan led to a small envelope arriving this morning with the above samples from the Jacobite Rebellion range produced by Wofun Games .

Wofun produce a range of plexiglass 2D figures from various periods in both 18mm and 28mm with the artwork by Peter Dennis. In many ways these are like Peter’s paper soldiers but without the hassle of cutting them out! 

Andy is writing the rules that go with the figure ranges (check out the link above to see what is available) in the same way that he has with the Paper Boys range published by Helion.

I really like these figures and as a reluctant painter they certainly tick a number of boxes - much to ponder methinks!

Friday 12 June 2020

Waterloo A La Carte....Game Number 56, Part 2


The opening dispositions with the Allies in the North.

First of all apologies for the delay in getting to this after action report but we decided to decorate another room! That is now complete and so I was able to get to the game and managed to get it fought and completed over two sessions. I opted to write the report as I went with two pictures for each turn - one for the French and of course one for the allies. The report will be in two parts with this post featuring up to (and including) turn 6. I have needed to redo some of the pictures from the second half which has proven a challenge due to it being very overcast and our electrics being on and off as some 15 or so sockets have been changed! 

The opening positions are above and so without further ado I present Waterloo A La Carte Part 2 by Jay Ward but fought on squares rather than hexes!


French Turn 1 - 7 Action Points. Attacking both Hougoumont and La Haye Sainte with artillery moving up in support of the latter and bombarding the former to the discomfort of the Guards forming the garrison (note the white disruption counter that gives a +1 to an opponents attack dice)


Allied Turn 1 - 6 Action Points. The Guards soon recovered and drove off part of the attacking French columns whilst the artillery scored a telling hit against their opposite number (note the black counter which indicates a hit). The rifles engaged the attacking French to their front whilst the Scots Greys moved up in support. The Belgian horse moved out wide of Hougoumont whilst some of their countrymen occupied Papelotte.


French Turn 2 - 5 Action Points. The fight for Hougoumont intensifies as a hit and a disruption is scored against  the gallant Guardsmen as more French infantry are thrown into the fray. The attack on La Haye Sainte makes little headway but wait - French Cuirassiers are seen moving up into new positions....


Allied Turn 2 - 5 Action Points. The garrison of Hougoumont fought back and inflicted a telling blow against their assailants whilst the supporting Belgian cavalry launched a thundering charge into the Voltiguers scoring two hits! The French fell back for one hit and took the second as the cantankerous horsemen continued to cut a bloody swathe through their ranks. A devastating series of rifle shots from La Haye Sainte proved too much for the young conscripts facing these grizzled veterans as they broke and ran.


French Turn 3 - 7 Action Points. As the Voltiguers fell back the Cuirassiers immediately charged into the Belgian cavalry but to little effect. The artillery continued to bombard the allies but again, with little result whilst some fresh infantry headed up the Brussels road to resume the attack on La Haye Sainte.


Allied Turn 3 - 6 Action Points. The Belgian cavalry, not wishing to push their luck against the heavier French horse fell back to their supporting infantry whilst the Guards continued to blaze away at the attacking French. The British artillery has rather better of the duel with their counterparts and so the Frenchmen pulled back slightly to the main gun line. Meanwhile, and spoiling for a fight, the Scots Greys launched a charge into the approaching French columns and pushed them back relentlessly to the main French position.


French Turn 4 - 5 Action Points. Hougoumont falls! With what was certainly going to be the last attack on the chateau from the investing French unit a single hit that was not saved despite the ‘elite’ status of the Guardsmen was enough to finish their rather undistinguished day. The Cuirassiers pursued the Belgian horse but to little effect. Similarly, the attempts to attack the milling Scots Greys were also ineffective.


Allied Turn 4 - 4 Action Points. The Scots Greys continued to push on into the main French position but with impetus lost and horses tiring it was to little effect. The British artillery made up for this though with a telling blow against their French opposite numbers! The Belgian cavalry continued its uneven fight with the Cuirassiers whilst their infantry moved up to Hougoumont.


French Turn 5 - 6 Action Points. The French moved cautiously into Hougoumont with the Voltiguers  in support. Further infantry moved up to exploit the open allied flank. Unfortunately this was to be but a temporary advantage so further reinforcements, especially artillery, was urgently called for.


Allied Turn 5 - 5 Action Points. Reacting to the fall of Hougoumont quickly the Duke immediately ordered the Belgians forward and redirected the artillery to bombard the wrecked chateau. Their fire was extremely effective and the new occupants, already weakened from their fight with the Guards, beat a hasty retreat out of the blazing ruins. With the Allied right flank under threat the Duke sought to redress his deployment and so a right shift took place. The Allies had rather better of the engagement this far but they were being pulled out of formation.


French Turn 6 - 7 Action Points.  As the French sought to realign their attack to take advantage of the now unoccupied Hougoumont, a lull descended over the battlefield. For sure the presence of the Scots Greys milling around in the centre of their position was a distraction but it was a mere inconvenience. The French artillery finally got its eye in and scored a telling hit on their opposite number whilst their other cavalry began to move to support the right. 


Allied Turn 6 - 4 Action Points.  The Belgian infantry moved into the charred wreckage of Hougoumont as more of their countrymen moved along the ridge to support the right. The Scots Greys, now barely at walking pace, continued to mill around, looking for an opportunity to cause some additional damage but to no avail.

We have now reached a convenient break in the proceedings as the remaining game turns feature the potential arrival of the Prussians as well as an appearance by the French Old Guard. The former arrives randomly whilst the latter pitches up regardless.

As far as the action itself went the French plan was to launch a diversionary attack against Hougoumont as well as La Haye Sainte. The former succeeded whilst the latter did not but in both cases losses were heavy. So far the British have held their own (despite losing the Guards) but they are being pulled out of position. The French, perhaps somewhat taken aback by their success on the right, are trying to hurry reinforcements over to potentially turn the Allied flank. The Scots Greys, by maintaining their presence in the heart of the French position, have held them up rather more effectively than by the casualties they have caused.

The rules have worked well although I did make one critical mistake that I will adjust for in the second half.

To be continued....

Friday 5 June 2020

Waterloo A La Carte....Game Number 56, Part 1


The map from the original scenario. It was on an 8 x 6 hexed map which I needed to convert to fit on an 8 x 8 chessboard. The full details can be found here.

I know, I know...Waterloo AGAIN but I offer no apologies! I fully intend to refight the action in a bigger way using one of the gamer designed versions available from the Command and Colours website at some point, but for now I am making use of the excellently designed Waterloo A La Carte by Jay Ward.

In order to game this the first thing I needed to do was to convert the set up to squares. By dint of some nudging about I eventually settled on the picture you see below.


An overview of the battlefield with the allies deployed in the north. The three buildings in a rough line from left to right are of course, Hougomont, La Haye Sainte and Papelotte. The red roofs and walls serve to indicate fortified status. The ridge and other raised ground I have indicated using movement trays stacked one on top of the other.

The forces used for the battle are of course taken from the DelPrado collection. I opted to use 3 figure  infantry units, 2 figure cavalry and for the artillery, a gun and two gunners. This is about the maximum number of these figures you can comfortably fit in a 6cm square - this is of course after I had previously said that 75mm for a square was too small!


The allies. The Guards are deployed in Hougomont with the ridge occupied by two units of Belgians infantry, two of British and with the Rifles occupying La Haye Sainte in the centre. A unit of Belgian infantry is deployed just above Papelotte whilst the cavalry has taken up station to the rear of the ridge.

The allied army consists of the following units.

British Line Infantry x 2
Dutch-Belgian Line Infantry x 3
British Guards/Highlanders x 1 (I fielded the Guards, hence in bold)
British Riflemen x 1
British Heavy Cavalry x 1
Dutch-Belgian Light Cavalry x 1
British Artillery x 1
Prussian Infantry x 3 (these are reinforcements that can arrive from turn 7 on a d6 roll of 4 to 6)


The French army looking suitably imposing. Note the massed artillery deployed to face between  Hougoumont and La Haye Sainte.

The French army consist of the following units.

Line Infantry x 4
Conscript Infantry x 2 (I have used the French Infantry figure advancing for the conscripts)
Voltigeur x 1
Cuirassiers x 2
Chasseurs x 1 
Artillery x 2
Imperial Guard Infantry x 2 (these are reinforcements available automatically - one unit on turn 7 and one on turn 8. There is one unit of Old Guard and one of Young)

The scenario is very flexible in terms of the initial deployment in that the allies set up first anywhere on and north of the row including La Haye Sainte and Papelotte with one unit in Hougoumont. The French are deployed basically anywhere south of the allies and not adjacent to any allied units.

The Rules - an overview

Each side has a number of action points that can be modified by a dice roll and these are expended to order units. The units them selves are rated for attack dice - the number of dice rolled when in combat, defence score - the number an attacker has to achieve to score a hit and movement, in this case in squares.

I have allowed diagonal movement and and also for firing (only artillery has a range, all other combat is adjacent) but only at the rate of one square per move or range calculation. All units are destroyed by their second hit so using the removal of a single figure for the first hit will suffice for recognition purposes.

The game can last 14 turns and the victory conditions are quite simple. The French win by destroying 7 allied infantry units AND exiting 3 French infantry units off the northern edge of the map by turn 14. The allies win if the French fail to meet their victory conditions.

Part 2 will see the action taking place but in the meantime I would to extend a big thank you to Jay for giving me this wonderful toy to play with!


Tuesday 2 June 2020

Wargaming Primordial Soup


Primordial soup but why am I thinking....MORDOR!

It has been a busy but very pleasant couple of days and the DIY has been mercifully at a lower level! Our grandson is with us and so we went out for a brief wander about in a local wood yesterday to stretch out legs and get some air. He really enjoyed it and wants to revisit it with a picnic at some point. He also helped me sort out a whole pile of Command and Colours blocks and came with me to the car wash (which he enjoyed immensely). A family roast beef dinner in the garden completed the day followed by a barbecue today.

My thoughts continue to meander around but in a very pleasant way. I rediscovered a cache of Town in a Bag scenery that is ideal for use with the various Portable Wargame ideas I have. I also dragged out my rather nice handmade wooden chessboard that has 6cm squares in two shades of light brown, ideal for the desert or anywhere that has that sandblasted, arid look. This is the board I am using for my next game which I hope to fight in the next few days.

Another discovery - not entirely unknown but sufficiently distant in the memory to qualify as such - was the great stash of Axis and Allies WW2 ships, vehicles, aircraft, infantry and assorted artillery. Back in the day I had such high hopes for this lot and seeing it all again certainly brought back a few ideas. It is certainly something that I should revisit especially as it would be a very low cost set up.

If I am honest much of my thinking over recent days has been along the lines of budget wargames and making use of what material I have rather than laying out vast swathes of cash. For me this means making use of bits and pieces from board games such as Axis and Allies or any of the various editions of Risk. I have a vast selection of odd bits and pieces, all of which would have a gaming use of one sort or another. For sure I have selection of ‘actual’ wargame bits and pieces but there is a certain degree of satisfaction in making use of something for a purpose other than what it was originally intended for!

I am still thinking about what do with the 1:600th collection and of course, the Del Prado Napoleonics will be resuming centre stage as soon as the house is back to normal.

The soup in the title refers to many things....some considered to be unnatural....