Tuesday 26 April 2022

Evolving a Naval Wargame


A typical pre-dreadnought battleship circa. 1900


The same ship repainted overall grey

I believe that I have now gone about as far as I can go with the ACW naval rules and so I am typing up the draft for play testing purposes using live players as opposed to just little old me!

If I have learned anything over the past two years of this project it is being convinced that the core system will work for other periods with some specific tweaks. This was a real eye opener for me and it has really opened a Pandora’s Box of potential goodies. I reckon that the age of sail - in this case I am looking back to the 16th century as well as the more usual Napoleonic period - would work but obviously provision would be needed for sails as the motive power (and oars as required). This will require some work, not to mention the small matter of adding sails to the models! Potentially this could take a while to organise and the models will need careful planning. I am still keen to maintain the momentum though and so have settled on what will be the next phase of this ongoing project

I am of course thinking about the period 1885 to 1905 - the pre-dreadnought era.

I reckon that it should be easy enough to reset the gun and armour types (you would need to see the rules to appreciate what I am talking about or alternatively if you take a look at David Manley’s excellent Dahlgren and Colombiad rules you will see what I mean) to reflect the later period and things like ship speeds etc will largely take care of themselves. Even ‘proper’ torpedoes would not be too much of a challenge to incorporate. I fully intend the rules to be usable for ‘normal’ games as well as the 3 x 3 format. The ‘currently being typed’ ironclad rules are becoming more and more the same set as the differences between the two have largely been eliminated - in effect they will be a simple larger set or a more complex 3 x 3 set! Either way they are a lot of fun.

Unsurprisingly there is an ulterior motive to all this. Years ago I raised a substantial French fleet for the period using 1:3000th Navwar models using a set of rules called The Devil at the Helm. I remember having some epic games using these rules although they did become quite clunky as the number of guns carried by ships went up.

I am not looking at gaming fleet sized actions and indeed the scale I am looking at is not that far removed from what I am currently gaming for the ACW. I am thinking more of Colonial style naval operations - repurposed ironclads being used as flagships on foreign stations supported by more ‘modern’ cruiser types with gunboats aplenty and requisitioned civilian vessels armed with whatever happened to be available at the time. Very much second string stuff but glorious all the same! I will be building the models and as yet I have no specific nationality in mind. I rather like the idea that Bob Cordery has been writing about with his ‘Belle Epoque’ forces. Failing that the old standby of the world of 1891 or even, dare I say it, Madasahatta.

The ship models will be built using my MDF laminate technique with the sizes once again being similar to the ACW types so the largest models will be around 6” long. Having learned from building the ACW models I will need to give some careful consideration to the various bits and pieces I will need from Warbases. Some more modern looking turrets will be needed as well as shielded deck guns - primarily singles - and certain pieces of superstructure, bridge ‘wings’ etc. As ever the models will not be scale specific and will be purely representational looking in terms of detail.

First of all though, there still remains completion of the ACW project - ships, rules and a new board as well as for the Russo Turkish War so there is plenty to be going on with, probably sufficient for the rest of the year!

Meanwhile though, back to the ACW - must stay focused!

Sunday 24 April 2022

Action along the Yazoo….July 16th, 1862….Game Number 71


U.S.S. Tyler, U.S.S. Queen of the West and the U.S.S. Carondelet about to do battle with the C.S.S. Arkansas

Aside from the historical basis for this game its inspiration also came about as the result of a comment on an earlier blog post of mine. The author of the comment was none other than that well known Bon vivant, wit and raconteur as well as being a truly gifted blogger - Archduke Piccolo. It is to him that this action is dedicated and with my grateful thanks for the suggestion!

Background

Ordered into the Mississippi to attack Union shipping north of Vicksburg, the Confederate ironclad C.S.S. Arkansas set off from Haynes Bluff early on the 15th July with the intention of surprising the Union fleet at dawn. Unknown to the Confederates the Union had heard about the rebel ironclad from deserters (despite their own intelligence being that the ship was still incomplete) and so had decided to send a small force into the Yazoo to find and engage her. 

The Union force that steamed into the Yazoo consisted of the timberclad U.S.S. Tyler in the van followed by the U.S.S. Queen of the West and with the ironclad gunboat the U.S.S. Carondelet bringing up the rear. At around 6am on the morning of July 16th, the opposing sides came into sight of one another and so battle was joined.

The Opposing Sides

Confederate

C.S.S. Arkansas - Size: Medium (3), Speed: 2, Defence Factor: 6, Flotation Points: 9 (7/2), Guns: FW: 4, P, S: 5, Ram Bow

Union

U.S.S. Carondelet - Size: Medium (3), Speed: 2, Defence Factor: 5, Flotation Points: 9 (7/2), Guns: F: 5, P, S: 3, A: 5

U.S.S. Queen of the West - Size: Medium (3), Speed: 2, Defence Factor: 4, Flotation Points: 9 (7/2), Ram Bow

U.S.S. Tyler - Size: Medium (3), Speed: 2, Defence Factor: 3, Flotation Points: 9 (7/2), Guns: FW: 2, P, S: 4

Victory Conditions

The Union wins by sinking or reducing the C.S.S. Arkansas to its critical point. The Confederates win by sinking the U.S.S. Carondelet and exiting the playing area on the opposite side to where they entered. Any other result is a draw although favouring the Union.

Initial Positions


The C.S.S. Arkansas steams along the Yazoo and spots the approaching Union squadron. bringing up the rear of the column is one of the thrice cursed Yankee ironclad gunboats! 

Turn 1. No firing and the Confederates are deemed to have the initiative for the first turn. The rebel commander opts to allow the Union to move first.


End of Turn 1. The Union column steams parallel to the rebel ironclad with the U.S.S. Queen of the West looking to get an early ram attack in.

Turn 2. The C.S.S. Arkansas immediately opens fire against the leading Union ship, in this case the U.S.S. Tyler. The rebel ship rolls 5d6 scoring a 1, a 2, a 3, a 4 and a 5 meaning two potential points of damage. The U.S.S. Tyler has a defence of 3 (her size alone as she is unarmoured) and rolls a 2, a 3 and 4 meaning that the roll of 4 negates one of the two potential points of damage inflicted. The U.S.S. Tyler fires back with 4d6 scoring a 1, 2 4s and a 5 meaning three potential hits. The C.S.S. Arkansas has a defence factor of 6 and rolls a 1, 2 3s, 2 4s and a 5 meaning that all three hits bounce off her armour. For initiative the Union rolls a 4 and the Confederate a 3. The Union opt to allow the Confederate ship to move first.


End of Turn 2. The U.S.S. Tyler leads the U.S.S. Carondelet on a looping arc to come up on the stern of the rebel ironclad. Meanwhile, the U.S.S. Queen of the West lines up her bows with her intended victim.

Turn 3. Both the leading Union ships are able to open fire against the rebel ironclad. The U.S.S. Tyler rolls first with 4d6 scorning a pair of 1s, a 5 and a glorious 6! Her additional roll is also a 6! The next roll though was a miserable 1. That is 5 potential points of damage. The C.S.S. Arkansas rolls her 6d6 for her defence scoring a 2, a pair of 3s and three 5s meaning that 3 of the 5 points of damage are negated so the rebel ship suffers 2 hits. The U.S.S. Carondelet fires next with 3d6 scoring a 1, a 2 and a 3 for no effect. The C.S.S. Arkansas fires at the Union ironclad gunboat with 5d6 scoring 1,  a 5 and 3 6s! She then rolls a 3, a 5 and a further 6 which converts into a 3. That is an incredible potential 10 points of damage! The U.S.S. Carondelet rolls 5d6 for her defence and scores a pair of 1s, a 2, a 4 and a 6. She then rolls a further 6 followed by a 3. She has negated 5 of the 10 hits - heavy damage, but nothing fatal. For initiative the Union roll a 2 and the Confederate a 4. The rebel ship, perhaps mindful of the lurking U.S.S. Queen of the West, opts to move first.

As expected, the U.S.S. Queen of the West accelerates to attack speed and rams the C.S.S. Arkansas head on. She is a size 3 ship fitted with a ram meaning her attack would normally be 4d6. However, her speed of 2 gives her an additional d6 but this is removed by the angle of attack. She rolls a pair of 1s, a 2 and a 5. The C.S.S. Arkansas has a defence of 6 which is halved when being rammed. She rolls a 2, a 5 and a 6 with a 2 for her extra roll. She has negated the single point of damage she received and her excess is 2 points which are recorded as damage on the luckless Union vessel. As only one ship suffered any damage there is no roll to see if they are locked together. Both ships are able to execute a free turn.


End of Turn 3. The two Union gunboats maintain a discrete distance from the rebel ironclad and for the moment are content to let the ram carry the fight. With the damage the U.S.S. Carondelet sustained no doubt being a factor in their cautious approach.

Turn 4. The C.S.S. Arkansas blasts the U.S.S. Queen of the West at point blank range with 4d6 scoring a 1, a pair of 2s and a 4. The single point of damage is easily negated. Meanwhile both the U.S.S. Tyler and the U.S.S. Carondelet open fire - the former with 4d6 and the latter with 3d6. The U.S.S. Tyler scores three 1s and a 4 which is easily negated by the 6d6 defence of the rebel ship (in truth she only scored a single 5 so it was a close call!). The U.S.S. Carondelet does rather better and hire the rebel ship with a 4, a 5 and a 6 with the extra roll coming up as a 5 meaning 5 potential hits. The U.S.S. Carondelet is able to negate 4 of these so a single point is recorded against her. For initiative the Union roll a 1 and the Confederate a 3. The Union are asked to move first.


End of Turn 4. The C.S.S. Arkansas effectively doubles back on her original heading, mainly to gain some distance from the Union ram. Approaching her head on are the two Union gunboats - with the powerful frontal battery of the U.S.S. Carondelet about to come into play!

Turn 5. The U.S.S. Tyler rolls 2d6 and despite rolling a 6 fails to damage the rebel ship. The U.S.S. Carondelet rolls 5d6 scoring a 5 and 6 with nothing for the re roll. The armour of the rebel ship negates all three potential hits. The C.S.S. Arkansas rolls 4d6 from her forward battery at the U.S.S. Tyler. She rolls a 2, a 3 , a 5 and a 6 with the additional roll being a 4. That is 4 potential hits. The tension was palpable as the U.S.S. Tyler rolled her 3 defence dice. They came up with a 1, a 2 and a 3! The four hits were recorded. For initiative the Union rolled 3 whilst the Confederate rolled a 1. The Union moved first.

The U.S.S. Queen of the West saw her opportunity and immediately rammed the rebel ironclad in the stern. The dice total came to 4d6 and she scored a 1 , a 2 , a 3 and a 6 with a 4 scored with the extra roll. Three potential points of damage. The C.S.S. Arkansas was able to negate two of these and a point of damage was recorded.


End of Turn 5. After the Union ram attack both ships were able to turn and coincidentally opted to face the same direction! Although the C.S.S. Arkansas was now in the broadside of the U.S.S. Tyler she had the U.S.S. Queen of the West more or less within pistol range off her starboard beam - effectively masking her from the fire of the U.S.S. Carondelet!

Turn 6. U.S.S. Tyler fired with 4d6 scoring three 6s and 3! This was followed by a 5 and a pair of 1s so a potential 7 points of damage were scored. The C.S.S. Arkansas was able to negate 3 of these meaning a painful four points of damage were scored - the rebel warship was grievously damaged but still in the fight. She turned her attention to the U.S.S. Queen of the West. Her 5d6 came up with a pair of 4s and three 6s! She then rolled a pair of 2 and a further 6 which then became a 1. Ten potential damage points against a defence of 4. The Union ship was made of stern stuff though as she rolled a pair of 3s and a pair of 6s followed by a 4 and 5 meaning that in total she was able to negate 6 points with 4 being recorded. For initiative the Union rolled a 1 whilst the Confederate rolled a 6. The Union were made to move first.

The U.S.S. Queen of the West overshot the C.S.S. Arkansas leaving her room to move into the attack on the conveniently but accidentally placed U.S.S. Carondelet. Her 4d6 ram attack came up with a 1, a 3, a 4 and a 6 with an additional 4 meaning four hits in total. The defence of the U.S.S. Carondelet is 5 halved (and rounded down) to 2d6. The roll was a 1 and 3 meaning 4 points of damage were scored against the Union ironclad. With the 6 points she had already suffered it was sufficient to send her to the bottom of the Yazoo!


End of Turn 6. As the Union formation tried in vain to reorganise itself an opportunity arose for the C.S.S. Arkansas to ram the U.S.S. Carondelet. The rebel ship needed little encouragement to do so and the damage inflicted was more than enough to sink the Union gunboat. It had been a Pyrrhic victory though, as the rebel ship had sustained heavy damage and with a pair of Yankee ships between her and safety - all she could do now was to head on through the Union fleet to seek safety under the guns of Vicksburg.

Thoughts on the action

The C.S.S. Arkansas was in pretty poor shape at the end of the action and in all probability would have been fortunate indeed to have made the safety of Vicksburg. She allowed herself to get embroiled with a Union squadron that was individually weaker but collectively stronger as a formation - at least while they operated as such. The early charge of the U.S.S. Queen of the West ‘stretched’ the Union forces somewhat which initially worked to their advantage - certainly it caused the C.S.S. Arkansas to be drawn into a fight that quickly got out of her control. Unfortunately for the Union the U.S.S. Carondelet was caught out of position by the frenzied manoeuvring that took place which enabled the rebel warship to take instant and devastating advantage.

Tactically the battle was a Confederate victory of sorts, but the C.S.S. Arkansas was in no fit state to exploit the situation.

Thoughts on the rules

Wow! I really enjoyed this little action and have to say that I think I have finally nailed the firing and damage system. The opposed dice rolls really cranked up the tension - even when playing solo - and the results added a nice level of unpredictability to the overall flow of the game. The pacing of the action felt right and although it was only six turns long it had the taste of a much more involved affair.

The ram rules felt a lot better in execution although going forwards I shall base the defence dice solely on half the vessel size (rounded up) rather than size and armour. From what I have seen for the most part ship armour of the period tended to be above the waterline so would not readily protect against a ram attack.

In Conclusion

It was a brisk little action that was great fun to fight and felt appropriate to the period. As a result of this recent flurry of ACW activity the remaining tasks left on the to do list are as follows:

  1. Finish the last of the ships (a dozen in all)
  2. Type up the rules
  3. Organise a board with larger squares.
No change with that lot then!


Saturday 23 April 2022

Guns, Rams and the C.S.S. Arkansas (Again!)


The combatants in the last adventure of the C.S.S. Arkansas. The only Union ship in the above picture that will feature in the next action is the U.S.S. Queen on the West (top left).

I have come to the conclusion that the C.S.S. Arkansas has become something of an obsession with me as she features in quite a number of battles I have fought - and this weekend will be no exception! I have had a radical rethink about the whole gunnery/to hit/to damage system for the rules and have come 

up with something that I believe will be the solution to the problem I never knew I had….

Guns and Gunnery

I have veered between a single dice roll to cover hits and and damage to having a dice to hit and then a dice roll to damage. Both systems have worked but neither in the way that felt, well, Portable Wargame-ish. This is important to me as the rules I have developed are meant to have Bob Cordery levels of complexity with David Manley levels of detail. I think I may well have stumbled on something that will go some way towards satisfying both.

In a nutshell Bob’s ACW naval rules use a number of d6 for gun dice per ship type with the amount of d6 rolled reduced by range. The firing player rolled the appropriate number of d6 and either hit or missed to a greater or lesser extent. Essentially each d6 rolled scored 1 point of damage for every 4 or 5 rolled and 2 points for a 6. David Manley’s rules (Dahlgren and Colombiad) use opposed rolls - rather like DBA or similar - to determine hits and damage. The key here is that the dice rolls are opposed.

I had been primarily working on the ‘roll to hit then roll to damage’ basis. In other words, the target had little involvement in the process other than to ‘take it’, or not, as the case may be.

For a more inclusive system I am thinking that using opposed rolls may well be the way forward as it means that both players are tapping into the world of variables - aka adding to the fun factor!

I realise that without a copy of the rules a lot of what I am writing may not make a great deal of sense but please bear with me!

A firing ship will have as its ‘gun dice’ the number of gun factors PLUS the associated penetration factor. For example, the C.S.S. Arkansas has broadside guns rated as 2 (gun factor) / 3 (penetration factor) which means in the new world this would translate as gun dice of 5d6. For each d6 rolled a 4 or 5 is a single hit and a 6 is 2 hits AND entitles the firer to another d6 roll. So far so good. The target ship has a defence factor equal to its overall size PLUS any armour factor. Once again, using the C.S.S. Arkansas as an example she had a defence value of 3 (she is rated as a medium sized vessel) and an armour rating of 3. Adding the two together gives a defence dice factor of 6, meaning that she rolls 6d6 to defend herself from incoming fire with the same chance of negating hits as for scoring them i.e. 4 or 5 negates a single hit, 6 negates 2 hits AND gets another d6 roll. 

Although on the face of it this seems to be quite ‘gamey’ there is most certainly a method in the madness. A ships ability to fire is determined by the number and effectiveness of its artillery whilst a ships ability to take damage is dependent on the overall structure and the level of protection or armour built in to it.

Using this system also means that I have a simple mechanism to reflect critical hits. My thinking at present is that if a firing ship scores sufficient hits to exceed the target ships defence value and these have not been negated then a critical hit is rolled for. This means that ships that are better armoured are less likely to sustain such damage whereas, for example, a wooden warship with no defence other than its size could suffer more readily - in the context of the period I have no problem with this as a potential outcome. The jury is still out on that one!

Rams and Rammery


The small ram the C.S.S. Winnebago rams the double turreted Union monitor, the U.S.S. Winnebago

The biggest challenge I have experienced with this has been largely of my own making. Initially I was happy to use the system that Bob had devised in the ACW rules of his Gridded Naval Wargames. They worked a treat but I wanted them to better reflect specific ship types, not just the addition of a ram bow. I should clarify that by explaining my thought process.

I believe (and I stand to be corrected by those with greater knowledge than I of ship building!) that a a ram attack depends on a number of factors. The most obvious is the presence of a ram bow and the hull strengthening that usually goes with it. The size of the ramming ship, its speed of approach and the angle of impact are all factors that need to be considered. All of these, when taken as a whole will determine the number of hit dice rolled for damage. For example, the C.S.S. Arkansas is a medium sized vessel fitted with a ram bow. Her size gives her 3d6 and the addition of a ram bow gives her a further d6 meaning 4d6 in total. Let us assume she is able to ram an enemy ship square on the beam. This would give her an additional d6 making 5d6 in total. If she was able to hit the target at speed (in this case 2 or above) this would give her an additional d6 making 6 in all. The speed issue is a moot point in that a captain ramming a ship would want to avoid excessive damage to his own vessel so a more measured approach may be appropriate! Assuming that damage is inflicted then once again the rammed ship will have a chance to reduce the impact based on its size. A rammed ship that manages to negate more hits than it receives instead passes the excess to the ramming ship as damage - a case of the biter, bit!

In the previous action there were two instances of ships having rammed, drew apart (whilst still in the same square) and then launched a further ram attack. That seems a little too neat to me so from here on in a ship must enter a new square in order to carry out a ram attack. Bear in mind that many of these ships were not only slow but also not particularly handy in the old manoeuvring stakes!

The whole ramming thing must seem hellishly complicated but it really is not. I am a great believer in explaining things thoroughly -  even if they do not make a lot of sense!

Parent and Child thoughts

My 3 x 3 rules were derived from my main set and were intended to be a fast play alternative to them. This no longer the case as I am very close to having a single set of rules that will work readily for either the standard game or the 3 x 3 variant. At this stage the only real difference I can see is around speeds and distances. My thinking is that 3 x 3 will be a variant in small points of detail only and will play almost identically to the parent set.

In closing

Three steps forward and two back seems to have been the way with this project but overall it continues in the right direction. The finishing line is in sight and whilst it may not be in the shape or form I originally intended it will at least be how I want it. The proof of the pudding is in the eating, so they say, but in this case it is in the testing so….

Look to tomorrows post to see how it all hangs together (or falls apart!)….

Tuesday 19 April 2022

Thoughts on Forts, Boards and Rules

Fort Yuwatus (pronounced Yew-WAT-us) in all its glory. Rumour has it the fort was named after a local Native American called Yuwatus who worked there after having survived his small oyster boat being overturned offshore during a sudden squall. He was very close to drowning when a passing dolphin happened to nudge him to the shore and safety which was seen as quite fortuitous by the garrison and so the name stuck….

Now that the dust has settled after the Easter weekend game I have had a chance to sit down and think about various parts of the whole and what it means for me going forwards. I am sure I am not the only gamer to go through this process after a battle and I am a firm believer in there being a lot to be gained from doing so. Anyways, this post will be covering the three areas mentioned in the title and how I see these going forwards.

Boards


At the height of the action the board was a little congested in places. A larger size of square would make a substantial difference as ships would be able to be placed correctly in relation to one another as required. With only 9 squares to use one needs every inch of space available!

Whilst my board is perfectly usable it is a little on the small size for the models I have built. I reckon it would work really nicely with 1:1200th models though as each 6” square will have plenty of space to maintain the illusion of distance. For my models the squares are just about large enough but given that the rules make use multiple square occupancy - two or three models can occupy the same square and not just as the result of a ram attack - it makes more sense to have the largest squares one is comfortable with. At this stage I am thinking about 8” squares meaning that the area being fought over - I am not including the ‘manoeuvring zones’ around the outside of the battle area - will be a 2ft square. The larger squares will enable me to use the models in a slightly more roomy fashion as well as adding to the illusion of range and distance. The resulting larger board will look exactly the same as the one I already have as I am more than happy with the overall look of the thing - a nice blue being used as the mud coloured Mississippi notwithstanding!

Rules

I am happy with 95% of the rules but it is the 5% that is threatening to derail the entire project. That is not strictly true but I do keep coming back to certain systems that I really think could be made ‘slicker’ - which is more in keeping with the whole Portable Wargame mantra. I keep veering between having a ‘to hit’ and then a ‘to damage’ dice roll or having both catered for in a single dice roll. The former is probably more ‘accurate’ but the latter has the advantage of speed of execution and is the method Bob Cordery used in his Gridded Naval Wargames. One option I thought about was having the current gun factors of number of dice rolled and the associated penetration factor added together. For example, a ship rated at 3/3 would roll 6d6 to hit. Using the usual 4, 5 for one damage point and 6 for two the firing player would need to score hits greater than the the armour value of the target in order to score any damage. For example, a ship rolling 4d6 scores a 2, a 3, a 4 and a 6. This equals three potential damage points - one for the roll of 4 and two for the role of 6. Say the target has armour of 2. This would mean that the potential 3 points of damage would be reduced to a single point (3 - 2 =1). A roll of a 6 would entitle a further throw.

I am going to try this out but I will also need to think about the number of damage (flotation) points ships carry. Currently these are dependent on the size of the ship only but I am now leaning towards boosting this by adding the armour value to the total - funnily enough this method brings some of the vessels inline with the flotation points Bob Cordery used in his ACW rules contained in Gridded Naval wargames. I believe that this will serve to reflect the armour effect in two ways - reducing the chance of damage being scored and slightly increasing the survivability of the target when hit. I see this as being essential if going with a single dice roll for hit/damage otherwise ships will have a short, but exciting time of it! My parent rules allowed for individual hit locations but this is a little longwinded in use so I have abandoned it - the 3 x 3 version did not use it in any event as it was captured by the critical hit rule. 

The rules for mines and ramming still need a little work but I think I have this just about dialled in. The same applies to the whole critical hit issue. In all three of these areas the game threw up a number of minor anomalies but nothing terribly difficult to resolve. Overall all is well and certainly heading in the right direction.

Forts


Fort Yuwatus viewed from the front. Most of their artillery was emplaced facing the sea and the window shutters are used to cover infantry firing ports. The only signs of the previous buildings on the site are to be seen inside so from the exterior the aspect is that of a tidy and business-like fortification, well suited to provide cover over that side of Mobile Bay.

The small fort that featured in the battle came about as the result of two hours of work including scrambling around in my supply of wooden bits and pieces I use for modelling. The fort was manufactured from four ‘not quite Jenga’ blocks (previously available from the Works - as I recall I purchased around 15 sets of it - most of which formed my block armies) with two of them being three quarter sized. The doors and windows were made from Warbases supplied pre cut grey board, the ‘gunwales’ were made from some thin wooden strip (this was the fiddliest part of the operations), the flag staff and gun barrels from cocktail sticks and the flag from those I acquired from Brigade Models. It was not based on anything in particular - I am afraid I am a complete novice when it comes to military/naval fortifications - but it looked and felt about right for what I wanted it for i.e. a small fort!

Building it though, has given me the confidence to tackle some rather more ambitious real estate. I shall make another small fort to the original design for the ACW collection and I am now looking to build a larger version using similar techniques. I will also need to think about some fieldworks for shore batteries, not to mention some more traditional terrain. The small spit of land was made from a piece of grey card with some grass mat stuck to it at a slightly smaller size. The uncovered strip represented the seashore and was covered with sand and painted with Vallejo Iraqi Sand and then washed with Agarax Earthshade before being given a gentle highlight with Vallejo Buff - look at me going all ‘art house’!

When I acquired the 15 boxes of ‘not quite Jenga’ blocks many of these were cut in two. The current version of the block armies are made up of units that are half a block wide. A local carpenter was able to saw these in half for me but I also had some cut into three and one quarter piece. I have loads of these in bags currently unused but there is certainly plenty of raw material for me to make all manner of buildings etc. A nice obvious one would be North African/Middle Eastern white washed flat roof buildings - nicely suitable for the Arab quarter on Madasahatta as well….

In Closing

The game was thoroughly enjoyable and certainly looked the part. The action and the outcome felt largely credible and as mentioned, I am happy that I am on the right path with the project. I believe I am fast approaching the stage where I need to draw a line under the rules as well as completing the remaining ship models. I have spent many happy hours immersed in this facet of the American Civil War and the lessons I have learned will stand me in good stead going forwards and with other similar projects.

Monday 18 April 2022

“No Sailor but a Fool fights a Fortress!”, August 25th, 1864….Game Number 70….Part 2

First of all I hope you all had a very nice Easter break and that the chocolate was in manageable quantities!

Battle is joined….

With the small ‘90 Day’ gunboat - the U.S.S. Kennebec in the van, the Union squadron manoeuvred into position to begin reducing the rebel fort. So far all was quiet although the telltale signs of funnel smoke were seen rising into the clear August morning sky from beyond the headland due south west.


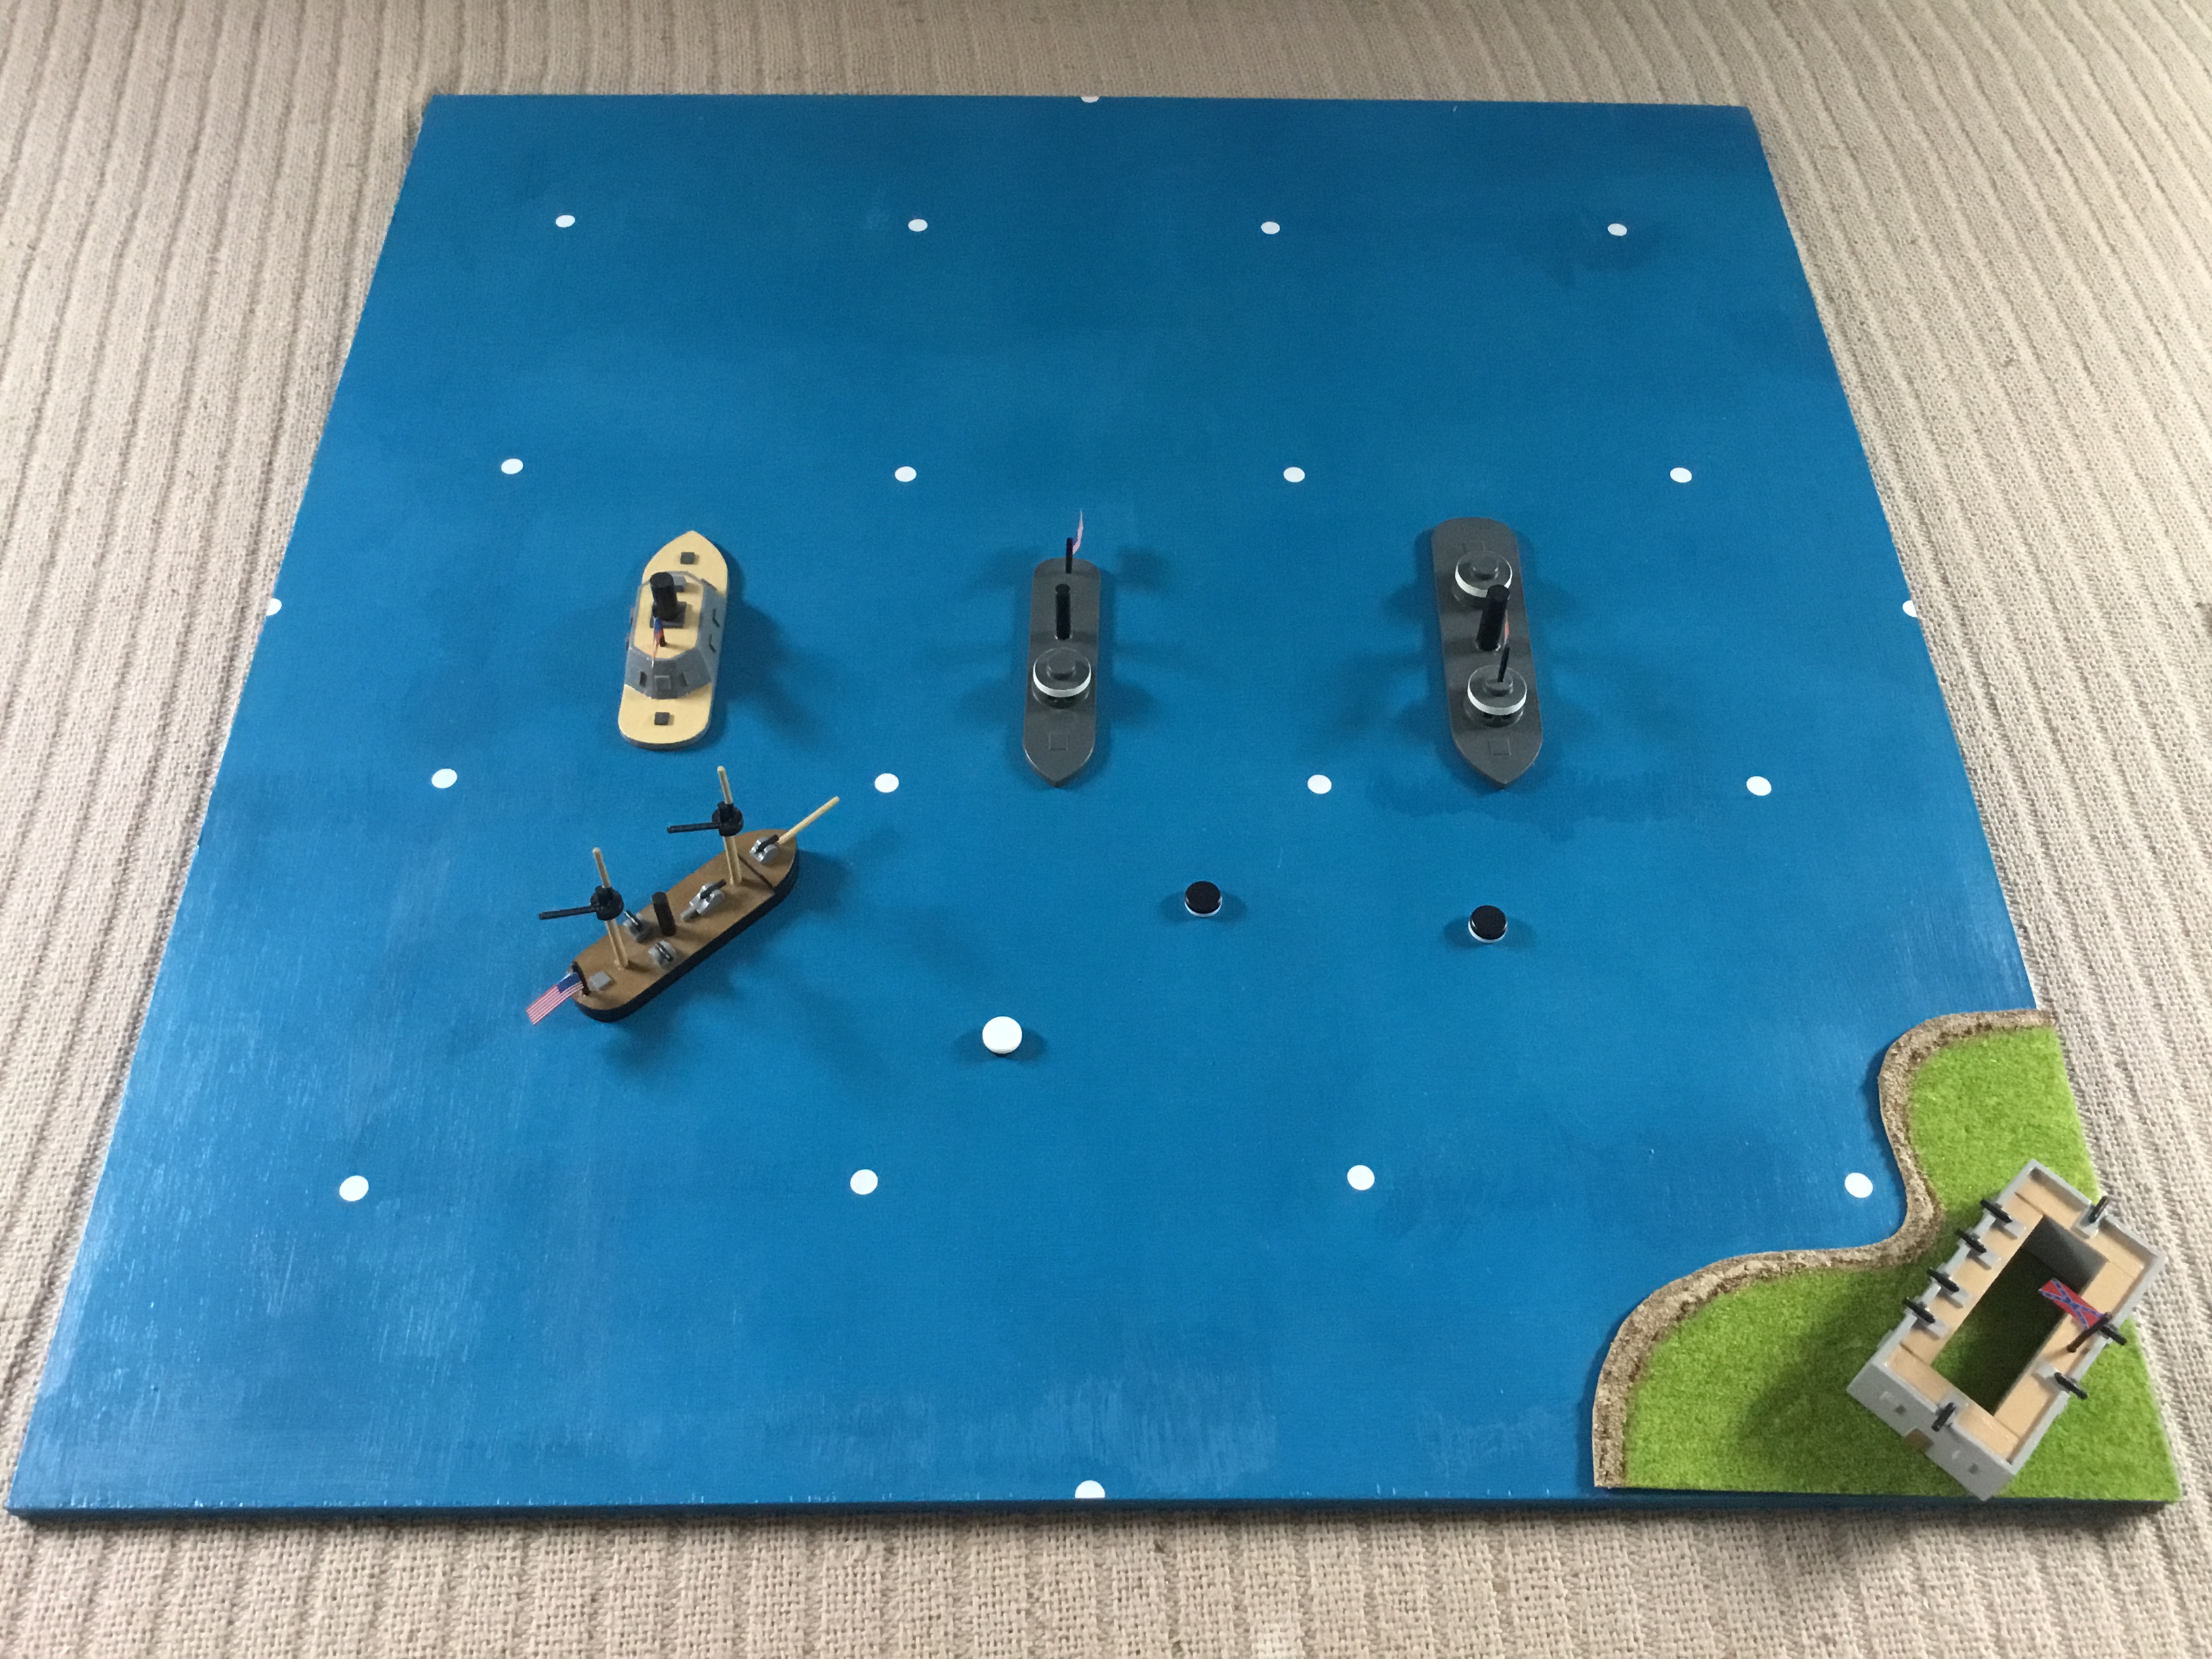
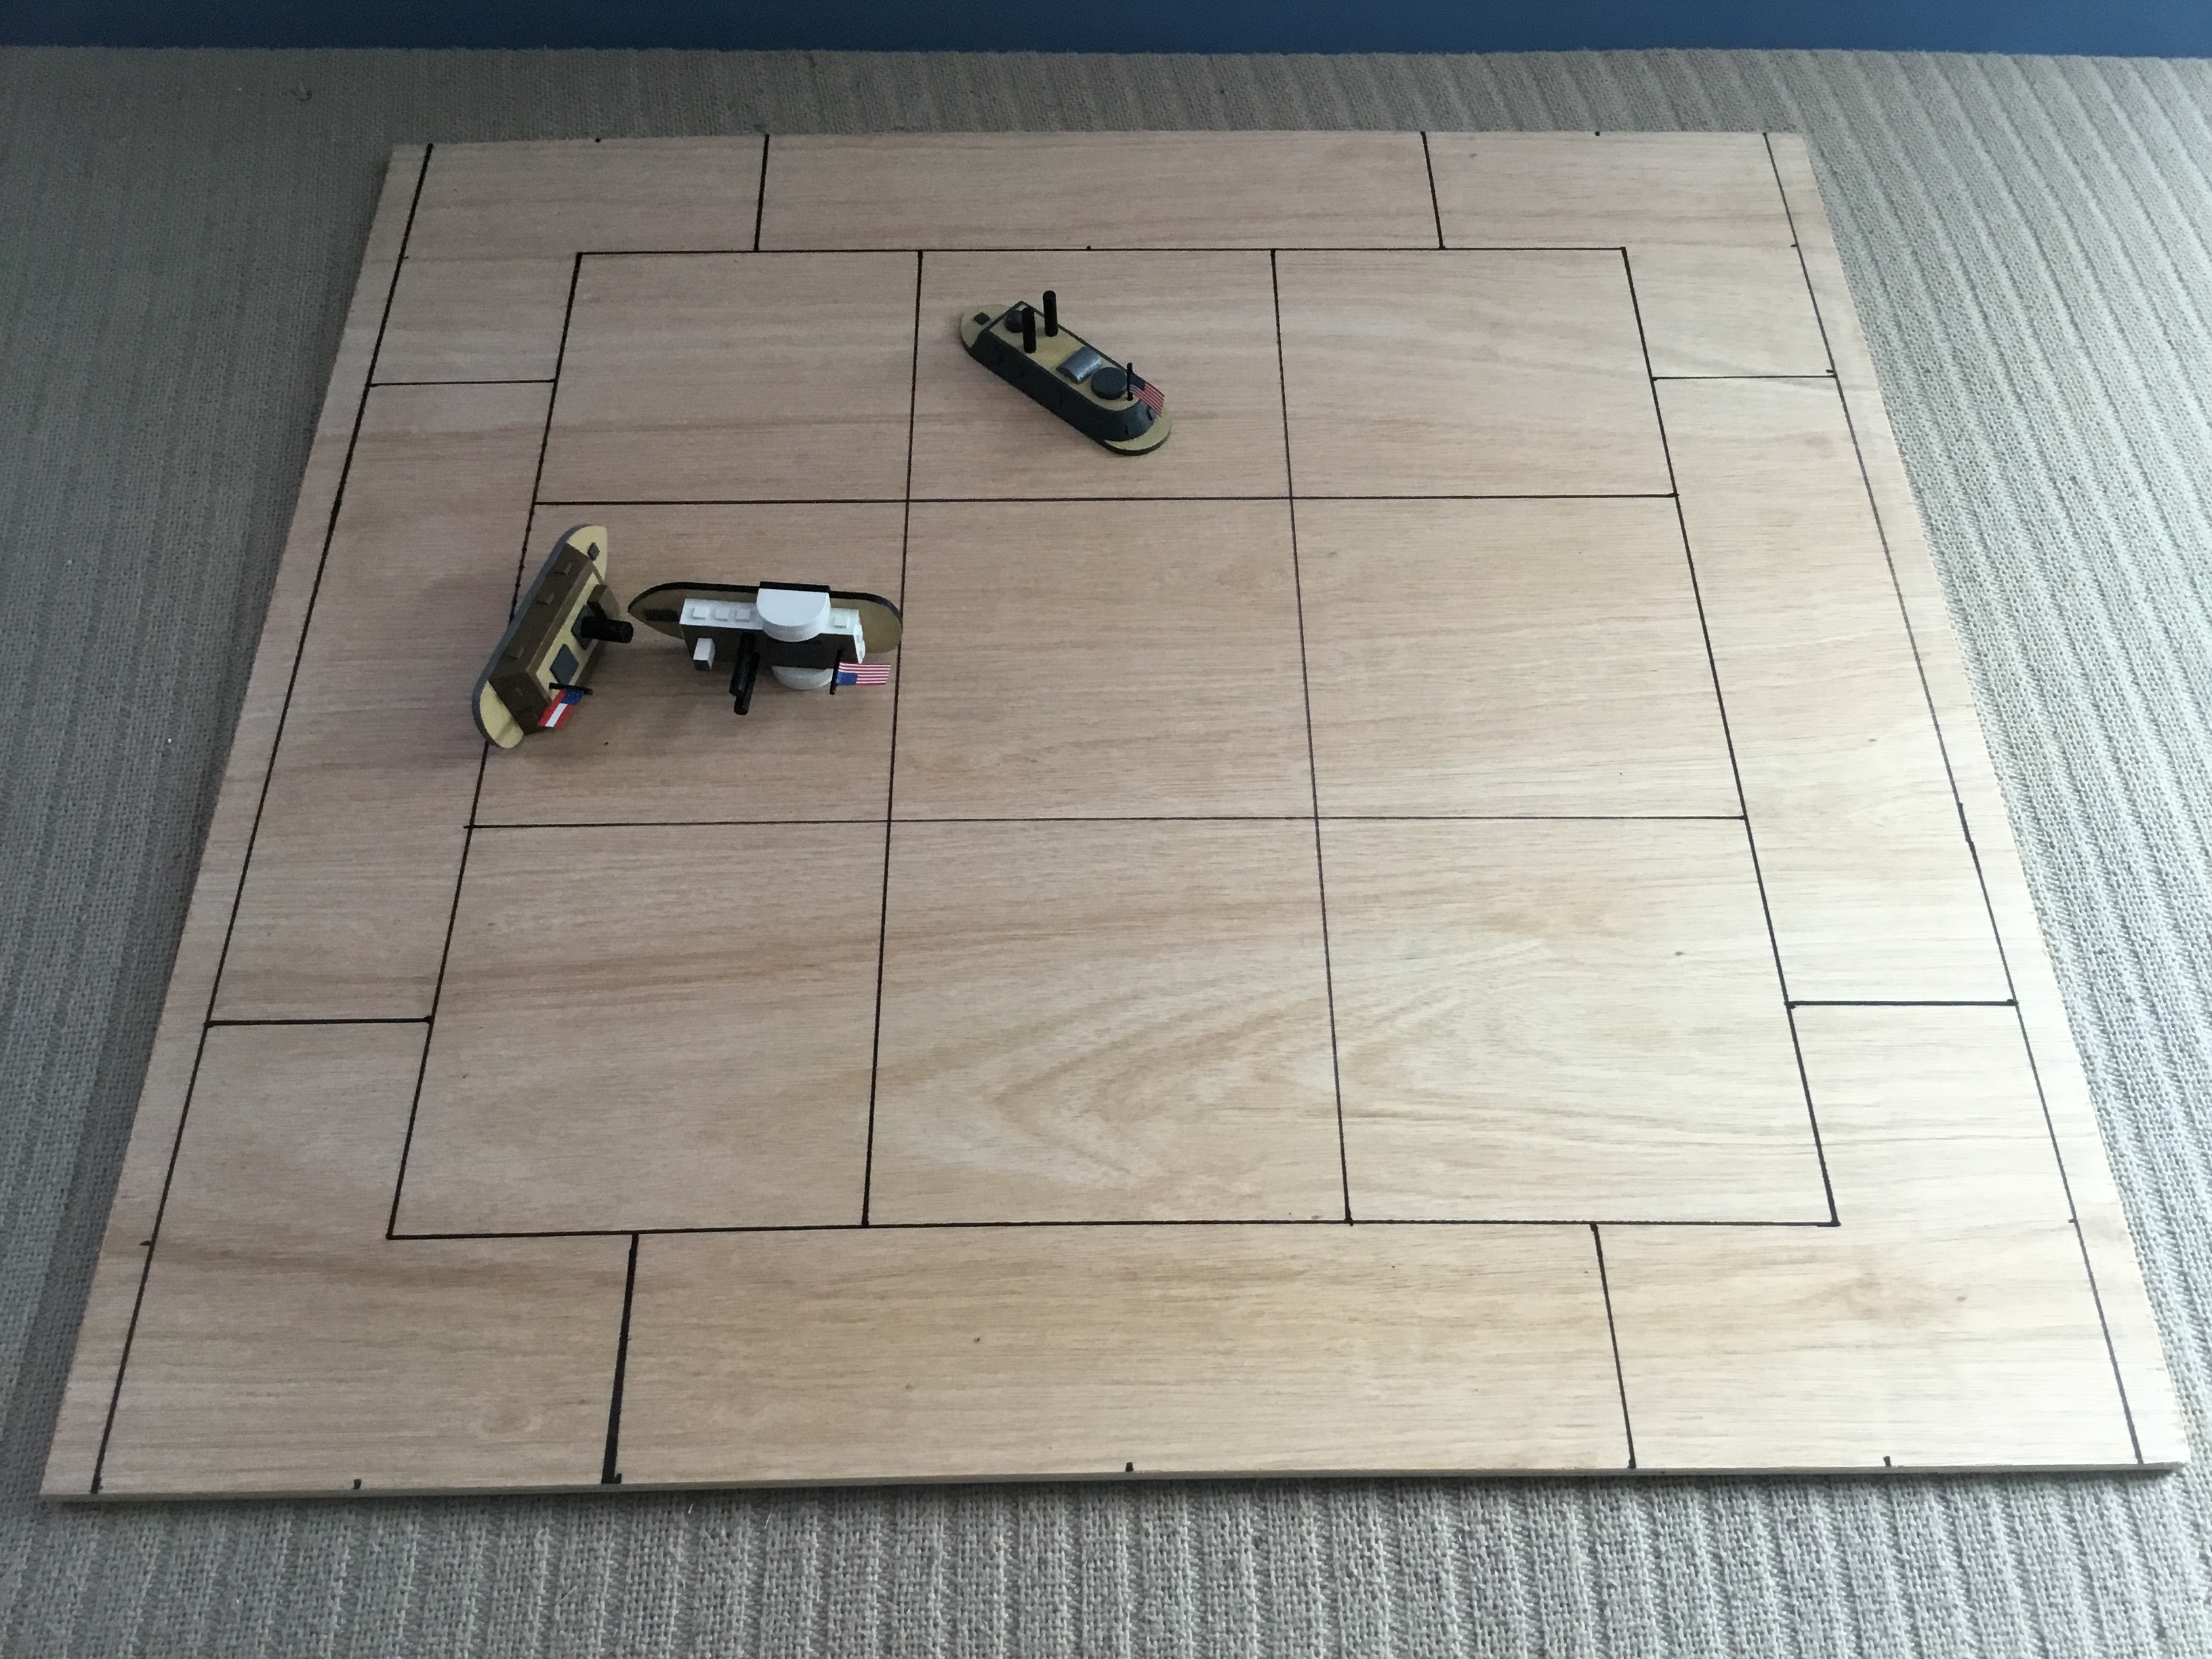
Initial positions. The Union force was split into two columns with the larger of the two consisting of the U.S.S. Kennebec, the U.S.S. Hartford and the U.S.S. Winnebago. The second column consists of the U.S.S. Galena and the U.S.S. Manhattan. Only the lead ships are currently on the board in the manoeuvring zones. In the bottom right hand of the picture is Fort Yuwatus, proudly sporting the ‘Stars and Bars’. The bottom left of the picture shows the C.S.S. Little Rebel leading the C.S.S. Texas.

Turn 1. No firing as yet and under the scenario conditions the Union moves first this turn so no initiative rolls are required.


End of Turn 1.

The two Union columns continue to move into position when suddenly an explosion is heard close to the U.S.S. Kennebec - she has run into a minefield! (The black spots are mines - ordinarily their position would be recorded on a piece of paper to preserve the element of surprise). The mine successfully explodes but aside from drenching the deck crew has no effect on the Union gunboat - a lucky escape!

Turn 2. Immediately the Confederate fort opens fire on the leading Union ship - the U.S.S. Kennebec. She rolls 2d6 at range 2 requiring 5 or 6 for a hit but as she is a fort gains a plus 1 meaning 4, 5 or 6 will hit. A 5 and a 6 are rolled with the 6 granting an extra roll. As 2 hits have been scored the chance of an extra hit is calculated as 1 or 2 on a d6 - a 2 is rolled meaning that the Union ship has suffered three potential hits. The penetration versus armour modifier is +3 over 0. The three damage rolls are a pair of 2s and a 5, each of which add a +3 making 5, 5 and 8. That is 4 points of damage (1 for each 5 and 2 for the 8 with chance of an additional damage roll - 1 or 2 required but rolled a 4 so nothing doing. Even so, the U.S.S. Kennebec has taken 4 points of damage and is still in the minefield! Initiative was 2 for the Union and 3 for the Confederates - the latter opted to allow the Yankees to move first.


End of Turn 2.

The U.S.S. Kennebec, despite the battering she had received from the guns of the fort, not to mention the near miss of the mine, steamed gamely on to close with the fort - straight into a continuation of the same minefield! Again the mine detonated but to no effect. The plucky ship was certainly riding her luck! Meanwhile the flagship, the U.S.S. Hartford, ignoring the threat from the rebel mines followed in the wake of the U.S.S. Kennebec. Again a large explosion was heard and again the result was the same - a lot of water splashing around but little else - there seemed to be something amiss with the Confederate mines.

Meanwhile the C.S.S. Little Rebel swung her helm hard over and looked to engage the leading Union ship, the so far fortunate U.S.S. Kennebec. The C.S.S. Texas however, only had eyes for the Union ironclad the U.S.S. Galena and so moved into a ramming position.

Turn 3. The fort once again opened fire at the U.S.S. Kennebec. The roll was a 6 and 1 so one potential hit and the chance of an additional (needed to roll a 1 and scored a 6 so no additional hit). The damage roll was a 2 so plus 3 makes 5 meaning a further point of damage. The Union ship fired back at the fort. 3d6 scoring 1, 3 and 6 and a dismal 5 for the potential additional hit (when needing a 1). Her guns are rated 3/3 and the fort armour is a 3 so straight dice are rolled. The score was a 3 so no effect.

Meanwhile the C.S.S. Texas opens fire against the U.S.S. Galena with 2d6 and misses with both. Initiative is 1 for the Confederates and 2 for the Union. The Union opts to move first.


End of Turn 3.

The U.S.S. Kennebec swings across the face of the fort, firing as she goes but to little apparent effect. Almost immediately yet another mine explodes but again, fortune smiles upon her and she escapes with no damage. Similarly the U.S.S. Hartford, still following the gallant U.S.S. Kennebec, sees another explosion of her port beam causing no damage. So far the Confederate minefields have caused no damage to the Union.

The C.S.S. Little Rebel, seeing her intended target sweep alongside her starboard bow immediately changes target and heads at full speed towards the U.S.S. Hartford. The impact shook both ships and the Union flagship staggered under the blow. 4d6 were rolled to hit with 2 x 4 and a 6 coming up meaning 4 points of damage. The additional roll due to the 6 required 3 (3 hits scored) or less to generate a further damage roll and a 4 turned up. The C.S.S. Little Rebel suffered a single point of damage in return as she pulled away from her target.

The C.S.S. Texas crashed into the beam of the U.S.S. Galena and immediately rolled a pair of 4s, a 5 and 6 meaning 4 points of damage - the additional roll came up as a 5 - too much as 4 or under was needed. She did not get of lightly though as she suffered 2 points of damage in return. As the C.S.S.Texas tried to break free her captain realised that the two ships were locked together!

Turn 4. The U.S.S. Kennebec opened fire at the C.S.S. Little Rebel scoring a 2, a 4 and a 6 meaning two hits. The roll for an additional hit was a 6 when a 2 was required. Her guns are rated as 3/3 and the rebel ships armour is a 1 so damage dice each get a plus 2. A 2 and a 3 come up becoming a 4 and 5 meaning a further 2 points of damage on the rebel ship. The U.S.S. Hartford opens fire on the fort and rolls a miserable pair of 1s, a 2 and 3! The U.S.S. Winnebago enters the fray and her target is none other than the C.S.S. Little Rebel. She rolls a 3, a5 and 6 with no extra hit. For damage her guns are rated 3/3 so each hit gains a plus 2 - she rolls a double 1! Somehow the plucky rebel gunboat survives, at least for now.

The fort opens fire on the U.S.S.Hartford scoring a 6 and a 4 but with no additional hit. Her guns are rated 2/3 against the 0 armour of the Union ship. She rolls a 3 and 6 which convert to a 6 and a 9. That is four points of damage in all! The Union flagship has reached her critical point and must now attempt to disengage. Her critical hit is a 2 - hull damage and so the Union flagship slowly settles by the bow.

The currently locked together C.S.S. Texas and the U.S.S. Galena roll to separate and successfully do so - both sides roll a d6 and any 6 frees the two ships. Initiative is 4 for the Union and 2 for the Confederates. The union opts to move first.


End of Turn 4.

The U.S.S. Kennebec pulls clear of the minefields and finds herself more or less parked on the stern of the C.S.S. Texas! The rebel ironclad had separated from the U.S.S. Galena and so both ships attempted to turn away from one another. Meanwhile the U.S.S. Manhattan appeared from behind the Union ironclad to position herself off the bow of the rebel ship.

Meanwhile the C.S.S. Little Rebel, despite being surrounded by enemy warships and having traversed he own minefield spotted the looking bulk of the U.S.S. Winnebago ahead. Immediately her captain ordered full speed and she braced herself to ram the Union warship. The ram roll was a 6, a 5 and a pair of 4s meaning 5 points of damage. The additional roll was a 1 so another damage roll was permitted - this came up as 3 so no effect. The Union monitor was hard hit but in receiving such a heavy blow the C.S.S. Little Rebel suffered 3 points of damage in return - she was now at her critical point and her critical hit roll was a 2 meaning hull damage. This was sufficient to sink the gallant rebel warship. Fortunately the two ships were not entangled so the U.S.S. Winnebago was able to ease away from the sinking enemy vessel.

The U.S.S. Hartford, stopped in her tracks by the recent ram attack of the C.S.S. Little Rebel was immediately subjected to a withering fire from the fort which proved to be too much for her timbers to bear.  Her bows gradually tilted forwards as the inrush of water overcame the efforts of the pumps and so she slowly sank in shallow water right under the guns of the rebel fort.

Turn 5. The C.S.S Texas opened fire against the U.S.S. Galena. She rolled a 6 and 4 meaning two potential hits. the additional hit roll was a 6 against a 2 being required. Her guns are rated as 2/3 and the armour of the U.S.S. Galena is a 1 so overall +2 to each damage roll. A 3 and 5 came up converting into a 5 and a 7 making 3 points of damage. No additional damage was scored. Her critical roll came up as yet another 2 meaning hull damage. The options for hull damage are 2 flotation points or 1 flotation point and 1 off the speed. The Union opted for the latter meaning that the U.S.S. Galena was now afloat, barely, but dead in the water. She could however, still fight to protect herself. She returned fire against the C.S.S. Texas but with abysmal effect - she rolled a 1, a 2 and a 3 (the extra d6 is awarded when firing at a target within the same square - it represents point blank fire). The U.S.S. Kennebec also fires at the rebel ironclad and misses with each d6. Finally the U.S.S. Manhattan opens fire. She is rated as 4/4 and rolls no higher than a 2! 

Initiative is Union 2 and Confederate 3. The Confederate opts to move first.


End of Turn 5.

The two Union monitors bear down on the fort but the threat of the C.S.S. Texas is real so the U.S.S. Manhattan keeps a wary eye on the rebel ironclad. The U.S.S. Galena is doing an excellent job acting as a breakwater directly in the path of the rebel ship and so the C.S.S. Texas responds in the only way she knows how - she once again steers into the U.S.S. Galena. She roll 4d6 scoring 3 1s and a 6 (no additional) scoring two points of damage. The U.S.S. Galena slips slowly beneath the waves. The C.S.S Texas suffers a further two points of damage for her efforts but luckily for her is not entangled with the sinking Union ship.

The two Union monitors circle ominously and carefully avoiding the suspected rebel minefields.

Turn 6. The C.S.S. Texas, although faced with a Union monitor opts instead to fire at the U.S.S. Kennebec. She hits with one d6 and scores two points of damage - this is sufficient for her to reach her critical point. Incredibly her critical roll is yet another 2! She takes one point of flotation damage and one off her speed. Her return fire is sufficient to cause a single point of damage against the rebel ironclad. 

U.S.S. Manhattan fires next. She manages to score 3 points of damage on the rebel ship which takes her to her critical level. The C.S.S. Texas rolls a 4 which reduces her gun factor by 2 in any single arc but in any event she must now break off the engagement.


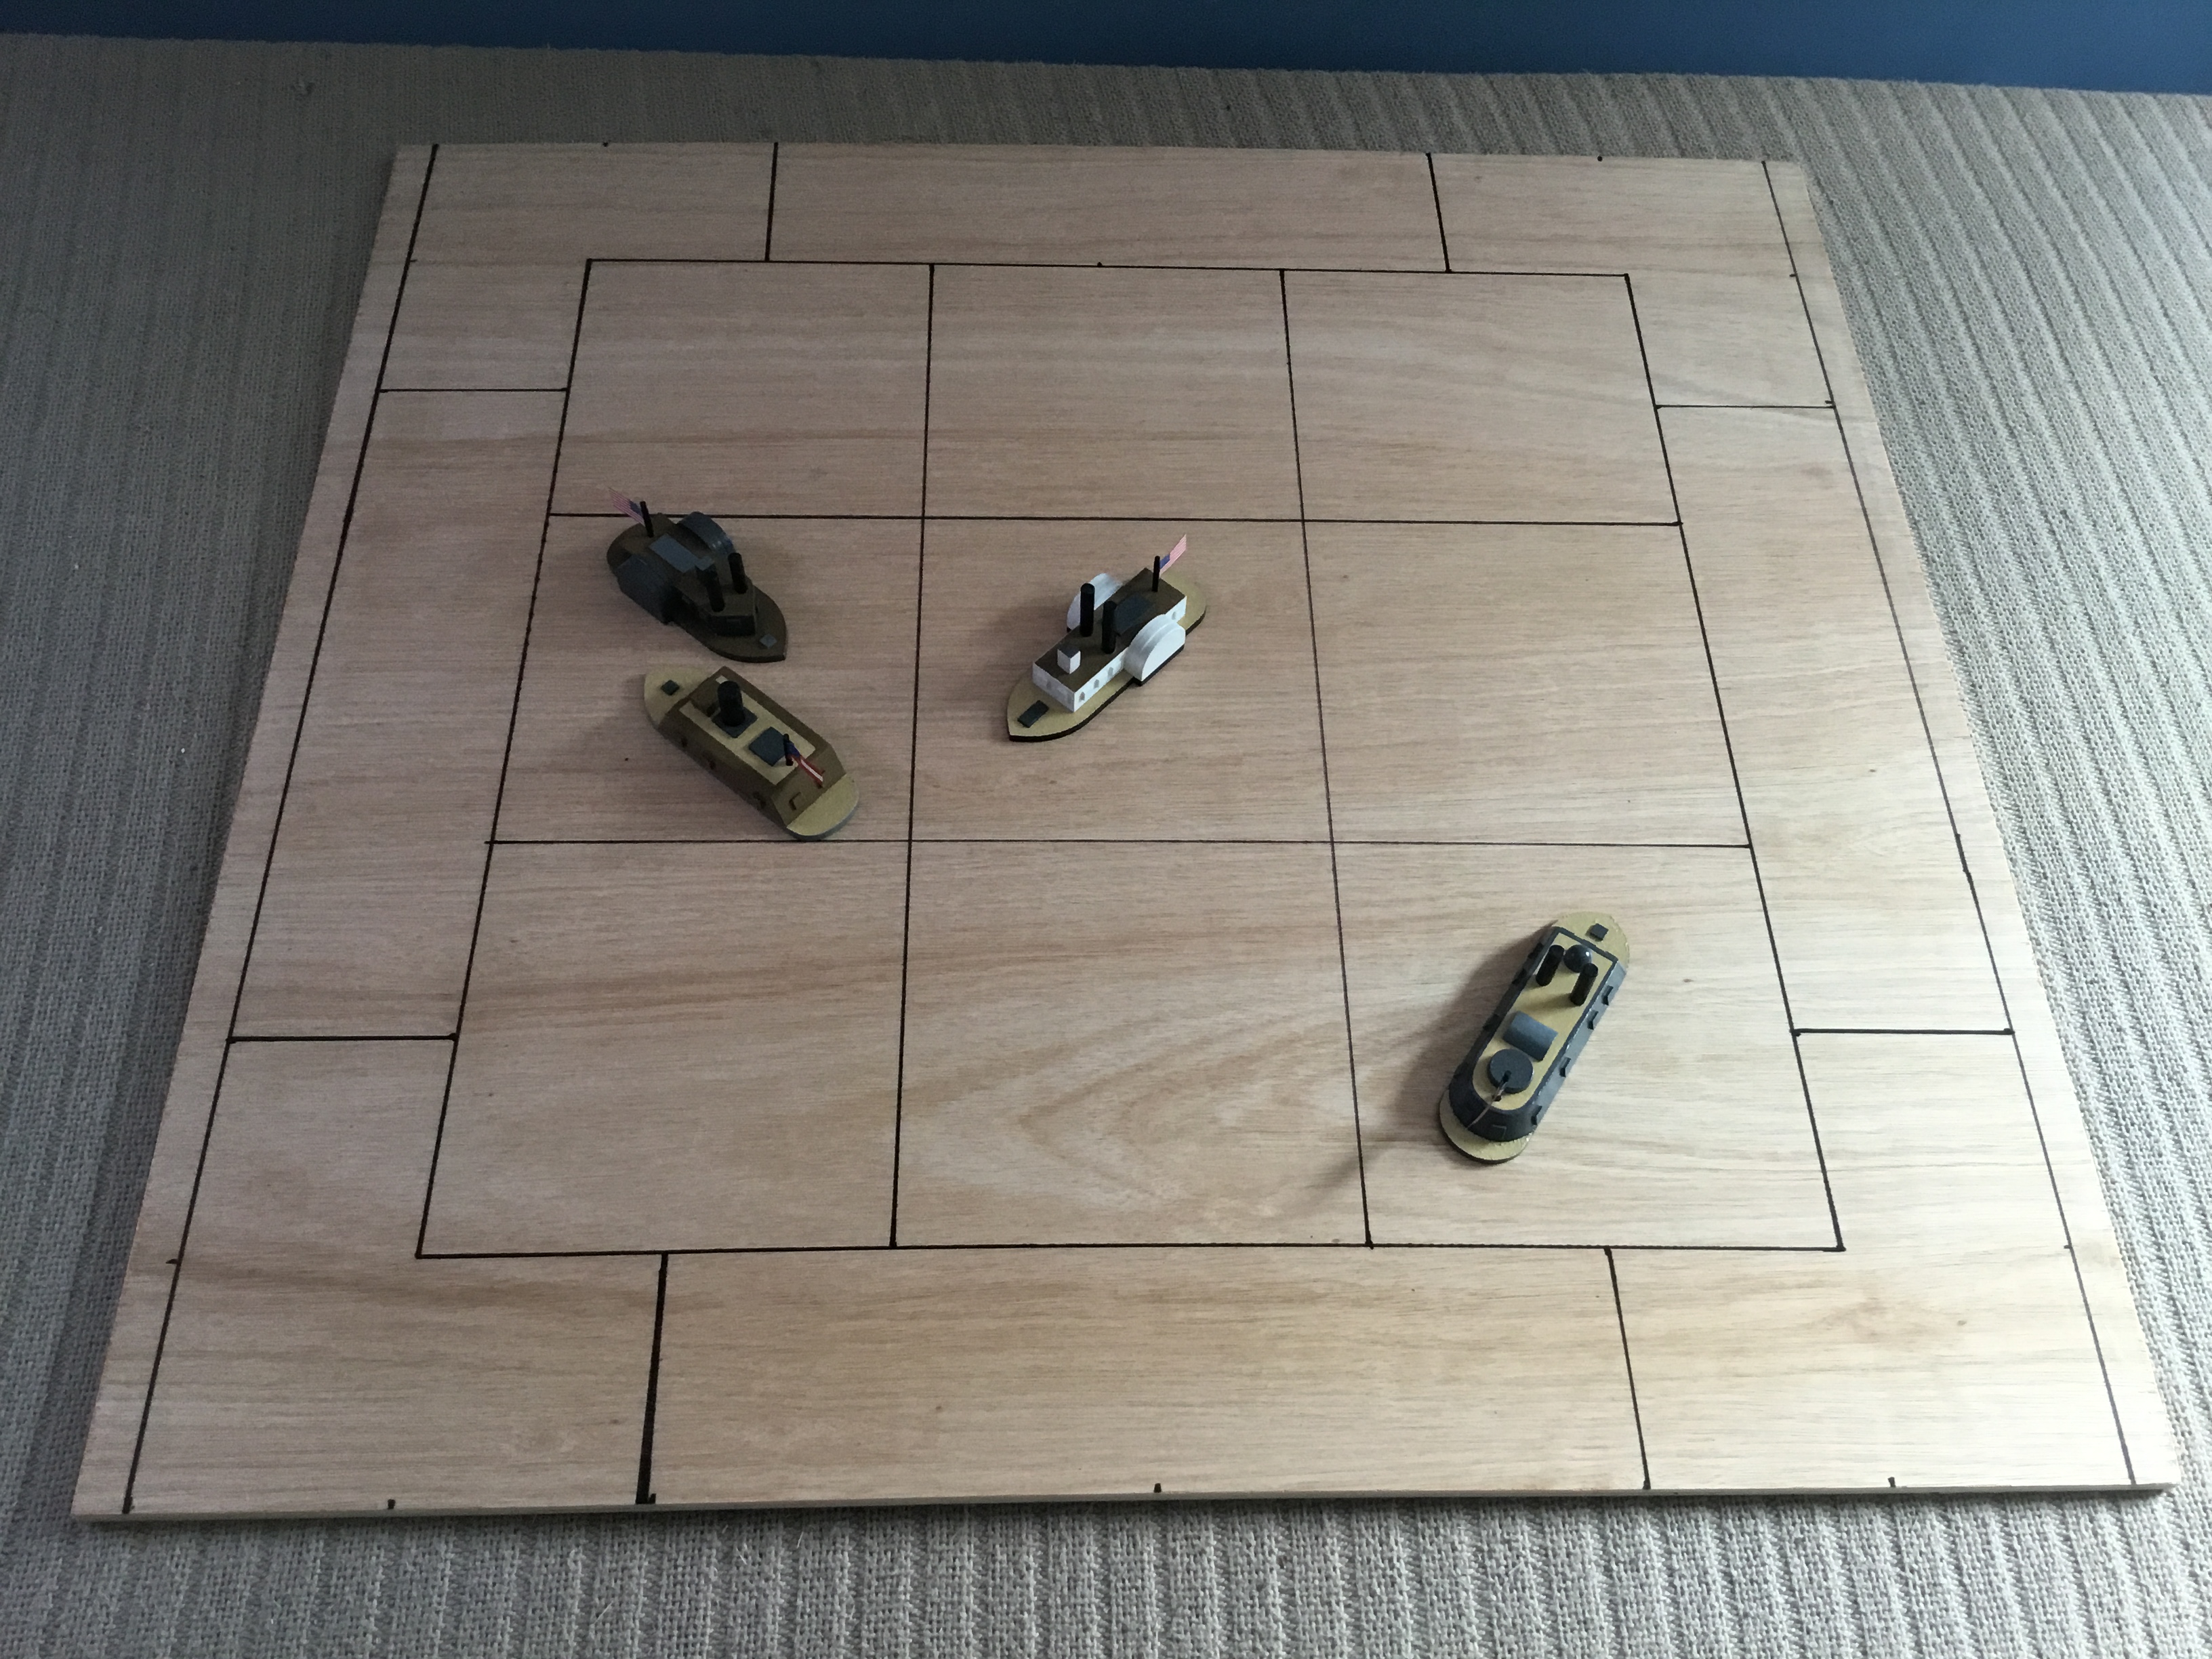
Endgame. As the U.S.S. Galena slips below the waves the U.S.S. Manhattan (centre) opens fire on the C.S.S. Texas and scores some telling damage. The rebel ironclad is now in serious trouble having dismounted artillery and a hull riven with shot and shell whilst Union warships lurk menacingly between her and safety. The U.S.S. Kennebec, battered but unbowed, limps away from the action. The garrison of Fort Yuwatus are content to be observers for now but they know that their time will come and probably sooner rather than later.

The crew of the C.S.S. Texas let out a ragged cheer as the U.S.S.Galena slowly sank. Their cheers were short lived though as a single turreted Union monitor opened fire at close range. The damage was immediate and telling and so the C.S.S. Texas attempted to limp away from her tormentor. The U.S.S. Winnebago was still in the fight but had sustained below waterline damage at the hands of the C.S.S. Little Rebel and so was in no position to attempt to enter a known enemy minefield.

The U.S.S. Kennebec was still steaming albeit in a very ragged fashion. Her damage was extensive but considering the storm of shot and shell she had been subjected to, along with the ineffective mine attacks, she could be well pleased (and relieved) with her endeavour.

All thoughts of taking on the undamaged Confederate fort were now abandoned as the remaining Union ships decided to retire to regroup and repair. The first assault on Fort Yuwatus had failed and at a heavy cost. 

The garrison of the fort watched the retiring Union ships with a mixture of relief and misgivings. The Yankees would be back, in greater numbers and next time there would be little that the rebel navy could do to stop them.

Aboard the C.S.S. Texas, an hour or so later, the captain weighed up his options. None of these were attractive and so, with no hope of exiting the bay he ordered the ship to be run hard aground and fired. It was a bitter but an inevitable ending.

Mobile Bay was now even closer to being entirely in Union hands. 

Thoughts on the Game.

Well! The mines were ineffective, gunfire was very hit or miss (literally!) and the ram seemed to be the wonder weapon! Certainly a gunfire/ram attack combination seemed to be very effective which I have no problem with in the context of the game. I had hoped that the fort would be involved but to be honest the Union deployment may have been less than optimum in this respect - perhaps the monitors should have gone in sooner - but I can put this down to an element of overconfidence on the part of the Union command following the earlier victory at Mobile Bay.

The rules worked well - there are still a few minor niggles to contend with - and I am pretty comfortable with them. I just need to get then properly typed up, proof read and play tested. 

I thoroughly enjoyed the game and with seven ships on a 3 x 3 playing area it was snug but not overly so. It has certainly given me the impetus to crack on with the remaining ships as well as making some more scenery.


Fort Yuwatus ready for action

The Fort

Very simple to build and not based on anything in particular - I used four Jenga blocks with two of these 3/4 sized, cocktail sticks and pre cut card pieces - but it looks the part and fits in with the ships models very nicely. As a trial run it worked really well and has certainly made me think about some more bespoke models for the period but that is something to think about for another day.


The action viewed from the fort - C.S.S. Texas at the top of the picture limps off slowly to her lonely fate.


Saturday 16 April 2022

“No Sailor but a Fool fights a Fortress!”, August 25th, 1864….Game Number 70….Part 1


The Battle of Mobile Bay - note the sinking Union monitor the U.S.S. Tecumseh - sunk by a torpedo (a mine in the parlance of the day). 

Now that I think I have gone as far with the 3 x 3 variant of my ironclad rules as I think I need to without the benefit of ‘live player’ play testing, I wanted to try a large scale battle to see how the system stacks up. Large is relative as under normal circumstances a naval war game of six or so models would not usually be thought of as being excessive but the focussed playing area of the 3 x 3 system means that it is. It was a feature of many ACW naval engagements that a fair number of vessels could be operating in a fairly compact area and so the 3 x 3 game board reflects the ensuing chaos rather nicely!

The action I have settled on is in many ways a quite common one for the period - the bombardment and attempted neutralisation of a Confederate coastal or riverine fortification - so I am confident that the historical premise will at least be grounded in fact. ‘Based upon’ and ‘Purely representational” are the phrases that spring to mind!

Mobile Bay and the surrounding area.

The Background

Following the Confederate defeat at Mobile Bay the Union fleet was tasked with clearing out any remaining pockets of rebel resistance along the surrounding coastline. It would be arduous work as the entire region was beset with small inlets and coves - the area had been extensively used by Confederate blockade runners for this very reason - and each one had to be painstakingly investigated and subdued where necessary. Most of these coastal hideaways were little more than convenient anchorages although a few were based around a more permanent setting, typically a minor fishing community. Fewer still boasted any kind of fortification but it was one such location that attracted the attention of the Union command - Fort Yuwatus. 

The fort in question was not actually a fort at all. Originally it was built as a series of assorted utility buildings built within a walled enclosure to support the oyster beds in the bay itself but with the outbreak of hostilities had been hastily converted into a small fortification facing west and overlooking the bay. The exterior boundary wall - rectangular in shape - was reinforced with packed earth and timber along the interior and when completed successfully enclosed all the smaller buildings that made up the complex. The original buildings were of a similar height which meant that a high level walkway could be added to cover the entire perimeter and, when built, was strong enough to take eight pieces of artillery. Although the whole structure was improvised the end result was a sturdily constructed and imposing looking fortification.

Aside from the gun crews themselves, the small garrison, numbering just over a hundred men, also lived in the complex although it was not a pleasant place to be quartered. The whole collection of ramshackle buildings had been used extensively by the oyster fishing community and so everywhere was permeated with the smell of peat smoke and rotten shellfish. Still, thus far it had been a quiet posting and despite the living conditions being less than ideal the garrison, to a man, considered themselves fortuitous to be there rather than in the frontline somewhere.

The defeat at Mobile Bay changed all that. Unexpectedly the small fort was suddenly in the frontline and so, with orders to hold out as long as possible, the garrison made ready for the inevitable assault. They would not have to wait long.

The defenders at Fort Yuwatus were well supplied with ammunition and foodstuffs and also had access to a supply of command detonated torpedoes. Although these had been deployed some weeks previously, the garrison commander was confident they would help bolster the defence of the fort from any attacks from the sea. The Confederates did have one substantial advantage though. Moored just around the headland, protected by torpedoes and the guns of the fort, lay the squat bulk of the brand new ironclad, the C.S.S. Texas, and her escort, the small cottonclad gunboat ram the C.S.S. Little Rebel. With them in their makeshift anchorage were two small British built transports, waiting patiently, if a little uneasily, for the garrison of the fort to board in order to escape the oncoming Union fleet.

The C.S.S. Texas was a brand new and barely finished casemate ironclad of the Columbia type. Her crew was for the most part made up of experienced seamen but the gunners had come from the army and so had to hurriedly gain their sea legs. The whole crew had been working flat out to make the ship ready for action and the recent defeat at Mobile Bay and the loss of her  sister ship, the C.S.S. Tennessee, had only served to accelerate their efforts. 

The Union squadron looking to reduce Fort Yuwatus was a powerful and compact force of five ships. The flagship was the U.S.S. Hartford and she was joined by the monitors the U.S.S. Winnebago and the U.S.S. Manhattan, the ironclad the U.S.S. Galena and the small gunboat the U.S.S. Kennebec. It was a potent force and deemed to be more than sufficient to deal with the small rebel fort.

The C.S.S. Texas however, would prove to be a rather unpleasant and unexpected surprise.

The Opposing Forces

Confederate


C.S.S. Texas and the C.S.S. Little Rebel. Oh what fun I had making the thrice cursed octagonal casemate….There is no picture of Fort Yuwatus yet as at the time of writing she had only just been undercoated!

C.S.S. Texas - Size: M, Speed: 1, Flotation Points: 9 (6/3), Armour: 4, Guns: FW: 2/3, P, S: 2/3, AW: 2/3, Ram Bow*

C.S.S. Little Rebel - Size: S, Speed: 2, Flotation Points: 6 (4/2), Armour: 0, Guns: FW: 1/1, P, S: 1/1, Ram Bow

Fort Yuwatus - Hit Points: 9 (6/3), Armour: 3, Guns: FW: 2/3

Union


The Union attackers. At the top of the picture is the U.S.S. Hartford flanked by the U.S.S. Galena. The bottom row (left to right) has the U.S.S. Kennebec, the U.S.S. Winnebago and the U.S.S. Manhattan.

U.S.S. Hartford - Size: M, Speed: 2, Flotation Points: 9 (6/3), Armour: 0, Guns: F: 1/1, P, S: 4/2

U.S.S. Winnebago - Size: M, Speed: 1, Flotation Points: 9 (6/3), Armour: 3, Guns: F, P, S: 3/3, A, P, S: 3/3

U.S.S. Manhattan - Size: M, Speed: 1, Flotation Points: 9 (6/3), Armour: 4, Guns: T: 4/4

U.S.S. Galena - Size: M, Speed: 1, Flotation Points: 9 (6/3), Armour: 1, Guns: P, S: 2/3

U.S.S. Kennebec - Size: M, Speed: 2, Flotation Points: 9 (6/3), Armour: 0, Guns: 3/3

* The numbers in brackets after the Flotation Points total shows the split at the Critical Point - e.g. a ship with 9 Flotation Points has a Critical Point at 3 hence the 6/3 split. For Guns the the numbers refer to the number of firing dice that are rolled and the following number is the penetration factor. The letters refer to the firing arcs e.g. F = forward, FW = forward wide, P = Port, S = Starboard, A = aft, AW = aft wide. T = turret.

The Opening Moves

The Union squadron, with the U.S.S. Kennebec leading, steamed in line ahead approaching the fort from the North West. The plan was a simple one, each ship would sail across the front of the fort, firing all the while, and then circling back to repeat the process as many times as were required to silence the rebel guns. It looked straightforward enough and with no interference expected from the Confederate navy.

Meanwhile, the crew of the C.S.S. Texas made ready to engage the enemy.

To be continued….(I shall be fighting the battle on Easter Monday)


Wednesday 13 April 2022

The Fast Play 3 x 3 Portable Rubik’s Cube


I had one of these ‘back in the day’ but never solved it, not even by peeling the stickers off and rearranging them BUT, from the shape of this humble device has sprung a number of ideas….

Now I am not for one minute suggesting using a Rubik’s Cube for a Fast Play 3 x 3 Portable Wargame but read on to see how I came to this extraordinary idea!

On the ground or sea level if you prefer, the footprint of the 3 x 3 variant of the Portable Wargame is, well,  3 x 3 squares. Now flip that on its side and you have a vertical playing area of 3 x 3. The point I am getting to is that but looking at the 3 x 3 area as a kind of Rubik’s Cube shaped playing space you can open up the system for all manner of 3D fun as you would effectively be using 3 x 3 x 3 or 27 spaces instead of 9 on the ground.

Initially I was thinking about naval air attacks. The target ship would typically occupy the very centre of the playing surface whilst the assailants (and of course any defenders) would occupy the remaining areas, jostling and jockeying for position whilst trying to avoid AA and enemy fighters etc. By factoring in three vertical levels - let us call them low, medium and high - you can more effectively represent air assets and the defensive AA capability of the target. Having the three height levels also paves the way for pure air to air combat as well. It is certainly an idea I will explore further at some point as I am fond of aerial games but once again, the compelling need to mirror specific rather than generic types will mean it may take slightly longer to achieve.

It would not be a massive stretch of the imagination to employ a similar system in deep space so Star Wars, Star Trek and others could make an appearance as well something Victorian Science Fiction based - Martian cloud ships, ether flyers, Aeronef and similar. One could even take the system undersea - substituting height for depth levels. 

These are all viable ideas as far as I am concerned but for now my main priority is to complete the ironclad set and the expansion that will take the rules up to 1905 (these have not even been started yet and exist merely as a couple of ideas scribbled on a scrap of paper).

Sigh….So many ideas and so little time - I really need to retire!


Tuesday 12 April 2022

Downsizing Bargains

 I will let the pictures do the talking but I have taken the decision to offload a whole pile of books - mainly because they relate to periods of history that whilst I maintain an interest in them it is highly unlikely I will ever get to game them in a meaningful way. To make matters really easy every title is the same price - £10 and naturally this excludes postage. I would be open to any amount of ‘wheeling and dealing’ in respect of part exchange or discounts for bulk buying etc. 

The best way to contact me if interested in anything (and no sensible offers are likely to be refused) would be to email me on roguejedi@btinternet.com so we can thrash out the details.

Enjoy!


Let me know should anything take your fancy!


Blue Water Boarding


A US Frigate attempts to engage a Confederate commerce raider on the high seas. Sea or indeed any waterway colour is always a minefield in my experience so I have opted for safety first and have gone with the above - even for the ‘coffee coloured’ Mississippi! At least it is easy to tell that it is a naval game….or even an aerial one!

 I have finished my board for use with my 3 x 3 Ironclad rules. It started life as an off cut from a sheet of 8mm thick plywood - I have another couple of spare pieces that have been earmarked for various projects - painted using a tin of Wilkinson’s ‘Totally Teal’ matt emulsion paint, some sticky white ‘dots’ and a coat of satin varnish to give it some sheen. It is not perfect but it does suit the models I have built and so is in keeping with the overall look of the thing. Whilst the colour is quite tropical looking it will suffice as I am firmly of the ‘blue sea or indeed any waterway’ school of naval wargames! Quite what the brown water types would think of this is anyone’s guess but I take solace that not for nothing was the River Danube known as the ‘Blue Danube’ - slightly out of theatre I know but you get the drift of what I am getting at!

I opted to use white dots rather than lines so that the grid effect was less intrusive. For some reason it actually makes the playing area seem larger than it is although I have already thought of making a similar board but using bigger squares (these are 6”). The nine central squares are enclosed by four areas that perform a similar function to the reserve and flank areas of the various land based versions of the rules. My plan is to use these for grand tactical manoeuvres to add a little uncertainly to the proceedings. Each of the surrounding four zones overlaps three squares so a ship or ships entering the central battle zone may be able to exercise some tactical acumen when doing so as the opponent will not know exactly where they are coming from. I have not even begun to think about the rules for using this but I will certainly be doing so. This painted design is subtly different from the previous unpainted version due to the change in the outer zones.

As an aside the board will also serve for use in 3 x 3 aerial games and I suspect you will not be surprised that I have a cunning plan in that direction….

Sunday 10 April 2022

Raiders! And the Lost Ark….13th August, 1862….Game Number 69


“The Arkansas is coming!”

It has been a busy week with work and various Laurel related bits and pieces - nothing serious, just administrative in nature - which means that my plans around typing up the final draft of my ironclad rules (including the 3 x 3 variant) as well as painting up a dedicated board have rather fallen by the wayside.

Be that as it may, I have managed to get in another game that incorporates all of the tweaks etc from the previous versions and prior play testing. It has worked a treat with only minor tidying up around the ramming rules and the number of ships that can occupy a grid area.

The Background

In order to push to Vicksburg the Union forces first had to secure the waterways so as to allow for speedier troop transfers and supplies getting to the front line. In order to achieve this they first had to find, engage and neutralise the powerful rebel ironclad, the C.S.S. Arkansas. 

A Union cavalry patrol had sighted the rebel ironclad berthed in a minor back water and so a scratch force of three ships, the gunboat U.S.S. Essex and the two rams, the U.S.S. Switzerland and the U.S.S. Queen of the West was hastily assembled and tasked with bringing the rebel ship to heel. The reasoning behind the composition of this force was simple. The U.S.S. Essex would provide the firepower whilst the two rams would look to administer the coup de grace whilst the rebel ironclad was occupied in a shooting battle.

Unbeknown to the Union forces the Confederates had gotten wind of this sortie via the same method i.e. a cavalry patrol had spotted the three ships making their way at all speed towards the mighty ironclad. Not wishing to caught at a anchor the C.S.S. Arkansas raised steam and swung her bows towards the approaching enemy raiders. Battle would soon be joined.


The protagonists - The C.S.S. Arkansas in the foreground with (from left to right) the U.S.S. Queen of the West, the U.S.S. Essex and the U.S.S. Switzerland. As usual, any resemblance between the models and their historical counterparts is purely coincidental and representatively intentional….

The Ships

C.S.S. Arkansas - Size: Medium, Speed: 2, Flotation Points: 9 (6/3), Armour: 3, Guns: FW: 2/2, P, S: 2/3, Ram Bow

U.S.S. Essex - Size: Large, Speed: 2, Flotation Points: 12 (8/4), Armour: 2 Guns: FW: 3/4, P, S: 2/2

U.S.S. Queen of the West - Size: Medium, Speed: 2, Flotation Points: 9 (6/3), Armour: 1, Ram Bow

U.S.S. Switzerland - Size: Medium, Speed: 1, Flotation Points: 9 (6/3), Armour: 1, Guns: P, S 1/0 Ram Bow

The Initial Positions


The U.S.S. Essex, in a loose formation with the two rams - the U.S.S. Queen of the West (off the starboard beam of the U.S.S. Essex) and the U.S.S. Switzerland bringing up the rear. Meanwhile, the C.S.S. Arkansas approaches from the south eastern corner.

Turn 1. No firing thus far so straight to the initiative rolls. The Union scored 5 whilst the Confederates rolled 2. The Union, no doubt keen to ascertain the intentions of the C.S.S. Arkansas, opted to allow the Confederate to move first.


End of Turn 1. The U.S.S. Essex heads straight for the rebel ironclad in order to bring her powerful forward battery into action. The faster U.S.S. Queen of the West cuts closely across the bows of the slower U.S.S. Switzerland to support the Union gunboat. The C.S.S. Arkansas readies her forward artillery whilst her commander considers making use of her ram and so orders full speed ahead.

Turn 2. Both the leading ships open fire. The U.S.S. Essex rolls 3d6 at a range of 3 (remember that the square the firing ship occupies counts as range 1 and at range 3 a 6 is needed for a hit) scoring a pair of 2s and a 6. The 6 generates a further d6 roll which comes up as a miss. The damage roll is a 5 which adds a 1 due to penetration of 4 against armour of 3. The final score is 6 meaning 2 points of damage are scored against the C.S.S. Arkansas. The rebel ships fires back to no effect, scoring a 2 and a 5. For initiative the Union rolled 4 whilst the Confederate rolled a 1. The Union opted to move first.


End of Turn 2. The C.S.S. Arkansas attempts to ram the U.S.S. Essex head on but only lands a glancing blow (she rolled 4d6 scoring a pair of 2s and a pair of 3s) so both ships find themselves broadside on at point blank range! Meanwhile the two rams manoeuvre to secure the best position to launch their own attacks.

Turn 3. At point blank range the U.S.S. Essex and the C.S.S. Arkansas exchange ineffective broadsides - no doubt the gun crews were still recovering from the jarring ram attack of the rebel ironclad. A single hit is scored by the Union ship but the effect roll was insufficient to cause any damage. For initiative the Union roll a 1 whilst the Confederate rolls a 2 - and opts to move first. The two ships have moved apart but the rebel ship puts her helm hard over and launches a further ram attack against the Union gunboat, this time on the beam. The C.S.S. Arkansas rolled 5d6 for the ram itself (4 for a ram attack when the ramming ship is equipped with a ram  and with an additional d6 for the beam attack) and scores a 2, 3, 2 x 5s and a 6 which translates into 4 points of damage - 1 for each of the 5s and 2 for the six. As damage was inflicted the ramming ship then suffers a ram attack from the target ship. In this case 2d6 are rolled - neither of which score any damage. The two ships then separate as the ram does not result in them being locked together. 


End of Turn 3. After the second ram attack the U.S.S. Essex opted to disengage from the rebel ship. Meanwhile the two Union rams lined up to attack the C.S.S. Arkansas with the U.S.S. Switzerland steaming head on towards the rebel ship.

Turn 4. The U.S.S. Essex fires at the C.S.S. Arkansas to no effect whilst the rebel ship opens fire on the looming bulk of the U.S.S. Switzerland scoring a single hit. The initiative rolls are Union 4 and Confederate 5 so the rebel player opts to move first - and you can guess what is coming! 


End of Turn 4. The C.S.S. Arkansas rams the U.S.S. Switzerland scoring two points of damage for nothing in return. The two ships are then broadside to broadside. Meanwhile the U.S.S. Queen of the West circles ominously whilst the U.S.S. Essex looks to move into a decent firing position.

Turn 5. The C.S.S. Arkansas delivers a punishing broadside against the U.S.S. Switzerland - 5 points in total - and the Union ship succumbs to the damage! The initiative rolls are 6 for the Union and 5 for the Confederate. The Union opt to move first and so the U.S.S. Queen of the West orders full steam ahead and rams the C.S.S. Arkansas! The Union ship rolls 4d6 scoring a 1, a 4, a 5 and a 6 and the extra d6 (for rolling a 6) came up with a 4 meaning that 5 points of damage are inflicted on the rebel ironclad. Unfortunately for the Union ship she received 4 damage points in return - the shock of impact against the rebel ironclad no doubt loosening seams due to shock damage.

At this juncture the C.S.S. Arkansas had each reached its critical point and the resultant roll came up a 5 meaning a flood result. Fortunately the effect roll was a 1 meaning that the rebel ship could take either a flotation point damage or one off her speed. She opted to sustain the speed loss meaning she was now at a speed of 2. 

Meanwhile the U.S.S. Essex manoeuvres into an optimal firing position, ready to take advantage of the hotly engaged rebel ironclad.


End of Turn 5. The critically battered C.S.S. Arkansas, her speed reduced and required to break off the action, limps past the sinking U.S.S. Switzerland while the U.S.S. Queen of the West lurks menacingly nearby. The U.S.S. Essex in content to observe events from a prudent distance.

Turn 6. Although below her critical point the C.S.S. Arkansas is still able to fire at enemy ships if they are adjacent. She duly does against the U.S.S. Queen of the West and scores a single point of damage. For initiative the Union roll a 6 whilst the Confederate rolls a 5. The Union opts to move first.

Despite her damage the U.S.S. Queen of the West seized the opportunity to administer the final blow to the crippled rebel ironclad. She immediately turned to ram the enemy ship and this time the damage to the Confederate ship proves to be fatal. Her ramming rolls are 2 4s, a 5 and a 6 meaning 5 points of damage are scored, 4 more than the C.S.S. Arkansas has left. The celebrations of the Union ship were cut short though as a rending sound was heard from below the waterline forward and by inflicting the mortal wounds on the rebel ship the U.S.S. Queen of the West herself sustained fatal damage. Both ships slipped slowly into the murky waters or the river.


End of Turn 6 and the of the battle. By dashing her already riven hull into the rebel warship, thereby sinking her, the gallant U.S.S. Queen of the West sacrificed herself and succumbed to her extensive damage. The U.S.S Essex made ready to pick up survivors from the three ships.

Overview

I very much enjoyed this action although some clarification around the ramming rules - before, during and after - is certainly needed. To my shame and embarrassment I misinterpreted my own rules but fortunately it did not prove to be a massive issue. This is the largest 3 x 3 action I have fought and surprisingly enough it did not feel particularly cramped. Although a degree of ‘driving the narrative in a particular direction’ took place - I wanted to get the rams in action - it did not feel out of place. The U.S.S. Essex needed to keep the C.S.S. Arkansas at arms length - ideally in her forward gun arc - so as to avoid her ram attack. The two Union rams on the other hand, really needed to get stuck in and so they did but paid the ultimate price for their temerity.

Thoughts on the Rules

I am now confident that I am pretty much there with the rules. I know what to do with the whole ram attack thing as there are two main problems I had to tackle ‘on the fly’ so to speak. I am going to assign the number of ram attack dice rolled based on the size of the ship and if ram equipped. For example, a medium sized ship would 3d6 plus a further d6 if equipped with a ram. Similarly, the post ram attack positioning of ships needs some clarity and I want to address the whole ‘I have rammed you once and missed so I am doing it again as we are next to each other’ scenario. This happened twice in the game which was not how I intended it. I guess I just git caught up in the moment!

….And in closing….


….the pimped up game board after the second coat of paint (finally!). The patchy appearance is due to it drying unevenly. The paint was obtained from Wilkinsons and the colour is Totally Teal - possibly a touch tropical and certainly not great for rivers but I am a great fan of blue water! The tin cost about £3 as I recall - this was a pre pandemic purchase that is finally getting used!