Wednesday 27 January 2021

Building Turkish Ironclads and the Russian Response


 A quite superb title - I only wish it was in hardback! Note the positions of the spars on the leading ship - very much looking to operate with a reduced sailing rig

Part of my ship building programme includes a selection of ships for the Russo - Turkish War. My main references for this is the excellent book by Piotr Olender as well as my old friend The Ottoman Steam Navy 1828 to 1923 although I have it on very good authority that apparently the latter is not quite as good as it appears. Naturally Conways also features (I own the ‘holy trinity’ of the 1860 to 1905, the 1906 to 1922 and the volume going to 1946) as well the internet which has been a revelation in respect of information if you are prepared to do a little digging.


I thought this was the definitive work on the subject but apparently this is not the case. I always found the coverage of ships a little uneven but the redeeming features of plenty of pictures and some very useful plans made up for it! It is a good book all the same.

I have a certain amount of wargames history with the Turkish navy although primarily from the Balkan and Great War period so it has been a really enjoyable experience looking at those ships the Turks had from their original commissioning and in their original configuration. Many of these earlier ships were rebuilt and served in the later periods - not exactly in a hugely successful way it must be said - but given the parlous economic situation the Ottomans routinely found themselves in modernising an old ship was probably a better bet than building from new.

Anyways, aside from the Danube river theatre I wanted to get some deep water models built otherwise the whole project would have been very similar to what I am doing for the ACW - mainly river and coastal actions. This way I am covering a wide strategic canvas so to speak.

I did not want to go overboard (never a great idea when on a warship....) with the build and fortunately the naval forces for both sides were quite modest although the Turks definitely had the advantage, in numbers if nothing else. I finally settled on five or possibly 6 ironclads.

To give you a flavour of how my construction process works and just why using Warbases was such a life saver take a look at the following.


Using the template on the right as the base of the hull you can see how the layers are built up. I am waiting on the hull shapes you see (in the quantities stated) to finish this pat of the process. The holes are where the masts will sit and the notches are gun ports and also for the bowsprit as all of these will have a full sailing rig. The two diagrams on the left are all that is required for the two hulls I have started on - in this case the Feth-i Bulend and her sister. The larger three are for the Messudiye.


The above are for the Muin-i Zaffir and her sister ship. In both the above pictures you can see the gun sponsons and the central box battery. getting these laser cut would be immeasurably more accurate than anything I could do by hand!

The Messudiye, as befits her size will have a hull a full 6 layers deep (meaning she will be 18mm tall at the main deck level. Feth-i Bulend and the Muin-i Zaffir will be 4. In actuality both of these were roughly three quarters of the length of the Messudiye and a third of the displacement but I shall be building them to the same length of 5” (and thereby having my soul cursed for all eternity!). As they are primarily for use on a grid it does not make any real difference in respect of the size in my opinion.

Once I have the hull assemblies the rest of the model is very straightforward. All I will then add will be hatch covers (usually placed where there is an empty space on the deck!), funnels and the masts and spars. I need to think about deck mounted artillery - the Peter Pig models are a little too detailed for the models - and am also looking at adding ship’s boats at some point.

Hatch or gun port covers are usually from card, funnels are from dowel rod cut to length, masts are from bamboo skewers, spars and flagstaffs are from cocktail sticks. 

Russian About....

I wanted to beef up the Russian navy so I shall build two or three of the Ekaterina ll class despite them not being commissioned until the mid to late 1880s. Certainly the Turkish navy had not changed since the end of the war and in fact had probably gotten worse! This ship will be a challenge for sure given the curious arrangement of 3 barbette gun positions. These will be the last models for the Russians for this project and they will only be built once everything else has been. It has given me an extra idea though.


Now that is going to be fun to build and no mistake!

The Russians were very concerned about the possibility of the Royal Navy entering the Black Sea to prop up the Turks (bear in mind the Bombardment of Alexandria in 1882) and in fact the class of ironclads mentioned were built with this threat in mind. They were built with two barbettes forward and one aft with the forward two deployed side by side. This gave them a four gun forward broadside considered to be very helpful when used in support of amphibious landings as well fighting in a confined roadstead with limited room for manoeuvre.

Rule Britannia 

Mention of the British brings me to the final part of this post. The final part of this project will be the building of a Royal Navy squadron - no more than six models for the battleships, possibly with some support vessels - to help keep the Russians honest. Paul Hague in the first volume of his Sea Battles In Miniature fought an action between the Royal Navy and the Russians using his own rules - and it was great fun to read. This would take the project into ‘imagi-naval’ wargames which I have no problem with at all.

Summary

This all seems like a lot of work but it should be viewed through the prism of being both very practical and spread out over the next couple of months. Most of the models for the Russo Turkish war are of a simple style to build with the sailing rig being the thing that takes the longest to tackle. With the exception of the pieces for the four Russian ironclads (and for the British although one ship may be built alongside the Messudiye) I will have everything I need to build the models from stock. 

First of all though, I need to finish the ACW part as well as the rules.

No pressure then....


Tuesday 26 January 2021

Limbering Up for the Final Phase....


The hulls for the next three models prior to completion. Gun ports, funnels (funnel in the case of the C.S.S. Missouri, pilot houses and the paddle boxes to be added - not forgetting the all important flagstaff and the paint!

Those very nice people at Warbases - Diane and Martin - contacted me to say that my order is in the production queue for this week - HUZZAH!!

In the meantime I have set to work on what I can do in advance of the extra parts arriving to complete the models. I had planned to have a ‘masts and spars’ building frenzy for the Turkish ironclads but due to getting some games in and tidying up the rules I did nit get around to it. What I was able to do was to build the casemates for the two city class gunboats and the C.S.S. Missouri.

As usual these are very much built in the ‘purely representational’ school of modelling rather than being of museum quality. I used my Dremel on some of the pieces - I am still learning to use it so the scars on the casemate roofs bear silent testimony to my deplorable beginners technique - but fortunately the marks left over will be covered when the the models are fitted out and painted.

The models will be rather more ‘racy’ looking than the originals, mainly because of the shape of the bow not being quite so blunt. The casemate angles are also slightly awry but hey ho - they are purely representational after all. No matter, they will serve as intended!

I have a further four river paddle steamers to build which will leave me three spaces to fill to make up the twenty four models for this phase of the project. I rather fancy tackling a sloop for the Union as well a Benton. For the Confederates I am undecided but I am sure I will think of something!

Once this core of twenty four models is completed my plan is that should anything else for the ACW catch my eye I will be able to add it in as required.

....And Part the Second....

I am rather looking forward to this as the navies will feature both the largest and smallest types of warship - in the case of the former Russian spar torpedo boats and the latter the Turkish ironclad Messudiye. I will need to give the Russians some heavier metal to even things out a little but fr me the real attraction will be building and using some of the Turkish ships in their original configuration rather than as the rebuilt versions still in service in the Balkan and Great War! As usual these will follow my ‘based upon’ method and I have to say that I am quite excited at the prospect fo building some of them!

Sunday 24 January 2021

The Duel of the Fates....Late 1864....Game Number 62


H.M.S. Shannon versus the U.S.S. Chesapeake - the inspiration for what follows.

The raiding cruise of the C.S.S. Sphinx had been reasonably successful but she now faced a dilemma. Her return to home waters was uneventful until two days previously when a Union sloop of war had spotted her. Wisely she had maintained her distance from the armoured rebel ship but she had made sure that her presence was reported by a fast cutter. The Sphinx had taken refuge in the Blackwater delta, secure for the moment but still a long way from safety. There was a small Confederate outpost where the Sphinx had made her landfall and so her captain wasted no time alerting the garrison commander and immediately sending a rider to the naval base at Immobile Bay.


C.S.S. Sphinx - based on the C.S.S. Stonewall but with a turret instead of the aft gun house. In my world her and her sister are a hybrid design incorporating elements of the two turret ships ordered by the Confederacy but taken into the Royal Navy as H.M.S. Scorpion and H.M.S. Wyvern

Meanwhile, the Union forces converged on the mouth of the delta. 

The Sphinx was safe from direct assault - the Union forces dare not risk navigating the myriad channels exiting into the delta without a local pilot - so as long as she stayed where she was all would be well. The Union blockaders would not be able to remain on station indefinitely although any attempt to breakout would mean that every step the Sphinx took would be shadowed. 

The Union forces were in a quandary. They could not allow the rebel ship to escape but as each day passed by the force blockading the delta would be reduced as ships retired for provisions, minions and essential repairs. Reinforcements had been requested but with the fleet stretched very thinly it was uncertain when or even what could be spared. 


U.S.S. New Glory based on the U.S.S. New Ironsides shown in her reduced rig.

Aboard the U.S.S. New Glory, the splendidly named Rear Admiral Quintus Gonville D’Gin had summoned his commanders for a council of war. Ideas went back and forth until the Rear Admiral, his mind absorbed by the problem they faced, raised his hand slowly for silence. “I know the captain of the rebel ship and I also know what his weakness is. Pride. I will challenge him to a duel between our respective ships and worded in such a way he will be eager to obtain satisfaction”. The captain of the U.S.S. New Glory spoke first. “Sir, may I remind you that whilst the New Glory will have size and weight of broadside in its favour it is sadly not the fleetest ship we have!”. The attendant company nodded in agreement with the exception of the captain of the U.S.S. Coeur D’Alene, Captain Benjamin Kanobie, formerly of the U.S.S. Padawan. He pointed out that his was the fastest ship in the squadron and although not quite a match for the rebel ship was more than able to give a good account of herself. The rear admiral listened intently to his younger captain, his face an impassive mask. 

“Captain Kanobie, I thank you for your observations and I know that you have the best interests of the squadron in mind but my decision stands. I must face this phantom menace alone. You will lead the remainder of the squadron away to rejoin the fleet. This you are charged to do so that other ships will avoid the fate that I may suffer - your destiny lies along a different path to mine...” The Rear Admiral’s words trailed off into the silence but the point had been made to his younger captain, eager and thirsting for glory.

The meeting broke up and soon the Rear Admiral was alone with his thoughts. Before meeting with the commander of his flagship to make ready for battle he composed the challenge for the rebel commander.

To the officer Commanding, C.S.S. Sphinx,

As the Sphinx appears now ready for sea, I request you will do me the favour to meet the New Glory with her, ship to ship, to try the fortune of our respective flags. I entreat you, sir, not to imagine that I am urged by mere personal vanity to the wish of meeting the Sphinx, or that I depend only upon your personal ambition for your acceding to this invitation. We have both noble motives. You will feel it as a compliment if I say that the result of our meeting may be the most grateful service I can render to my country; and I doubt not that you, equally confident of success, will feel convinced that it is only by repeated triumphs in even combats that your little navy can now hope to console your country for the loss of that trade it can no longer protect. Favour me with a speedy reply. We are short of provisions and water, and cannot stay long here.

I remain, your obedient servant,

Rear Admiral Quintus Gonville D’Gin United States Navy

He mulled the words one final time, sealed the envelope and placed it in the hands of the waiting junior officer. After a moment of further reflection he summoned the captain. The game was afoot.

Aboard the C.S.S. Sphinx Captain Darius Theoden Maule pondered the contents of the recently arrived letter from the commander of the Union fleet. Here was an opportunity. His ship was fast and although the Union vessel had the advantage of both size and weight of broadside he was supremely confident that he could bloody the nose of the Yankee and get speedily away. He was sure that more enemy ships would be close by so he would certainly not be able to hang around. The sensible thing would be to get away as fast as the ship could move and to avoid a fight entirely. He doubted he would be able to get away with this and for sure once it was known he had accepted and then spurned a challenge his reputation would be damaged beyond repair. “So be it, Yankee” he mused. He would accept the challenge and so sat down to draft a reply.

The die was cast.

The terms of the challenge were simple. The Sphinx would be allowed to enter the main channel of the delta and would there engage the New Glory. The Union had given a two hour grace period during which time the Sphinx could attempt to escape from the Delta and the assurance that no Union ship would interfere. When the two hours had ended normal rules of engagement would apply. The Union had ordered the remaining ships of the squadron away - to be honest they were not exactly steaming at full speed - so the delta would offer plenty of sea room for the combatants.

Aboard the U.S.S. New Glory nervous tension permeated the ship. All guns were primed and ready, fires were stoked, bunkers full and the crew poised for action. All eyes were on the channel that the Sphinx would be emerging from and sure enough, exactly at the allotted time, she appeared, malevolent and evil in aspect.

Notes on the Game

I wanted to tackle a single ship action using the rules as refined by the tests so far. The ships are intentionally unbalanced so as to ensure that either side has to play to their strengths. In the case of the U.S.S. New Glory this rests with her shorter ranged but plentiful artillery whilst the C.S.S, Sphinx has speed and the benefit of being ram equipped. This will be an open sea encounter.

The two ships will be approaching each other from opposite ends of the playing area. The victory conditions are quite straightforward - the Union player must sink or render the Confederate ship sufficiently damaged to enable her to be engaged by the rest of the fleet. In short, if she was not sunk then she needed to be slowed down.

For the Confederates the victory requirements were also straightforward although perhaps a little more involved. Sinking the U.S.S New Glory and getting away would be major success, getting away with minimal damage would be a success but did not inspire the captain of the rebel ship. He was keen to give the Union ship a bloody nose and so, rightly or wrongly, he would have his duel.

C.S.S. Sphinx (based on the C.S.S. Stonewall)

Medium sized - Ram bow

Speed (SP) 6

Medium Manoeuvrability (TF) 2 turns

Flotation Points (FP) 6

Armour Factor (AF) 3 

Gunnery Factor (GF) Forward 2, Penetration 2, Port or Starboard 2, Penetration 2

U.S.S. New Glory (based on the U.S.S. New Ironsides)

Medium sized 

Speed (SP) 3

Medium Manoeuvrability (TF) 2 turns

Flotation Points (FP) 6

Armour Factor (AF) 3 

Gunnery Factor (GF) Forward 2, Penetration 3,  Port or Starboard 4, Penetration 3


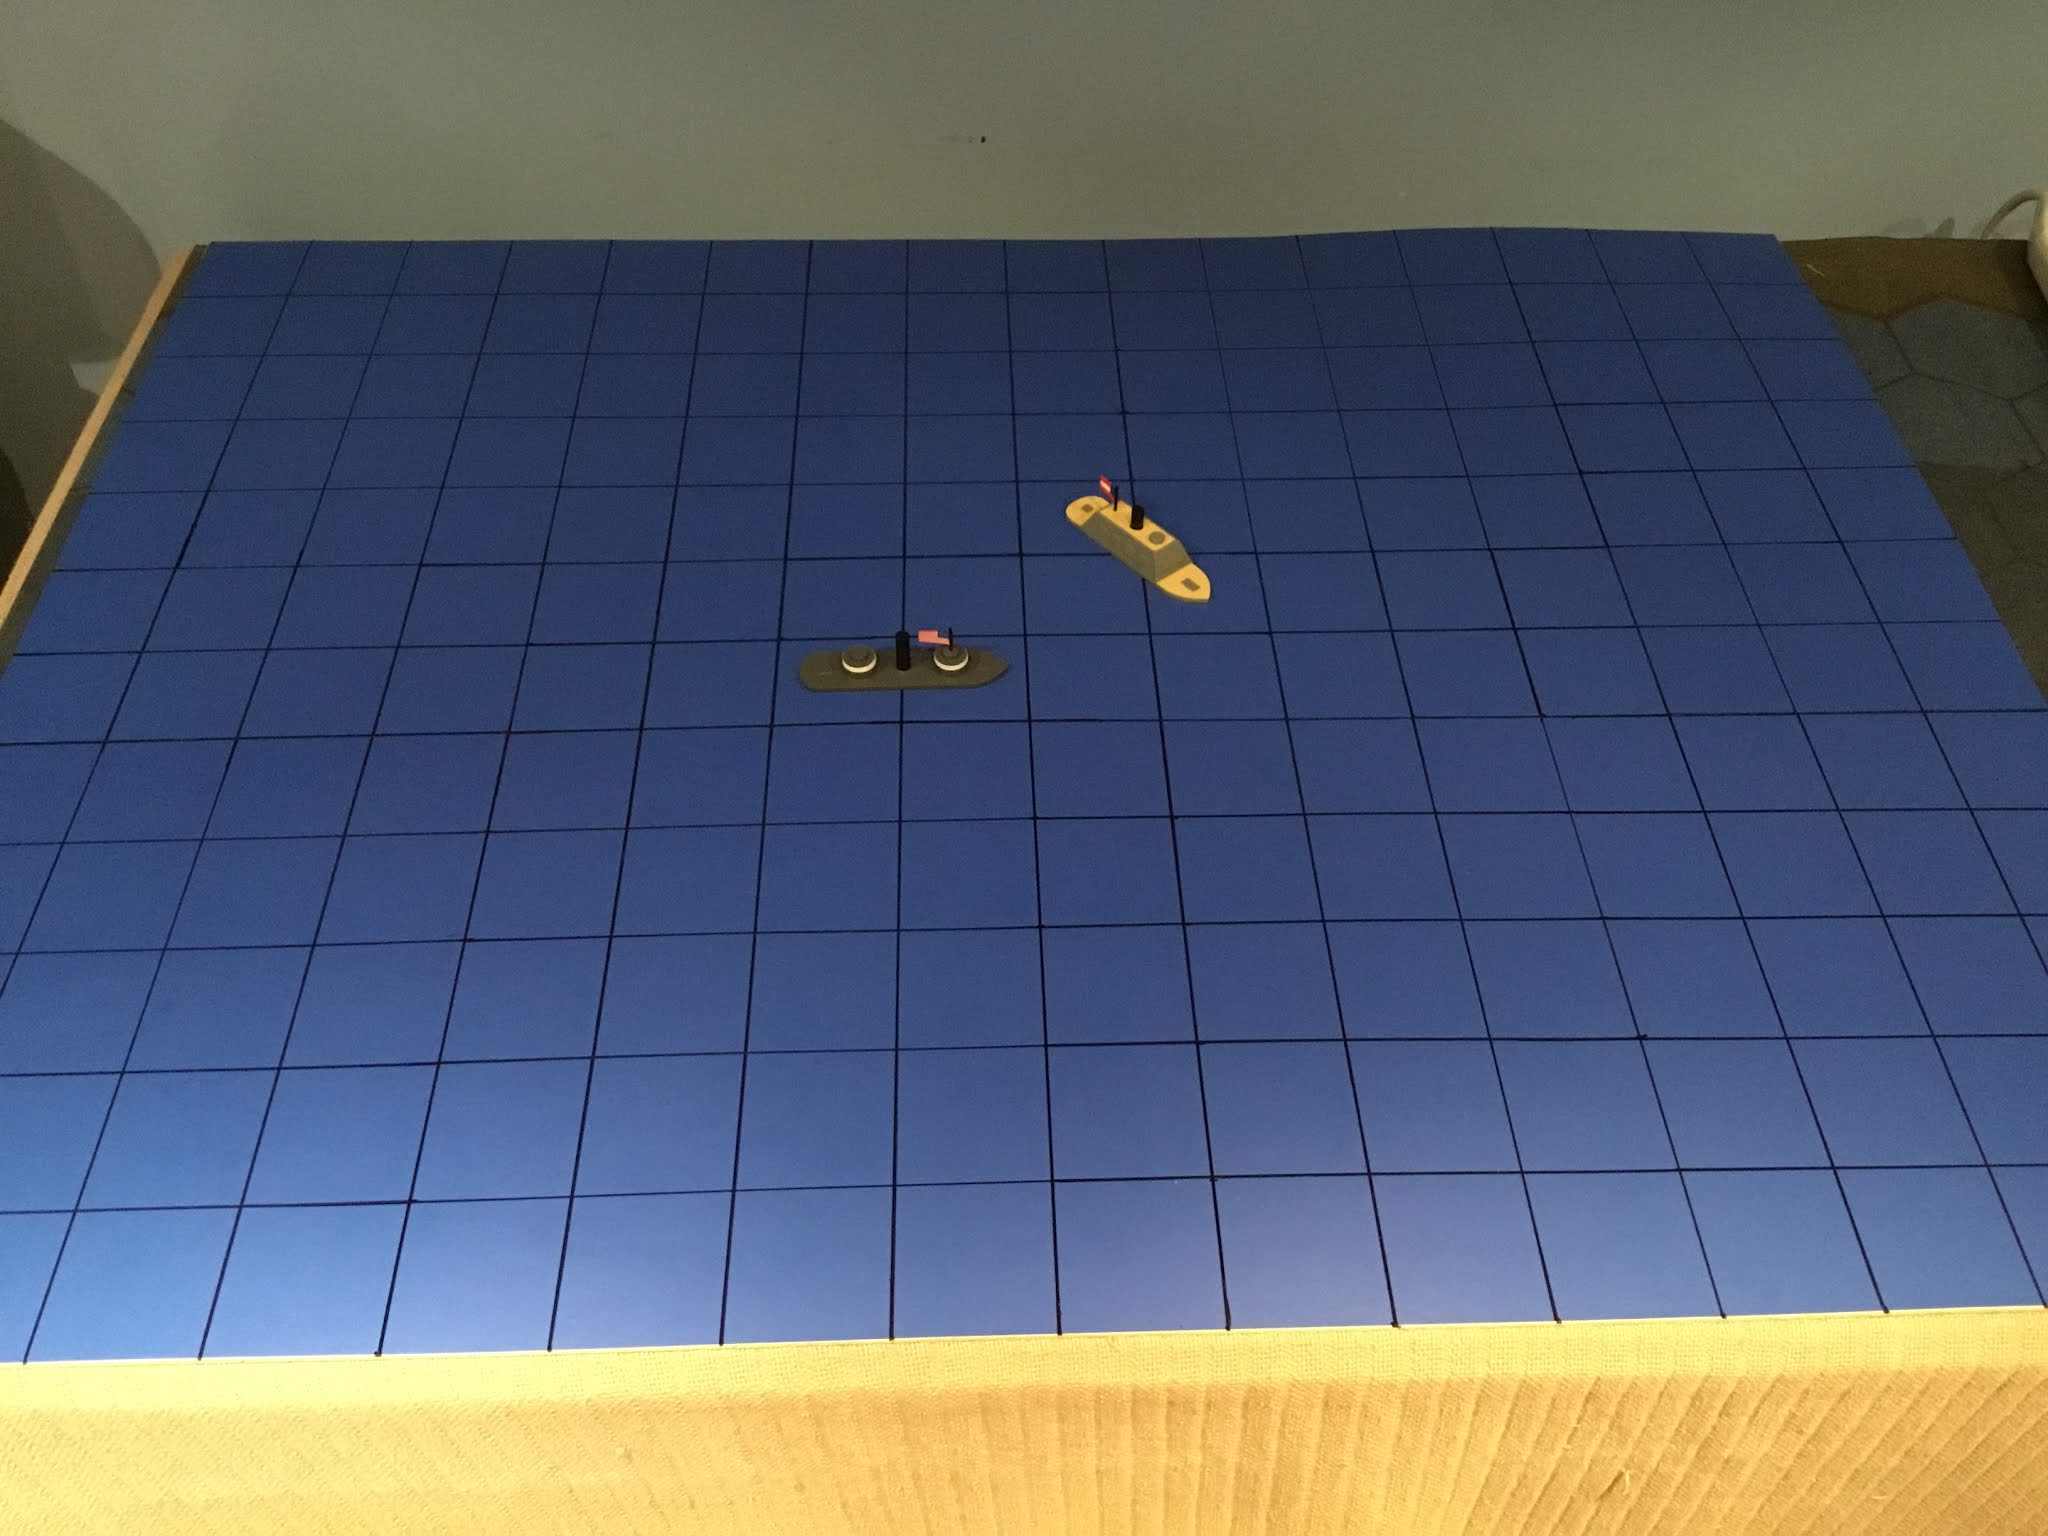
The initial dispositions. The escape route for the C.S.S. Sphinx is the opposite side of the board but honour demands that she must engage and damage the Union warship before doing so. The remainder of the union squadron are over the top edge of the playing area.

Turn 1. Nothing happening until the initiative roll which is a 3 for the Union and a 4 for the Confederates. The rebel captain asks for the Union to move first.


The Union flagship lumbered into her turn as tightly as she was able to show the rebel ship the full length of her broadside. Seeing this so the Captain of the Sphinx turned away and then resumed her Reginald heading, thereby ensuring that a respectful distance was between them. When she engaged the Yankee ship it was to be her terms.

Turn 2. The Union ship opened fire and this was only half a broadside due to the position of her target. At a range of 5 rolling 2d6 she scored a 4 and a 1 meaning all missed. The rebel ship opened fired rolling a 5 and 3  meaning she scored one potential hit. The New Glory has an armour factor of 4 whilst the guns of the Sphinx all have a penetration factor of 2 meaning that damage rolls deduct 1 from the dice roll. The roll of 1 was insufficient anyway. For initiative the Union rolled a 4 whilst the Confederate rolled a 1. The Union player opted to move first, mindful of the speed and the ram of his opponent.


The huge Union ship lumbered into a turn in the opposite direction from previously still trying to keep her broadside to the enemy. The Rear Admiral could only watch in admiration as the enemy ship, at double the speed he was able to make, turned to close the gap but, he wondered, had she been too eager in the turn? The Captain of the Sphinx had but one thought on his mind, to ram the Union ship and then to get away. So far she had escaped any damage but now that she was staying into the maw of a full broadside he could only hope that his speed would upset the gunnery of the enemy ship.

Turn 3. The Union ship opened fire at a range of 4 with 4d6. 2, 3, 4 and 6 were rolled meaning two potential hits on the rebel ship. The New Glory has a penetration factor of 3 against the armour factor of 3 for the Sphinx meaning that no modifiers are applied to the damage rolls. A 5 and 6 were rolled meaning 3 points of damage were scored. The Sphinx recorded 1 point against the forward guns and 2 to the floatation points. He dare not reduce his armour or speed at this stage. Firing back with 2d6 the rebel ship scored a 6 and 1 meaning one potential damage roll at -1. The roll of 2 was insufficient. For initiative the Union player rolled a 3 whilst the Confederate rolled a 2. The Union opted to move first.


The rebel ship was closing on the New Glory so the Union ship opted to throw the helm over at the last possible moment. The extra distance gained meant that whilst the Sphinx was closing hard she was at least unable to catch her for the present. The rebel ship would receive a further half broadside before contact. “Damn this fellow fights well!” The captain of the C.S.S. Sphinx muttered under his breath. It was only a matter of time before he caught the Union ship but in the meantime he would be under yet more fire, albeit obliquely. The crew braced themselves for what was to come....

Turn 4. The Union ship opened fire with half a broadside and rolled 2d6 scoring a 5 and 2 meaning a single potential hit with a straight dice roll. The score of 3 was insufficient to harm the rebel ship. The single d6 by way of a return was a 4 with a damage roll of 5 minus 1 leaving a 4. The Union ship had taken a point of damage (recorded against the flotation value). For initiative the Union rolled 4 and the Confederates a 5! The rebel ship proceeded to ram the U.S.S. New Glory in her port aft quarter. The damage roll was 4d6 as she is ram bow equipped and plus a further d6 for a side ram making 5d6 in total, The roll generated 2 6s and 3 2s so 4 points of flotation damage were scored against the Union ship. 2d6 were then rolled for the potential damage to the ramming ship scoring a 1 and 4 so the rebel ship sustains a point of damage recorded against the flotation value (all ramming damage is recorded solely against the flotation value as the damage is invariably below the waterline. The C.S.S Sphinx is able to back away from the Union ship - she has 5 movement points left so can move a maximum of 3 in reverse. The Union ship is displaced one grid area and can move as normal.


The C.S.S. Sphinx ram the U.S.S. New Glory


The C.S.S. Sphinx backs away whilst the U.S.S. New Glory looks to open the range once again

With a bone-crunching jar the C.S.S. Sphinx rammed into the port aft quarter of the U.S.S. New Glory. Chaos ensued as the screech of metal on metal was mixed with the cries of the wounded, the shouts of the officers trying to restore order and of the ominous sound of water rushing into the huge gash in her hull. The water at the stern of the Sphinx boiled as the great ship eased her way back from her enemy lest she become entangled with her. It was a heavy hit on the enemy ship of that the Captain of the Sphinx was sure but the Union vessel showed little sign of distress as she slowly moved off.

Captain Maule was torn. Should he finish off the Union ship or should he look to get away, his honour intact and his ship is relatively good shape? Much as he wanted to the needs of the many outweighed the needs of the few (or the one) so he looked to make his escape.

Turn 5. Despite the grievous condition of the U.S.S. New Glory Rear Admiral D’Gin resolved to fight to the last. As soon as the gun crews had reorganised after the ramming attack so they opened fire with a full broadside albeit it at maximum range. Unsurprisingly they missed. The rapidly retreating Sphinx managed a single shot and again to no effect. For initiative the Union rolled a 4 whilst the Confederate rolled a 5. The rebel ship opted to move first.


Quickly accelerating to her top speed the C.S.S. Sphinx swung about to head to the open sea and safety. In doing so she unavoidably sped dangerously close to the wounded U.S.S. New Glory meaning that she would be facing a final full broadside from the Union ship before she could get away. Captain Maule cursed inwardly but there was nothing he could do other than take it.

Rear Admiral D’Gin new that this could be the last throw of the dice for his ship. He badly needed to significantly damage the enemy ship so that it would be unable to get very far before the allotted time elapsed. The ship made ready for one final broadside.

Turn 6. The Union ship opened fire. A pair of 6s, a 5 and 4 - all hits! The damage roll was a 5, 2 4s and a 3 so three points of damage scored against the C.S.S. Sphinx - good but not enough. The rebel ship opted to silence the forward gun, take one hit on the aft gun and one flotation point. She fired back scoring one hit with no effect. For initiative the Union rolled a 1 whilst the Confederates rolled a 5 and so opted to move first.


The rebel ship was pulling away from the U.S.S. New Glory but not so quickly that the Union ship would not be able to engage her again and so the gun crews feverishly made ready to fire. The pumps were keeping pace with the inflow of water and the work of temporarily patching the hull was underway. The U.S.S. New Glory would live to fight another day. 

Captain Maule viewed the rapidly receding Union ship with a feeling of frustration. The enemy ship had been well handled and it was only through good fortune that his ship had thus far gotten off relatively lightly from the Union artillery. He held his breath as great gouts of smoke erupted from the gunports of the enemy ship....

Turn 7. The Union ship fired and scored 4 hits from 4d6! The damage roll was equally impressive with 2 6s and a 4 meaning 5 points of damage! The rebel ship silenced the last of his artillery for one point, reduced his armour by two points, reduced his turns by one and a further point from his flotation. The ship was a wreck but still able to steam at full speed. 

As the damage reports came in from across the ship Captain Maule took scant consolation from the fact that his steaming power was unimpaired. This was just as well as the ship had the last of its artillery dismounted, the steering was damaged and her armour plates had been beaten in and had worked loose in several places. Still, overall he was satisfied. His honour was intact and his ship could be repaired. He was still fast enough to outrun anything the Yankees had in the area and came very close to sinking his opponent. One thing he was sure of though. He knew in his heart that his path would cross with that of his enemy at some point and he resolved that the next time there would be a conclusion.

Rear Admiral D’Gin was disappointed with how his grand gesture had played out. He had heavily damaged his opponent of that he was certain but he badly wanted to reduce her steaming ability. No matter. The enemy ship would require a lot of work to get back into fighting trim (as would his own) but at least for now the sea lanes would be free of this most formidable ship. He knew that there was unfinished business with this determined enemy commander and so he look to the day when the reckoning would be had.

Game Overview

I rather enjoyed that! It was nice to have some sea room to fight over and although the scenario was a little contrived it was both entertaining and informative. There are a couple of things I am going to change before the next game but nothing in a major way. I definitely need to look at the provision of special effect hits as currently it is impossible to score them unless you have a positive modifier when shooting, meaning a larger penetration factor than the target armour value. Turning needs some clarification and I am having some thoughts around damage allocation. The core of the rules works well and I am happy with them but there are a few tweaks still needed.

Of the action itself the Union did as best as they could given the speed handicap they were operating under. Making sure the maximum number of guns was facing the enemy as often as possible was tactically sound, as was trying to stay in the middle so the enemy had to move further around the outside so to speak. The C.S.S. Sphinx was keen to ram the enemy ship but had to mindful of ‘running onto the guns’. This was quite tricky to avoid and so the ship was fortunate not to have suffered more damage. Those full Union broadsides could have caused a lot of damage but it was only at the end they showed this.

I have plans for a further action for this stage of testing and this will be quite a large one and so written up in the ‘three post’ format mentioned previously.

As ever, it was great fun to do!


Friday 22 January 2021

On the Stocks


The start of the hull and casemate. A Jenga block forms the core of the casemate with the four sides made from a craft stick. Copious amounts of glue and sanding then ensue in order to get to the finished shape.

C.S.S. Missouri and....


....a Union City class gunboat

 Whilst waiting for my order from Warbases to arrive I decided to go as far as I could with some of the models I have in mind so that once the bits and pieces arrive I can then finish them easily and quickly. To be honest I could fashion some of the pieces myself but that kind of defeats the object to having the relevant pieces custom cut! 

I am once again taking huge historical liberties in that I am essentially building the Confederate and the two Union vessels to the same core design, hence the three hulls in the picture. The differences will be in the fitting out and the paint job. The two most obvious differences are that the C.S.S. Missouri has but a single funnel and fewer gun ports. She will also be painted in my standard ‘Confederate Armoured Warship Grey’ (Humbrol Matt 140 or Matt Gull Grey in old money) as opposed to the darker shade I use for the Union. I am sure that level of technical and artistic interpretation will do for my collection! The remaining 6 models are all paddle steamers of various styles. I have in mind to tackle some other ships for the ACW but these will be very much on a ‘as and when’ the mood takes basis and will not feature until the Russo Turkish models are completed which of course are next in the running order.

So whilst elements of the build continue work can also carry on with the rules and the associated testing.

This of course also means another game.

Several, in fact....


Thursday 21 January 2021

The Egyptian Gambit, Somewhere off Immobile Bay....Late 1864....Game Number 61


The protagonists. From left to right the U.S.S. Senator, the C.S.S. Cheops and the C.S.S. O’Hara

 The newly built Confederate ironclad turreted ram the C.S.S. Cheops arrived with her sister ship - the C.S.S. Sphinx - after a circuitous voyage avoiding Union patrols to take refuge in the large rebel base of Immobile Bay. There they were made ready for action. Their new artillery was installed and naval crews assigned to either ship whilst pans were made for their deployment. After several heated planning sessions (including at least one duel) it was decided that they should independently slip away from Immobile Bay under cover of the night and then proceed to engage such Union warships as they could in an attempt to loosen the blockade. The first to leave would be the C.S.S. Cheops.

In the early hours of a dark September morning the rebel ship slipped her moorings and made her way as quietly as possible out of the inner basin and through the boom defences to the open sea. Every precaution was taken to avoid being seen so her fires were low and she relied instead on the current to take her as far as possible. All was going well until the ship shuddered to a halt and lurched alarmingly on to her port side - she had drifted onto a sand bar and was aground! Worse still was the fact that her artillery would be useless due to the heel of the ship.

It would soon be dawn and despite the best efforts of the crew she remained stuck fast. The captain ordered a boat lowered with instructions to get back to Immobile Bay as fast as possible to order up some tugs to free her. There could be little hope of proceeding on her mission as firstly the level of any damage would need to be ascertained and repaired if needs be.

The small rowing boat pulled away into the darkness, the hopes of the stranded ship carried within.

It was a nervous wait aboard the C.S.S. Cheops as dawn had broken and so all eyes were scanning every point of the compass. Almost simultaneously smoke appeared from both the east and the west - with the latter being most welcome as it meant that a help was arriving from Immobile Bay. From the west though, the low, sinister profile of a Union monitor with two turrets was seen.

The Ships


C.S.S. Cheops (based on the C.S.S. Stonewall)

Medium sized - Ram bow

Speed (SP) 6

Medium Manoeuvrability (TF) 2 turns

Flotation Points (FP) 6

Armour Factor (AF) 3 

Gunnery Factor (GF) Forward 2, Penetration 2, Port or Starboard 2, Penetration 2

C.S.S. O’Hara (based on the C.S.S. Raleigh)

Medium sized - Ram bow

Speed (SP) 3

Medium Manoeuvrability (TF) 2 turns

Flotation Points (FP) 6

Armour Factor (AF) 3 

Gunnery Factor (GF) Forward 2, Penetration 3, Port/Starboard 2, Penetration 3, Aft 2, Penetration 3


U.S.S. Senator (based on the U.S.S. Monadnock)

Large sized 

Speed (SP) 5

Low Manoeuvrability (TF) 2 turns

Flotation Points (FP) 8

Armour Factor (AF) 4

Gunnery Factor (GF) Forward, Port, Starboard 4, Penetration 4, Aft, Port, Starboard 4, Penetration 4

The current is running due west at a speed of 2 knots (1 square)


The opening positions. The U.S.S. Senator, heading north (towards the wall) with the C.S.S. O’Hara heading south west from the diagonally opposite corner. Meanwhile the hapless C.S.S. Cheops, listing alarmingly on the her port side, watches the approaching Union warship with trepidation.

Turn 1. The attempt to unground the C.S.S. Cheops fails - a 5 was rolled when a 6 was needed so she remains stuck fast and unable to to do anything other than observe. No firing as yet so it is straight to the initiative. Union 6 Confederate 1 so the Union players opts to allow the Confederates to move first.


The U.S.S. Senator, seeking to take the maximum advantage of the enemy ship’s discomfiture, puts her helm over and attempts to close the range, all the while being mindful of the likelihood of other sandbars and the approaching cloud of smoke from the north east. Meanwhile, the C.S.S. O’Hara closes on the stricken Confederate ship to lend assistance but, it looks like she may have to fight instead!

Turn 2. Still the C.S.S. Cheops fails to budge from her sandy berth. The Union ship is in range and so opens fire. Range 8, GF 4 needs 5 or 6 to hit but gains +1 per dice due to the target being immobile. Rolls 2 x 5 and 2 x 1 so two potential hits. The penetration factor is 4 and the target armour is 3 so +1 per damage dice. Rolls a 4 and a 1 going to 5 and 2 so one point of damage is recorded on the C.S.S. Cheops. The rebel ship records this against the flotation points. No other firing so on to initiative. Union 2 and Confederate 3. The rebels opt to allow the Union to move first.


The U.S.S. Senator continues her approach and sees a second rebel ironclad approaching. Clearly this will be the priority for her guns as thus far the other Confederate ship showed no signs of moving. The C.S.S. O’Hara was of a similar mind as clearly the Union interloper needed to be dealt with before she could go to the aid of the stricken C.S.S. Cheops.

Turn 3. Still the C.S.S. Cheops remained stuck fast rolling a miserable 2. Both the U.S.S. Senator and the C.S.S. O’Hara opened fire. Taking the Union ship first she has a GF of 4 at a range of 5. She rolls a 3, 4, 5 and 6 meaning 3 potential hits scored. Her penetration factor of 4 against the O’Hara’s armour factor of 3 means a +1 to each damage dice. A 1, 4 and a 6 come up meaning 1 damage point for the 4 (goes up to 5) and the 6 becomes a 7 meaning a Special Effect! The roll is a 2 which means 2 flotation points are lost (hull damage) and so are marked off whilst the other damage point the rebel player opts to take from the port side guns meaning they are now at GF1. Heavy damage but nothing fatal. She returns fire with her 2 d6. She scores a 4 and 6 meaning two potential hits. These are at -1 as her penetration factor is one less than the armour factor of the Union ship - 3 versus 4. She rolls a miserable 1 and a 2. For initiative the Union roll a 5 whilst the Confederates roll a 2. The Rebels move first.


The gallant C.S.S. O’Hara quickly realised that she was outclassed by the powerful Union warship and so she attempted to draw her away from the stranded C.S.S. Cheops. The speedier Union ship was able to cut inside the rebel ship’s turn and so she readied herself to pound her assailant at point blank range.

Turn 4. A glorious 6 came up for the C.S.S. Cheops! She was now free to move. The U.S.S. Senator opened a punishing fire against the C.S.S. O’Hara. Two 6s, a 5 and a 1 so three potential hits, all at +1 per d6. A 3, a 4 and another 6! Two points of damage already and a special effect. The dice came up with another 2 meaning further two flotation points. The rebel ship took one point off his forward and aft guns. She was taking heavy punishment. Her return fire scored a hit but failed to inflict any damage. The Union rolled a 4 for initiative whilst the Confederates scored 6 and opted to move first.


The battered C.S.S. O’Hara moved away from her powerful assailant who must have seen that the C.S.S. Cheops had finally worked herself free of the sandbar. The U.S.S. Senator quickly realised that not only did she now have two rebel ships to deal with but more worryingly they were between her and safety. She made full speed and swung away from the treacherous sandbar to gain some sea room before fighting her way back.

Turn 5. Straight to firing. The U.S.S. Senator continued to engage the C.S.S. O’Hara. A 6 and 4 scored potential hits with the damage rolls of 6 and 5! These became a 7 or special effect and two points of damage. The Special Effect roll came up with a 1 meaning that the armour value of the ship was reduced by 2 points (leaving 1). The rebel ship took the two points off the forward and aft guns meaning that she now had no functioning artillery in wither arc. Her reply was a hit but no damage was scored. The C.S.S. Cheops opened fire scoring one hit from two dice. The damage roll was a 6 but this was reduced by by 1 as her penetration was 3 opposed to the armour of 4. Still, a damaging hit had been scored that was taken off the Flotation points. For initiative the Union rolled a 4 whilst the Confederates rolled a 2. The Union player invited the rebels to move first.


The action fell away as the ships manoeuvred to gain a tactical advantage. The C.S.S. O’Hara was content to be a spectator at this stage as she had suffered grievously at the hands of the Union ship. The C.S.S. Cheops was eager to grapple with the Union ship but was mindful of her artillery and the need to be able to exploit her only advantage - that of speed.

Turn 6. No firing so straight to the initiative phase.Again the Union scored a 4 and the Confederates a 2 so the rebels moved first once again.


Turning as tightly as they were able both the C.S.S. Cheops and the U.S.S. Senator were straining every sinew to get back into the fray whilst the C.S.S. O’Hara limped along, still content at being out of harm’s way.

Turn 7. Again no shooting so straight to initiative. Union 6 and Confederate 1 so once again the rebels ships moved.


The Confederates opted to take the shortest route to the Union ship which meant navigating between the shore and the sandbar that had so nearly caused the loss of the C.S.S. Cheops. Her captain looked ruefully at the sandy shore and thought that there would always be something there to remind him of how close to disaster he came. The C.S.S. O’ Hara followed her at a respectful distance and looking to ensure that her starboard battery, thus far intact, would be the one to face the foe. Meanwhile the U.S.S. Senator, seeing where the rebel ship was heading resolved to give her a warm welcome.

Turn 8. Both the U.S.S. Senator and the C.S.S. Cheops opened fire over the sandbar at maximum range and solely with their forward guns. Needless to say both were unsuccessful. For initiative the Union rolled 5 and the Confederates 1. The Union player opted to move first, continuing the turn but ensuring that the channel was blocked as well. What happened next was entirely predictable.


Crunch! The C.S.S. Cheops did what her designers had intended and rammed the Union warship at the level of the forward turret. Such was the power of the impact that she nearly rode over the low warship but by the deftly applying some reverse thrust at the point of impact her captain was able to take some way off her. The Union ship was mortally wounded. As water poured in below decks, her captain reluctantly gave the order to abandon ship. She was sinking. For her part the C.S.S. Cheops received very minor damage in return. 

The Captain of the U.S.S. Cheops gave the order to pick up survivors as the Union warship slipped slowly beneath the waves. Her resting pace was in shallow water so there was a good chance she could be salvaged and possibly used again against her former owners.

The Union blockade could be broken as long as the Confederates had the tools to do so. The investment in European built warships seemed to be paying off.

After Action Thoughts

 I ran this game as a spur of a moment kind of thing as I wanted to run through the rules again, as well as trying out the new board for size. It all worked well although inevitably here are a few areas that need some minor fine tuning. Some changes from the first version were incorporated and these proved to to be well worth adding. The board is fine for now but I want to get a full 6ft by 4ft cloth which will cover my usual 5ft by 3ft table and the full sized version when I need it. I am sold on using squares for naval games so it will make a good investment when finances permit.

Of the action itself the Union can consider themselves to be a little hard done by. The C.S.S. O’Hara was cruelly battered and doing a passable representation of a colander whilst the C.S.S. Cheops was incredibly fortunate not to have suffered more damage than she did whilst being a sitting target. The U.S.S. Senator had certainly not done a lot wrong right up until the time that around 1,500 tons of French built ironclad decided to park itself on the foredeck! Even then the Confederate dice roll for the ram was impressive - of the 5d6 rolled four were 6s and the other was a 5. The union ship literally had the hull ripped from under her feet.

The rebels would be able to return to Immobile Bay where the C.S.S. O’Hara will be repaired and the C.S.S. Cheops readied for action once again. Meanwhile the Union forces will look to strengthen their blockade and seek out any rebel ships they can with superior force.

I know I said that ordinarily I would writing battle reports in three parts so as to be able to set the scene and pace the action accordingly. I shall still be doing that but his was very much in the nature of a test run so falls outside of the usual format.

That is my story and I am sticking to it!


Wednesday 20 January 2021

Board of the Things


The problem....

 It has been a busy few days and no mistake! Aside from work related stuff I have completed the first draft of the ironclad rules and these have been duly ‘looked over’ meaning a few corrections and clarifications are in order. Fortunately nothing major which is a good sign! I need to get some pictures organised that show firing arcs and turning etc but again, nothing too serious. There are also the ship specification tables to draw up but these should be relatively straightforward to tackle - as ever time is what is in short supply!


....the solution and....

One practical thing I was able to attend to was organising a square grid ‘sea’ gaming board. In am earlier post I mentioned that I wanted to use a 3” square grid with ships occupying two squares. I am happy this option works for me but I did not have a playing surface I could use. Originally I planned to use a cloth and a permanent fabric marker but I was not able to source one locally. What I did have though, was a couple of rolls of blue Fablon style sticky backed plastic acquired at a boot sale some years ago and a piece of 4ft by 3ft plywood.

In retrospect it would have been quicker to paint the board but I did not have any suitable colours available and did not fancy venturing out to get some - Asda this morning was quite enough retail therapy for one day! I decide to use the Fablon on the board and mark out a grid using permanent marker. 

Simple in theory.

The rolls are 44cm wide whilst the board is 91.5cm meaning that three strips would be needed to cover it. The rolls were not long enough for me to be able to cover the very narrow strip remaining in one, in fact it needed three pieces to do so. I also had to make these the same width as the grid so that I could disguise the joins under the permanent marker. It worked more or less and whilst not perfect - I shall order a 6 ft by 4ft ‘sea’ cloth with the appropriate grid when the finances permit - it will be more than adequate for the play testing I shall be doing.

The playing area is 4ft by 3ft so there are 16 x 12 squares. The blue looks quite dark as the lighting in the man cave is not very kind for this sort of thing but at least it will look better than using a desert and a steppe style board side by side!


....the end result.

One thing I did discover whilst making this is that  have a supply of 3” hardboard squares I had cut to use with 54mm figures for Volley and Bayonet - lord alone knows how long they have been lurking in storage!


Saturday 16 January 2021

A Long Time Ago....


 A whole lot of Sci Fi goodies at a very good price!

For a complete change of pace - if you recall I mentioned that this year I was looking at skirmish style games so as to ease myself back into some figure painting - and as I had a small balance remaining on my Christmas Amazon gift card, I decided to take advantage of the low price and purchased a copy of Mantic Games ‘Sci Fi Dungeon Crawler’: Star Saga.

To be honest I was attracted to this for three reasons - the figures, the terrain pieces and the fact it is a square based game reminiscent of Hasbro/GW’s Space Crusade or GW’s classic Space Hulk. This has done the game a slight disservice as there is rather more depth to it than the two mentioned. There are a number of expansions available that add to the experience with additional figures, scenarios and rules etc.


Some very useful terrain types including terminals, weapon racks, crates and a couple of holding/stasis tanks - “Looks like love at first sight to me. Oh he likes you Burke!”

Another useful part of the game is the ability to play it solo which is rather handy and is something I will explore in due course.


All very ‘epic space opera-ish’ looking

My copy cost £35 and represents really good value for money. To give you an idea there are 35 figures (28mm I believe although possibly slightly larger), 36 terrain pieces, 33 board tiles and even a brace of Aliens style sentry guns! On top of that there is a bewildering array of game cards and counters, range rulers, a flame template, the rules and a mission book.

The terrain pieces are rather nice as are the figures although I did look at some of the latter with a wry smile. I have to say that the whole package represented great value for money and I will certainly get some fun out of it, maybe not it the way the designers intended though.


Two excellent rules sets - designed for small numbers of figures

I have a few ideas around how to use the figures from the game - the upcoming Stargrave (from the Frostgrave stable) for one as well as Galactic Heroes and even a few other odds and ends I have kicking around. I am even looking forward to painting them as something a little different. I also have a long term skirmish rules plan in mind but that will be for another post at some point.


Friday 15 January 2021

Square Dancing and the Joy of Hex?


Rough and ready and posed for this blog post. The actual refight added the second board which is the colour of those hills you see at the bottom of the picture. I also used the wrong Monitor....

 It is funny how a chance comment can set in motion a whole chain of events and trigger some very enjoyable memories. In a recent exchange of emails with Bob Cordery the subject of using a square grid for naval games came up - in passing, almost as a throwaway comment even. I should have known better as this proved to be the catch that unravelled a whole range of ideas and thoughts! I am sure I am not the first one that this happens to though - and I certainly will not be the last!

I should perhaps put all this into context. Many years ago I played a number of games of the old Battleline  - Ship O’ the Line age of sail naval rules. These were designed by S. Craig Taylor Jnr (of Flat Top, Air Force and Wooden Ships and Iron Men fame - one of my all time favourite game designers) and made use of a square grid with most ship models occupying two squares. As I recall we had some cracking games with these rules and to this day I would have no hesitation in using them again.


Blasts from the past but cracking reads all the same. The age of sail rules also include a supplement for fighting naval battles in the age of the Spanish Armada

Moving forwards in time the book Naval Wargames - World War 1 and World War 2 by Barry J. Carter also made use of a square playing area. Historically Fred Jane’s naval wargame also used squares and I am sure there are several others I have not mentioned. 

Using a square grid offers the ability to use 8 directions for movement rather than 6 - natural compass points if you like - and so would seem to be a better option. Certainly producing a square grid is a darned sight easier than a hexed version as I know to my cost only too well!

There are a few other factors to consider. The old chestnut of diagonal movement. If one counts squares diagonally then after a while in real terms a greater distance is covered than if measured orthogonally. This is easy to solve. When measuring diagonally simply count every second square twice, for example 1, 2 3, 4, 5 6 etc. 

You may recall I had mistakenly decided that the maximum size of my ship models would be 5” (not allowing for the bowsprit) as I thought that the grid squares for my Hammerin’ Iron gaming mat were 5.5” across the flat sides whereas they are 4.5” - very much a schoolboy error on my part, I should have checked first! I was pondering how to get around this and came to the conclusion that a larger hex would be needed. This in turn raised another problem. It would mean that there would be fewer hexes in the playing area and therefore less ‘sea room’. If I am honest I believe that the size of gaming mat I have (this is 5ft by 3ft) is as large as I would go as it fits my gaming table nicely but I as feeling a little uneasy about increasing the hex size.

It was while I was wrestling with this that the subject of a square grid came up and with it the feasibility of using a smaller grid but with ship models occupying two hexes/squares. 

Let me hypothesise. If I were to use, for example, a 3” grid area (I shall refer to these as such going forwards as I am looking at both hexed and squared options) it would mean that one of my ship models would occupy two such spaces. Movement and measuring of ranges would be effectively halved as one would only be using single grid areas to do so. 

This is a big deal because it means that suddenly the playing area (by that I mean the gridded playing surface) will appear a whole lot bigger. As a result models will cover less of the table when moving and firing ranges can be employed that are more closely relative to ship speeds. Using the larger grid area size meant that ships got to grips far sooner and also crucially that any manoeuvring was more restricted by space.

I think that the key lesson here is that if one is using a grid to fight naval battles then having smaller grid areas will increase the manoeuvring space for the ships, even if they are occupying two such areas.

Bob casually asked if I would run the game again using a square grid. So I did.

After some hasty improvisations to the rules draft I ran the game using the two tables I have (one of which  is above - the other is covered in grass mat so sadly no ‘in action’ pictures, just the posed shot you see). The playing surface used 3” squares and when set up the grid measured 12 x 16 or 4ft by 3ft if you prefer. This was the same depth as for the original game but a foot shorter. 

I will not give a blow by blow account but the effect of using a smaller grid area was outstanding! Despite the models covering less with their moves they had more room to manoeuvre as the table seemed to open out quite dramatically. I will say no more other than there was a definite result to the action and that in terms of material losses the honours were even....

So what does all this mean then? From a practical perspective I am now committed to the use of  two smaller grid areas for the models as the gaming advantages for me far outweigh using a single, larger one. I would qualify this by adding that this option is what suits my playing area and so gamers with access to more space may not agree. In my man cave I could (and on occasions have) deploy a 6ft by 4ft table but I routinely use my 5ft by 3ft. 

I will need to make some adjustments to the draft of the rules I am working on - nothing major, just some additional notes around firing arcs and turning. I will also need to ensure that they are suitable for both square and hexed grid areas and also if players wish to use a single grid area for a model rather than two. 

The only other choice I need to make for my own games is to use hexes or squares although the latter is looking very appealing for a variety of reasons. It would be easier to make for one thing!

Thursday 14 January 2021

Feeding the Anaconda, one piece at a time....Late Summer, 1864...Game number 60, Part 3


The combatants. From left to right we have the U.S.S. New Glory, the U.S.S. Coeur D’Alene, the U.S.S. Senator together with the C.S.S. Secessionist and the C.S.S. Southern Belle at the top of the picture.

 After yesterday’s game I have had some time to sit down and think about what took place and how things played out. For me there were many positives about the whole experience - way beyond what took place on the table top - and it served to confirm some general hobby related ideas I have had circling around the brain cell for some time.

The battle report was a little unwieldy in that I intentionally went through the rules process as well as the narrative of the action itself. This is not how I will do this going forward as the end result was neither fish nor fowl! It was the thing to do though as I wanted to get the main part of the rules bedded in. In this I succeeded but as a result the narrative was not as crisp as I would have liked. In my defence I am a little out of practice in respect of creative writing so this will improve over time. In many way it is rather like going back to the gym after a long break - the spirit is willing but the flesh needs to get back into he swing of things! I am committed to the three post method for my battle reports. By doing this I can put things in their proper place and it makes for a clearer understanding of the whys and wherefores of the action being fought.

The Battle

As a scenario the balance was slanted in favour of the Union but they would still need to be careful. The C.S.S. Secessionist (modelled on the C.S.S. Mississippi) was a powerful vessel that could have caused the Union all manner of problems. She could have been taken by a combination of the Union vessels but for the weak link of the U.S.S. Coeur D’Alene. This ship had very poor armour and so slugging it out with a rebel ironclad on a one on one basis was never going to end well. She may have been better advised bringing up the rear of the line and out of harm’s way unless called upon in support whilst the rest of the squadron dealt with the C.S.S. Secessionist.

The Union could have adopted a more cohesive posture and merely circled in the channel whilst engaging the C.S.S. Southern Belle at a respectful range and allowing for the effects of the current. Getting up close to the target and in overwhelming strength was arguably an avoidable and some would say needless gamble on the part of Rear Admiral Dursley and this was borne out by subsequent events as not only was the Confederate floating battery more or less unscathed, one of his vessels was virtually immobilised.

It was fortunate for the Union that the C.S.S. Secessionist was not handled more aggressively - possibly due to her having to manoeuvre against the current - as she could have really caused some problems as not only was she well armed and protected, she also sported a ram bow.

Little need be said about the part played by the C.S.S. Southern Belle. All she needed to do was fire at anything belonging to the Union as fast and as often as she could - and this she did.

The U.S.S. New Glory was fairly safe but suffered from being slow - especially once she had gotten too close to the C.S.S. Southern Belle. Rear Admiral Dursley was quite correct to let her drift away from the Confederate floating battery as he needed room to manoeuvre and were it not for the situation in respect of the U.S.S. Coeur D’Alene would have been well placed to engage either rebel vessel, especially as the U.S.S. Senator was closing in support.

The Table Top

I used my Peter Pig Hammerin’ Iron gaming mat which has hexes that are 4 1/2” across the flat sides whilst the hills I used for the headland are 4” across the flat sides. I need to address this but, and more significantly, I am thinking that I need to use bigger hexes. When I started building my models I got it into my head that the Hammerin’ Iron hexes were 5 1/2” across so my largest model is 5” at hull level (bowsprits make this even larger so there is an element of overhang). The overall length of the largest models I have built this far is 5 1/2” so this could be a problem going forwards. I will need to think about this as I am loath to build too much terrain until I have decided on the hex size I want to use. 

There are elements of polish I want to add - smoke markers, something to indicate a ram attack and a few other things but all these will feature in time.


The two sources of inspiration for my ironclads project - both are quite superb and in each case the authors have been unstinting in their support of my efforts. Thoroughly decent fellows indeed!

The Rules

The rules I am working on are an extended version of the ACW set found in Bob Cordery’s Gridded Naval Wargames. They have been fused with elements used (with the author’s permission) from David Manley’s excellent Dahlgren and Colombiad set (available from the Wargames Vault).

I have taken Bob’s sequence of play and damage results and converted the ship stats from David’s rules as the basis for tailoring specific ships types. A degree of ‘shoehorning’ was required - Dahlgren and Colombiad are table rather than hex based -  but the end result appears to work out rather nicely and it is testament to the soundness of both author’s original designs that such an attempt stands up in the face of battle!

By his own admission Bob’s rules were intended as a simple support for land based games and so as with all his rules, the core systems can be added to as required. For my part I wanted a set of ACW naval rules that would enable me to ‘personalise’ individual ships as required, beyond the generic types that Bob has used. By grafting in the tremendous amount of work that David Manley has put in concerning ship types I was able to achieve just that. 

As a simple example a Dahlgren and Colombiad gunnery factor of 3 now means that the firing player rolls 3d6 to determine any hits. Assuming these are scored (range dependent - from 3, 4, 5 or 6 when adjacent to a 6 at maximum range) the target ship then rolls to see what, if any damage is scored. The magic numbers are 4 or 5 for one point and 6 for two points. Guns have a penetration factor and targets an armour factor and by comparing the two a modifier is produced (or not, if both values are the same) and applied to the damage roll. If the resultant score is 7 or above then a roll is made on the special effect (critical hit if you like) table. One effect of this that I had not thought about beforehand is that where the modifier is equal or favours the target then it is impossible to score a special effect hit. I may need to think about this further as I am great fan of the odd lucky shot and certainly it would be in keeping with the period!

Damage points can be applied as the target player sees fit across the various stats the ship has - flotation points, gunnery or armour factors, speed or rate of turn. Special hits, along with those from mines or ramming are applied solely to floatation points.

Ships are rated for flotation points and scale of protection and the rules will detail how this is arrived at.

By using hexes I have had to simplify a number of David Manley’s mechanisms for things like turning and fire arcs but the end result is not too far away in my opinion. Once the rules are fully drafted it will make more sense!

Overall I was really pleased with this first run out and the action felt properly paced and with sufficient period feel. I am looking forward to further developing the rules, building more models and expanding the coverage to cater for the Russo Turkish War amongst others.