The small island of Kalamitos was assaulted from both the air and the sea by German Fallschirmjager and elements of the Brandenburg Division respectively and after some heavy fighting are poised to break through to the sole remaining harbour, thereby denying the British their only escape route. The Royal Navy has been tasked with evacuating the British troops from the harbour in question but are running behind schedule due to constant Luftwaffe air attacks. The evacuation has been planned but the British will need to delay the German advance long enough to get the troops away and to enable the rearguard to fall back with them.
The Germans are pushing hard across the rugged terrain of the island and the leading elements of the invasion force are in sight of the small village of Rayleios, astride the main road into the small harbour of Canveya. The village controls the road into the harbour and also on to a small beach on the other side. If the Germans could capture the village they could then envelope the harbour from two sides. The British were well aware of this threat and so a small force of defenders has been hastily scrapped together and tasked with delaying the Germans. The force consists of a battalion sized battle-group organised as follows:
British
1 x Commander (2)
1 x company from 2nd Battalion The North Kent Rifles (4)
1 x company made up of RAF ground staff, assorted gunners, remnants of some SBS raiding forces and some Greek resistance fighters (4)
2 x Machine Guns (2 x 2)
1 x Mortar (2)
Germans
1 x Commander (2)
2 x Fallschirmjager companies (2 x 4)
2 x Brandenburg companies (2 x 4)
1 x Machine Guns (1 x 2)
1 x Mortar (1 x 2)
To fight this action I am using Bob Cordery's Modern Frontier Rules derived from the set originally drafted by Joseph Morschauser. The only changes I have made is to use unit strength points based on the convention used in Memoir 44 - namely 4 points for infantry, 3 for cavalry (not applicable here) and 2 for artillery or support weapons. Also, the loser of a combat has the option of losing a strength point or falling back. The other change was that any roll of a 6 in combat by either side resulted in the automatic loss of a strength point - with the loser then having to either fall back or lose another strength point. As usual, exhaustion levels were in use with the British having 6 whilst the Germans had 11.
Somewhere on the Island of Kalimitos....

The starting positions. The British have opted to deploy their machine guns in the van of their position with half of the infantry split between the church and the small hill in the bottom left of the picture. The other half is waiting in readiness as a reserve to the north of the road. The mortars and the command post are in the top left hand corner. The Germans are deployed with their main strength facing the church and the small hill with a holding force at the top of the picture facing off against the north of the town.
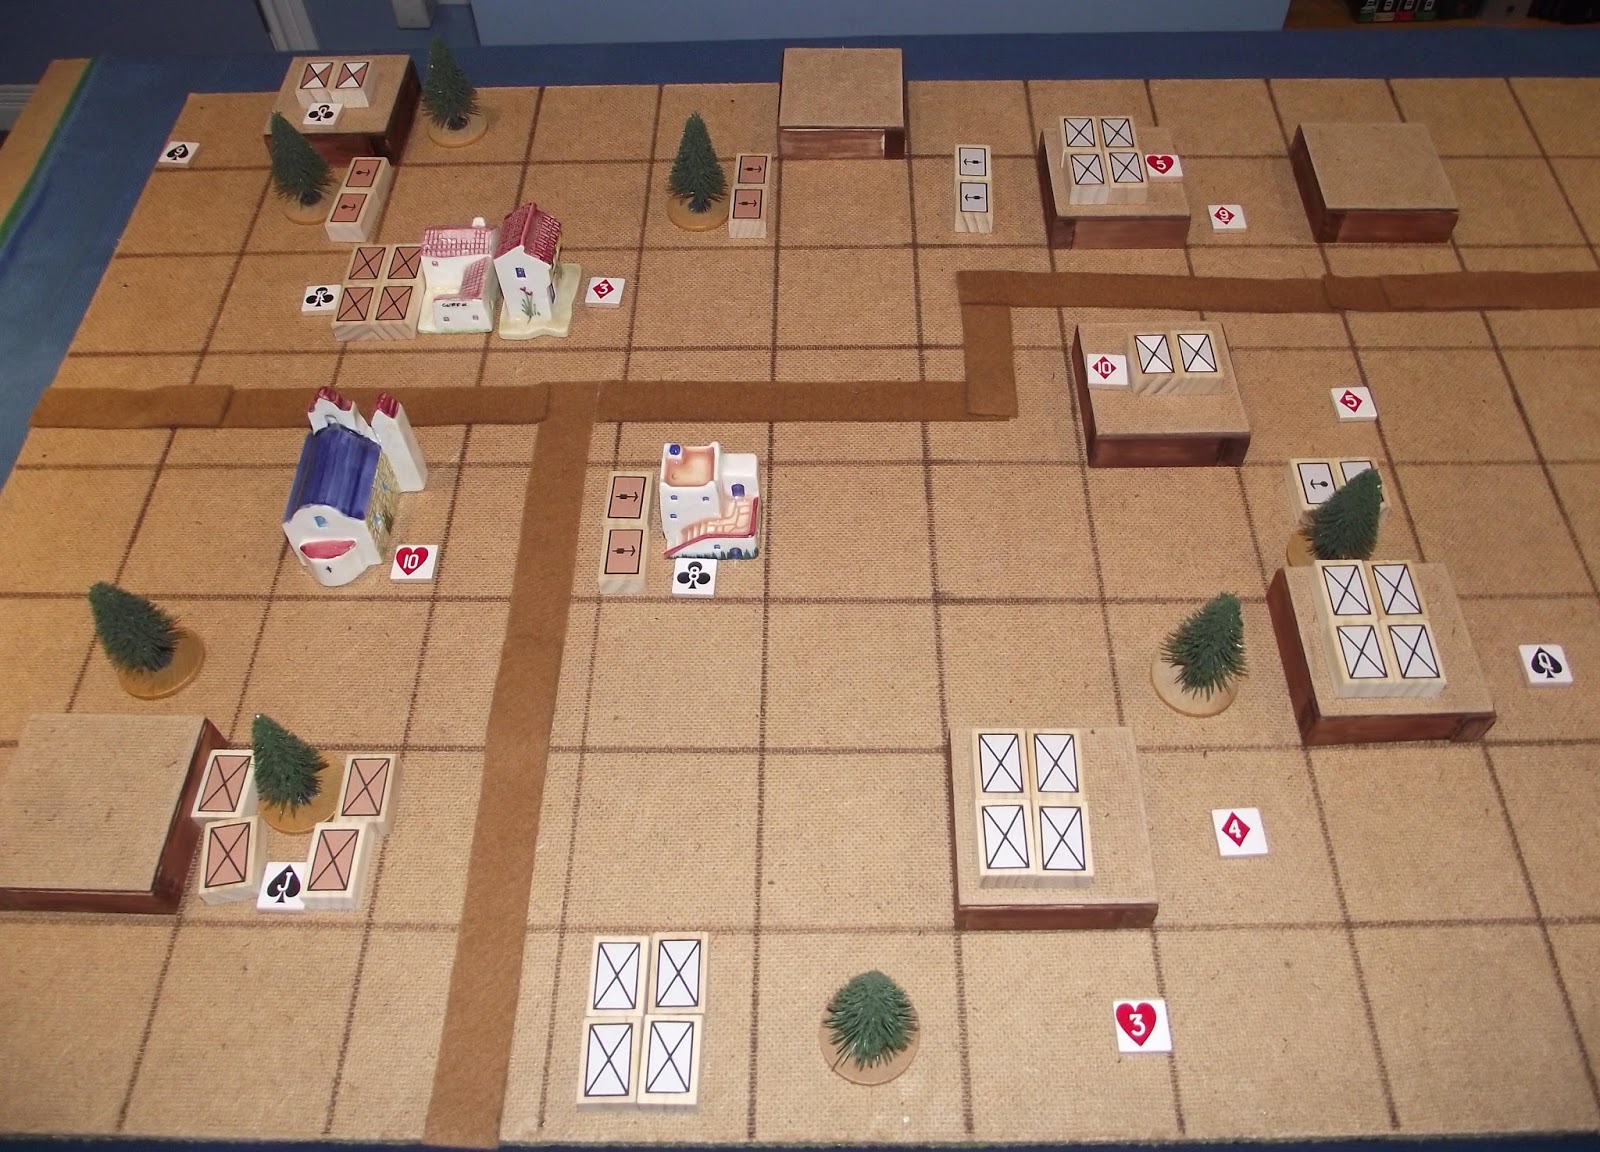
Turn 1 sees the Germans advance, albeit unevenly, whilst the British merely await developments, content to be spectators. However, the infantry by the church move to reinforce the troops deployed in the small wood at the bottom of the picture. The small tiles with card numbers are used to determine who moves and when and have been left to show the starting positions of the units as they move.

Turn 2 and first blood to the British as the northern most machine guns open up on the German infantry advancing against them at the top of the picture. A desperate German attack in the south grinds to a halt against the small wood in the foreground.

Turn 3 and the Germans are repulsed with losses in the north and the south although the British have now lost a machine gun at the top of the picture.

Turn 4 and the German attack begins again aided in the north by the remaining British machine gun redeploying into the town. Scarcely believing their good fortune the Germans immediately occupy the small wood at the top of the picture with their own machine guns whilst the rest of the infantry begin to move up.

Turn 5. Despite heavy mortar fire the Germans attack the north of the town and successfully drive the British machine gun out. In the south, the German attack against the small wood manages to drive the defenders back up the hill with losses but the attempt to take the town from the south meets strong resistance and casualties are suffered.

Turn 6 and the fight for the village intensifies. The Germans are poised in the north to take the final stronghold to the east of the road whilst in the south the gallant British defenders have inflicted damaging losses against the German flanking attack. Numbers however, are beginning to tell.

Turn 7 and the final phase. the last of the British troops on the hill in the south are destroyed but the British reserve manages to inflict telling casualties on the German assault force. Meanwhile though, the last defenders of the village to the east of the road are driven out and in order to avoid further bloodshed the British troops lay down their arms.

The British infantry were in effect surrounded on three sides (including the German infantry to the south and out of the picture) and although they could have fought their way out had reached their exhaustion level and so were unable to take any further offensive action.

The final score - it was very close and the Germans paid a heavy price for their 'victory'.
I have to say that the game was a real joy to fight and the use of the card tiles made for some very interesting tactical dilemmas. The small amendments I incorporated seemed to make a big difference and to begin with I thought I had erred too much on the side of caution but the final casualty score felt rather more realistic in game terms. Trying to coordinate an attack was very difficult using the cards (which felt totally correct by the way) and so the German offensive was very stop-start. The British initially were doing very well but once the Germans could get the numbers to count it was only going to be a matter of time. Even so, the Germans paid a heavy price for their victory.
It was also great fun to fight and a fantastic way to end my holiday.
2 comments:
David,
It was extremely interesting to see how well the minor changes you have made both fit in with the basic design philosophy of the rules and - more importantly - improve them. I like the idea that units are not wiped out in one go but are degraded by combat until they can no longer function.
A very good battle report.
All the best,
Bob
Hi Bob,
The changes seemed to work out very nicely and bode well for future use. Certainly addressing the apparent 'bang! You're dead' combat mechanism is a big step forward. I am still thinking about giving MGs a ranged capability though as I feel they are a little defensive in their use. I will need to think about this though.
The Aegean in 1943 has some great gaming ideas and is certainly something I would like to explore further in due course.
All the best and many thanks,
DC
Post a Comment